While Doom's hooded mantle continues to dry, I thought I'd proceed with the remaining metalwork on the figure--remember the gilt woodwork of the throne still awaits me!
This evening saw the successful finishing of the first round of metallics on the mantle clasps and the belt buckle. "First round" as I will wait for the printer's inks, using Liquin as the carrier, to cure before proceeding with the shading, and subsequent touch-ups to the highlighting. Should be ready by tomorrow. . .
I also began to super-highlight the armour, using the applied "glints" as catchlights. Restraint was the key throughout this process, and there is considerably more to follow, especially after the arms are attached. Finally, the scale chain that is to replace the crudely-modelled twisted "rope" connecting the clasps was painted gold. As it has yet to be attached, I fully expect judicious and careful touching-up to follow.
For better or worse, this has been the turning point in the project. Though far from completion, the piece is now approaching how I envisioned it when I first ordered it. Better late than never, I suppose. . .

31 January 2011
30 January 2011
Doctor Doom - Painting (V)
Let Phase II begin!
The trademark hooded mantle of Victor von Doom was scheduled for this weekend; and though I got off to a late start today, the mantle is now done! At least the first go-round.
The mantle is a test of endurance and awareness. In short, it is not an easy item to paint. Nothing that is difficult per se; rather, the miniaturist's task is to make the overworked drapery appear as natural and realistic as possible. I'm pleased with what is now before me, but it ain't over yet. . .
With but three items on the bench now, I will try to get some ip pics up when the initial sheen burns off.
Back to the bench!
29 January 2011
New publication: Steampunk Modeller -- REVIEW
Just received mine! 128pp tpb; sumptuously illustrated: all colour-- no skimping on photographs here; printed on 'heavy' satin paper. Featuring 12 articles/projects from English (5), French (5) and American (2) modellers. Perhaps not surprisingly (one can hope, though. . . no?!), the articles are rather "light" on figures. Having said that, there is a treasure trove's worth of information and inspiration between these covers, and this is a welcome addition to the modelling library.
Bring on the SMOG!!!
Bring on the SMOG!!!
27 January 2011
Red Skull - Painting: Intermezzo (2)
In all haste, a quick update re: my first day back with the brushes since the weekend. It was basically a session with metallics--silver to be precise, in anticipation of the joining of trench-coat to body. . . hopefully this weekend.
This evening, I painted the piping and insignia on the collar patches; the Anti-Partisan Badge and the edging of the EK1; and finally the belt buckle.
Prior to attaching the trench-coat, I will have to completely outline the work done today and paint the aforementioned length of the edges of the trench-coat: this is on tomorrow's to-do list.
More to follow. . .
UPDATE- 28.01.11. . . All the metalwork done yesterday is now outlined and "tight". While I was at it, I went ahead a wrapped-up the RK-OL-S. The figure is now ready to accept the trench-coat once the latter is ready. Stay tuned. . .
UPDATE- 29.01.11. . . The preliminary painting on the trench-coat has been completed and I couldn't be more pleased! Reviewing yesterday's work, I noticed that I still hadn't done the visible shirt collar, so I went ahead and took care of that. The trench-coat has been under the lamps since late afternoon, so if all goes as planned, the Red Skull will be assembled tomorrow.
UPDATE- 30.01.11. . . The Red Skull is now assembled, and ready to commence Phase II of painting. . .
25 January 2011
Dr. Harleen Quinzel, bka HARLEY QUINN
In all haste. . . I just wanted to share with you that I have just received a bust of DC's favourite female jester, Harley Quinn from the same source as the Jones "Vampire Bat" and the female Scorpion.
As with all of the busts in question, this three-piece bust is cast in my favourite PUR and the casting quality is a solid A. There are a few very small air bubbles to contend with, but in all honesty, these are hardly worth mentioning, and I suspect most modelers would miss them altogether.
The likeness is [loosely?] based on the classic Alex Ross portrait of the Joker and Harley, Tango with Evil. Say what you will, the 3-dimensional rendition is that of a more mature, seasoned? Harley that resonates with this miniaturist.
Any shortcomings? No, not really. I am not crazy about the way the right "horn" of her jester's cap was engineered (this is the third piece of the casting), but nothing to fret over. And yes, I will be reducing the height of the pedestal while introducing a bit of a nod to German Expressionism--you'll see what I mean shortly.
Back to the bench!
24 January 2011
The Scorpion (Carmilla Black)--Prepwork I
After a long weekend at the bench, a LONG Monday at work, and having a list of things to do before proceeding with the painting odyssey, I decided to take a night off and get my ducks in order, as it were. . .
Well, it wasn't all Work. After concluding the rebuild of my AB, I spent some time with a post-Show front-burner project. I've got quite a bit of work to do on the Scorpion (CB) bust, so I might as well jump-in feet first!
As I mentioned in the introductory posting, I always intended to make some mods to the basic sculpt. I hasten to point out that there is nothing "wrong" with the sculpture or the casting! These are changes that I feel necessary to fulfill my vision of Carmilla--and add a bit of interest, appeal to the sculpt. One of the changes to be tackled after the show is reworking the left arm to depict an expanded gauntlet; but there are less-involved mods that can be at least started now.
First up: shortening the base. The only thing I do not like about these busts are the oversized--height wise--pedestals. This is largely a matter of personal preference/taste, but it obvious that they were not intended to be mounted on a display base. So first stage reduction was eliminating 10-15mm of circular sub-pedestal. This now leaves me with the hexagonal truncated cone, which lends itself quite nicely to either a circular or a square base.
I've also played around with some putty, working on her breasts and adding a bit more flare to the hips. This is all very preliminary, but more than a crude rough-in. Finally, I've begun smoothing out the casting with file and sandpaper: this one is a bit less finished than I have come to expect, but nothing major.
And that's about it. . . for now.
21 January 2011
Doctor Doom/Red Skull - Painting: Intermezzo & the Weekend
By way of transition to Phase 2, I all-but-completed the front panel of the throne yesterday: all that remains to be done is the decorative gilt border along the lower edge. Once that gets done, I can begin to seriously consider how and when to begin assembling the figure.
Today (this evening) was spent tearing down, cleaning, and re-assembling my tried-and-true relic Badger 200 airbrush (AB). This was my very first AB: it is now over 35 yrs. old and still suits my particular needs admirably! While my workhorse AB is a Paasche H, the Badger gets the call for those "special" applications, and I have just that coming-up shortly.
Looking forward to tomorrow--and the weekend, I plan to do the gilt border on the front panel, and the belt on Doom (hmm. . . black or classic brown?); and the belt on the Red Skull. Time and energy permitting, I will also do the boots of the latter tomorrow. . .
Until then. . .
FOLLOW-UP- 22.01.11. . . The belt is done! And I opted for black. A custom black mixed from Perylene Maroon and Pthalo Green, mid- tones "highlighted" with Burnt Umber. An interesting "black" that doesn't get overwhelmed by the bright Kelly green tunic.
Back to the bench!
FOLLOW-UP (2). . . Just wrapped up the gilt edging on the front quarter panel, and the lower sections of the carved lions on either throne half. Once dry, I should be able to assemble the throne/ figure, leaving just the arms to attach. The moment of truth is nigh!!!
Lunch break!
FOLLOW-UP (3). . . The belt and the boots on the Red Skull are now done! Save for finishing the EK1 and the collar insignia (both now basecoated), it too is now ready for secondary assembly.
UPDATE- 23.01.11. . . Doom is now assembled! Assembly was 95+% uneventful, with some minor re-working of the trailing edge of the left half of the throne required, which in turn necessitated some repainting of the upholstered area of the same. I may have to revisit this once the piece is permanently mounted.
WEEKEND WRAP-UP- 23.01.11. . . The rest of the afternoon was spent with Doom, correcting the anticipated shortcomings of the assembly process (in-situ modelling), re-u/c'ing those areas, and beginning the re-painting alluded to throughout the postings re: this project. Fortunately, it will not be as drastic as I originally envisioned--which is not necessarily a good thing. . .
19 January 2011
Red Skull - Painting (III) - Pts. 1 & 2
Pt. 1 - The inside of the trench-coat is now done. As in most instances of what we do, the simplest solution proved to be the best. With the Dk. Iron basecoat completely dry/cured, I simply brushed on a medium coat of Brown Madder, and then brushed off the excess with a fluffy #5 Filbert. PERFECT!
While I was at it, I also took care of the inner leather seam along the length of the split in the tails. Save for some minor pre-painting along the length of the edges of the trench-coat, it is all-but-ready to be permanently attached to the body.
Pt. 2 - A most satisfying session painting the black tunic. I imagine there will be some "touch-ups" (tweaks to the shading and high- lighting) once the trench-coat is attached, but for now I am VERY pleased. Straightforward application of oils, using a mix of Ivory Black and Lamp Black for the basecoat and deepest tone, and "brought-up" with Liquitex Parchment.
Doctor Doom - Painting (IV)
The "upholstered" areas of the throne are now "done" [NOTE: for the remainder of this project, it is to be understood that when I say "done" (in quotes), it means that it will re revisited, re-evaluated, and, if necessary, repainted once the piece is assembled.]. I used Perylene Maroon with a touch of Burnt Umber added; shaded with Ivory Black; and highlighted/stippled with Titanium White--all w-o-w, of course. These Phase I results far exceed expectations!
That will probably be it for Doom until the weekend, though I might try to finish the front quarter panel over the next couple of days.
Back to the Red Skull. . .
That will probably be it for Doom until the weekend, though I might try to finish the front quarter panel over the next couple of days.
Back to the Red Skull. . .
18 January 2011
Doctor Doom - Painting (III)
The second half of the "Green Day". . .
Doom's tunic is now done. . . sorta. . . kinda. . .
If it were a free-standing figure, it would indeed be done; but much as with the leg harnesses, all I have now is an approximation of the final goal. Which means, in all likelihood, I will end-up re-painting about half the tunic once the figure is completely assembled.
The only green remaining untouched is the mantle. I am tentatively scheduling this for the weekend, though I may start working on the front quarter of the throne tomorrow: the front quarter (panel under the legs incorporating mantle and throne) must be completely painted before final assembly can begin.
This type of engineering might work well for "graphic 3-D" paint jobs where there is but one shade of a given colour used, and any shortcomings are hidden from view by liberal applications of black washes (see here); but for those wanting a more complete/finished and vibrant rendition? Not so much. . .
Red Skull - Painting (II)
As I mentioned in an earlier posting, today would be a "Green Day"...
Just completed the Feldgrau breeches on the Red Skull. Times like this make me appreciate "fantasy" figures more than I can say: while I believe my interpretation of Feldgrau is more than acceptable, I certainly don't want to engage in a tit-for-tat with a self-proclaimed Farbexperte. . .
Speaking of expert opinions, perhaps it is time to provide an overall colour scheme. I have alrea- dy pointed out some of the changes I made re: rank and insignia. Hopefully this alone will clue the viewer that I played the historical foundation of this piece rather loosely. If not, then a black(!) late-war field tunic worn over Feldgrau breeches is certain to cause some consternation. . .
Time for a break. . . Next up: Doom!
Looking ahead in 2011. . .
Looking back on last year's annual installment, I can say I failed dismally. Well, hardly that. . . let's just say I found a different creative route. . .
As most of you know, my modelling year is divided into two parts: an all-too-short prologue culminating with the annual Atlanta Show in February; and the rest.
PART 1
1) Vampire Bat[man]
2) The Red Skull
3) Dr. Doom
These are all in-progress paints.
PART 2
4) Gambit (Knight Models 75mm)
5) Scorpion - Carmilla Black (1/9th scale)
6) Jack O'Lantern (KitKong Model Mansion 1/6th scale)
7) Harley Quinn (1/9th scale)
All save Gambit are busts.
As always, subject--and likely!--to change.
Hopefully, you will find something of interest in the above. I look forward to your comments and observations.
Here's to a productive year! Back to the bench!!
A~
17 January 2011
Doctor Doom - Painting (II)
On to the painting in earnest!
Today was dedicated to the shading and outlining of the leg harnesses. While I am extremely pleased with what is now before me, I am fully aware that the metallics are going to require repeated sessions to get the lighting and sheen just right, especially as I am working on a disassembled figure.
Those of you who know me might have been a bit shocked at my choice of metallic lacquer, namely Chrome Silver. I'll be the first to admit that it was a bit of a leap of faith, but since we are dealing with a nuclear powered, computer assisted, titanium-alloy battle suit forged by Tibetan monks (at least in the original version), I don't believe mere natural weathering would have been in order. . . In any event, careful shading reduced the toy-like glare to a rich, vibrant surface sheen.
I decided to forgo pushing on with the arm harnesses, as these are will require relatively little brushwork and are much more impacted by their permanent locations; hence they will be addressed during final wrap-up.
Tomorrow, I will spend some time with "greens": Doom's tunic and RS's breeches. Until then. . .
Red Skull - Painting (I)
Wrapping-up the Top Three, updates on Herr General Schmidt, Der Rote Schädel, bka "The Red Skull".
RS was mostly undercoated late Saturday--straightforward blocking- off of major garments to this point. One of the last things I did Sunday morning (late Saturday) was u/c the head. This revealed some aspects that I was not entirely satisfied with, so I spent most of yesterday morning back at the workbench tweaking as necessary with grinder and putty; and once satisfied, applying the final coat of acrylics.
The kit's trenchcoat as provided did not include a [modeled] lining. Given the reflective nature of the satin?/sateen? lining, I consider this a significant oversight. As a considerable amount of time had already been spent reworking the lower edges of the trenchcoat during prep, I decided to carve-in the lining. . .
[FF to the present. . . ]
How to replicate the finery and sheen of the lining? I decided to undercoat the interior of the trenchcoat in Vallejo Black, and then apply an undiluted coat of G-S Dark Iron. After letting it set for ~3 mins., I buffed it out--perfect! If I were doing a med-dk grey lining, that would be as far as I'd go. But as I am leaning towards a colored lining, I still have the final glaze to apply. The trenchcoat is in the oven allowing the lacquer to harden.
More to follow. . .
16 January 2011
Doctor Doom - Painting (I)
Please forgive the condensed nature of this reportage, but with time being of the essence, one must strike while the iron is hot (the brushes wet?).
U/C'ing of Doom was essentially completed early this morning before calling it a night (the only item that remains to be u/c'ed is the throne itself). With that done--and cured, it was time to break out the metallics.
Given the relatively small scale and the absence of "wiggle room" to manage free-hand buffing, the metallic lacquer (G-S Chrome Silver) was essentially dry-brushed on, burnishing as I went. This worked out quite well, save for the fact that I had to touch-up the u/c'ing on the tunic due to the powdery misting of metallic pigment over the lower half of the figure.
The figure is now in the oven to "set" the lacquer so that I can begin shading and outlining the leg harnesses tomorrow.
More to follow. . .
15 January 2011
Vampire Bat (II)-- Undercoating
VB is now undercoated! I wish I could enhance this posting with images, but I've got two other pieces waiting in the wings. If I can manage to squeeze off a few shots before I break out the oils, I will edit this post.
U/C'ing was very straightforward. The only mentions of note are that I "painted" the exposed face entirely in acrylics (Badger Freak-Flex) as a rough chromatic sketch to serve as a foundation for the oils to follow; and 2) I used Vallejo Oxford Blue (#807) for the cowl and cape.
BACK TO THE BENCH!
U/C'ing was very straightforward. The only mentions of note are that I "painted" the exposed face entirely in acrylics (Badger Freak-Flex) as a rough chromatic sketch to serve as a foundation for the oils to follow; and 2) I used Vallejo Oxford Blue (#807) for the cowl and cape.
BACK TO THE BENCH!
14 January 2011
ATLANTA 2011--FANTASY CATEGORY: Update (4)
Greetings all!
Above you can see a slightly revised version (size considerations) of the second AFM ad that may or may not hit the streets before the Show. You saw it here first! For the full ad, click here.
BTW, those of you with sharp eyes will have noticed the error in the date. All concerned have been duly advised, and if it does make the presses in time, hopefully it will have the correct date.
Unless there is some groundbreaking, earth-shattering news, this will probably be the last update for this year's Event. Hope to see many of you there. . . Fair Winds!
11 January 2011
Snow Day #2 and The Final 4
It is not only Snow Day #2, but I have just been notified that there will be a Snow Day #3. As beautiful as it's been, things are now starting to get "ugly". The roads remain by and large impassable, and the time has come to break out the snow shovels. Yes, I DO love snow. . . YES, I do HATE shoveling it. Especially, the wet, slushy stuff that weighs a ton compared to its just-fallen, powdery counterpart.
But enough of that. . . With a little over 6 weeks to go, I've had to make some tough decisions over the last few days. The original line-up for the upcoming Atlanta show was winnowed down to four by Sunday. The finalists are as follows:
Four figures in six weeks. . . hmmm. . . certainly doable, but from where I'm sitting, not a very enjoyable prospect--and that's without knowing what knucklers will be hurled my way by work in that time.
Hence my listing. The first three are my anticipated core display: it would take something extraordinary to upset this lineup. Gambit will be the optional piece: I will work on it as time permits and in- between sessions on the "starters", but it will not be on the painting schedule, per se.
My only reservation re: my starters is the fact that Doom will have to be entered in the Painter's Category. Despite the fact that I essentially re-engineered and re-fitted the entire figure, expending nearly as much putty as it took to model the original, I don't think I will be allowed to enter it in the Open. I never have been partial to splitting my displays--in fact, to date I never have; so Doom may take a backseat to Gambit if this gets far enough under my skin. . .
Though I have one meeting scheduled for tomorrow, I fully expect to start slinging some paint in the next 18 hrs. . . .
But enough of that. . . With a little over 6 weeks to go, I've had to make some tough decisions over the last few days. The original line-up for the upcoming Atlanta show was winnowed down to four by Sunday. The finalists are as follows:
- The Red Skull
- Vampire Bat (bust)
- Dr. Doom
- Gambit
Four figures in six weeks. . . hmmm. . . certainly doable, but from where I'm sitting, not a very enjoyable prospect--and that's without knowing what knucklers will be hurled my way by work in that time.
Hence my listing. The first three are my anticipated core display: it would take something extraordinary to upset this lineup. Gambit will be the optional piece: I will work on it as time permits and in- between sessions on the "starters", but it will not be on the painting schedule, per se.
My only reservation re: my starters is the fact that Doom will have to be entered in the Painter's Category. Despite the fact that I essentially re-engineered and re-fitted the entire figure, expending nearly as much putty as it took to model the original, I don't think I will be allowed to enter it in the Open. I never have been partial to splitting my displays--in fact, to date I never have; so Doom may take a backseat to Gambit if this gets far enough under my skin. . .
Though I have one meeting scheduled for tomorrow, I fully expect to start slinging some paint in the next 18 hrs. . . .
10 January 2011
Moebius release updates
NOTE: These are not direct announcements and have been taken from their on-line Store.
The following updates my earlier posting. . .
Dracula March/April 2011
Dracula (Deluxe) March/April
Iron Man MK VI April
Black Widow June
The following updates my earlier posting. . .
Dracula March/April 2011
Dracula (Deluxe) March/April
Iron Man MK VI April
Black Widow June
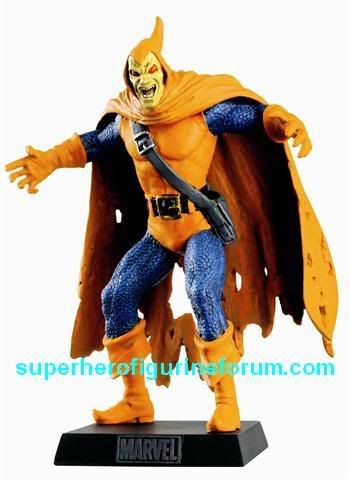
A Winter Wonderland & Eaglemoss's Hobgoblin
For many of the readership along the central Bible Belt of the US, the last two days have been a rare treat ("treat" for me; a meteorological curse for others): today, I woke up to 6" of snow in metro Atlanta, and it is gorgeous!!! While things have progressed to where 1 or 2" will no longer shut the metro area down (all evidence of grocery stocks to the contrary), anything over 4" will virtually guarantee us a "snow day". Today has been the first "snow day" in at least 10 years!
Regrettably, that does not mean a[n entire] day off to spend on the figures. Quite the contrary. In some ways, it is a more taxing work day than if I had gone in. But. . . one can sneak away and "piddle about" whenever an opportunity presents itself.
Since any serious figure work was out of the question until after at least 1700 (I have a meeting at 1600), I decided to start playing around with my first Eaglemoss acquisition, the Hobgoblin (Marvel #102).
After discovering the multi-media approach on Hawkgirl, I was wondering how much diversity would be found on the Hobgoblin. Well, aside from the display plinth, this one was all white metal. BUT. . . what I thought would be a two-piece casting turned out to be afour six(!)-piece affair!!! Say what you want, but that is an impressive number of components for a 'limited mass-market' prepaint! Close inspection revealed an isolated head, and obviously the tattered cape was cast separately (great engineering!); but the separately cast pouch almost escaped me, if only because I was not anticipating it. [NOTE: while rinsing off the casting after stripping, I noticed a build-up of gelled adhesive around the cuffs of the gauntlets: sure enough, the hands were cast separately! Duh!!]
FOLLOW-UP. . . While I had the stripping pot (Al foil "tray") going, I figured I'd make the most of it and go ahead and strip Viper/Madame Hydra (Marvel #114). More to follow. . .
Regrettably, that does not mean a[n entire] day off to spend on the figures. Quite the contrary. In some ways, it is a more taxing work day than if I had gone in. But. . . one can sneak away and "piddle about" whenever an opportunity presents itself.
Since any serious figure work was out of the question until after at least 1700 (I have a meeting at 1600), I decided to start playing around with my first Eaglemoss acquisition, the Hobgoblin (Marvel #102).
After discovering the multi-media approach on Hawkgirl, I was wondering how much diversity would be found on the Hobgoblin. Well, aside from the display plinth, this one was all white metal. BUT. . . what I thought would be a two-piece casting turned out to be a
FOLLOW-UP. . . While I had the stripping pot (Al foil "tray") going, I figured I'd make the most of it and go ahead and strip Viper/Madame Hydra (Marvel #114). More to follow. . .
New publication: Steampunk Modeller
The good folks at Sci-Fi & fantasy Modeller will soon be releasing their first annual? compendium?? of a Steampunk theme: Steampunk Modeller. For my interested readership across the Pond, you can do no better than going direct through the publisher; those of us in the colonies can contact Steve at CultTVMan's Hobby Shop.
Can't wait!
Can't wait!
09 January 2011
On to Acts I. . .Part II
By way of a quick update, Gambit and the Red Skull are now primed, and undergoing final cure in the oven. The painting campaign will begin in earnest, with no benchwork distractions, by the end of the week.
03 January 2011
Ragin' Cajun--FINE
As with the Red Skull, not quite, but close enough. . .
The finishing is all-but-done, and the groundwork is currently curing in the oven.
Re: the latter. The figure will be mounted on a 2.75" circular base: this not only complements the "swirl" of the trench-coat, but minimizes the amount of dead space, while still drawing the viewer "into" the figure. However, as anyone who has made circular groundwork knows, a regular, symmetrical perimeter is not easily accomplished. Thus I am experimenting with creating a removal "slab" whose circumference and surface can be finished prior to being permanently mounted on the display base. The figure has already been fitted and preliminary scribing of the flagstones has begun. I am considering taking advantage of this modular approach to distress the firmament more than I normally would.
In my next posting, which will be the first installment of the painting thread, I will post images of the dry-assembled figure primed: the work I have done will be obvious when comparing the primed figure to the painted boxart.
Laissez les bons temps rouler!!!!
FOLLOW-UP. . . Save for some finishing touch-ups--which will probably not get done until the groundwork is permanently attached to the display base--the groundwork est fini !!!
02 January 2011
Hawkgirl -- Benchnotes
First of all, a Happy New Year to the readership and yours!
The days since my last posting have been largely a painful haze with extremely long hours at work, extremely short "intermissions", and a residual soreness that only today has begun to dissipate. Which of course means very little "real" work has been done at the bench. But that doesn't mean some prepwork and familiarization was out of the question. . .
The days since my last posting have been largely a painful haze with extremely long hours at work, extremely short "intermissions", and a residual soreness that only today has begun to dissipate. Which of course means very little "real" work has been done at the bench. But that doesn't mean some prepwork and familiarization was out of the question. . .
- As I mentioned, Hawkgirl is cast in a lead alloy. This was confirmed when I started taking file to her to smooth-out the flattened planes of the seams. It was a bit of a flashback, as memories of working on Series 77's Gladiator (the pre- assembled, pre-primed version) immediately came to mind with the "drag" on each stroke of the file. The results of this first clean-up session were equally as satisfying.
- The wings were removed earlier: the attachment cavity has now been filled, and the paired wings unit pegged and fitted in anticipation of the separation of the individual components. As a sidebar, Hawkgirl's wing harness has always been a matter of murky speculation for me (save for one incarnation of the character), so if anyone has any thoughts on the subject, I'd love to hear them.
- I stumbled upon the one major flaw in the casting: the definition of the [feathered] points on the trailing edges of the helmet. These were "soft fills" that would benefit greatly from a rework. And so I packed the edges with MS and these will be re-carved at a later date.
Subscribe to:
Posts (Atom)