28 September 2016

Hela: Prep III - The Torso

The torso requires some "enhancement" to capture the voluptuous malevolence of the subject. As bench time is extremely limited this week, I figured I'd spend the available time "roughing in" the mods.

So far so good. Most of the work still lies before me, but a foundation has been more or less es- tablished. This is very much like sculpting an original: once key landmark structures are in place, the supporting details should go relatively quickly. 

Stay tuned. . .

UPDATE 11.10.16. . . The cups and extended gore have been roughed-in: the resculpting of the costume can now begin in earnest. . .

When the cost of a hobby exceeds the fun and doesn't attract new people, the game is over.” -
Oscar Koveleski, August 2003

24 September 2016

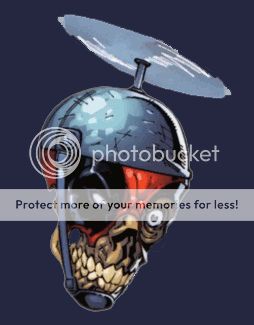
Lady Deadpool - Prepwork III: The Other Head. . . bka HEADPOOL

The 75mm hollow-printed skulls arrived today, and I immediately started working on Headpool. . .

I ordered 5 skulls, with the intent of sacrificing one to familiarize myself with the medium, etc. No need--the medium is quite forgiving and surprisingly "tough"! In short, you will have to go out of your way to ruin a skull.

Headpool is now about 70% done. After a few more hours of touch-ups and detailing, he should be on the home-stretch. . .

When the cost of a hobby exceeds the fun and doesn't attract new people, the game is over.” -
Oscar Koveleski, August 2003
22 September 2016

Lady Deadpool - Prepwork II: The Head

First things first. . . I freely admit that I lost quite a bit of my enthusiasm for this figure when I saw it 'in the resin' for the first time. . .  BUT, it grows on you quickly; and once you start assembly, the brilliance of the sculpture quickly dispels any doubts! I am enjoying this IMMENSELY!!

The head is next on the agenda, as it will require the most modification. After repositioning the head, I finalized fitting to the neck by building-up the band collar which the head will now "plug-into". Next, I applied the eye patches of the mask, which will be finished off the head and then permanently attached before I proceed with modelling the mask itself. Finally, I drilled a [counter- sunk] hole in the vicinity of the terminus of the sagittal suture to accommodate the pony-tail.

UPDATE 23.09.16. . . The pony-tail has been roughed-in over a copper armature. As I intend to support Headpool off of a loose strand of hair, this will be an ongoing concern until the very end 
of the project.

UPDATE 27.09.16. . . The pony-tail has been tentatively fitted to the head v-à-v Headpool. The mask is next. . . !

UPDATE 28.09.16. . . Eye patches permanently attached.

UPDATE 09.10.16. . . The mask and the pony-tail (including Headpool's attachment) are now all- but-done! 

When the cost of a hobby exceeds the fun and doesn't attract new people, the game is over.” -
Oscar Koveleski, August 2003
20 September 2016

Lady Deadpool - Prepwork I

In spite of the manufacturer-supplied obstacles, I am rarin' to go on this project!

To start off with, I "immersed" myself in the figure by careful removal of the ventral webbing on the torso and the waist belt. This confirmed a suspicion I had regarding the 'separatist' nature of the bodice, and I thus resculpted the breasts to bring them more in line with the character.

Next, I permanently attached the right leg. This is a critical step that needs to be taken slowly and with the utmost patience, especially as the all-too-shallow key is little help in positioning the leg.  

Then, I tentatively fitted the pistol to her right thigh. Fit was compromised by the expected cast- ing distortion/s, and--again--an all-too-shallow key. 

Finally, I got the ol' girl up on her feet! First I bulked-up the severely s-a-s'd ankles and roughed-in the boots to replace the tabi. I then pegged the figure using 18ga. copper wire. Since she is walking on the balls of her feet, this required 'dog-legging' the wire down the arch of the foot. 

She is now mounted on her work base!

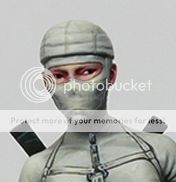
 UPDATE 21.09.16. . . I tentatively fitted and pegged the optional head today. The main head is what we usually see--oriental features and coiffure, hood bundled at the neckline. The optional head is masked and wearing a skullcap:


I opted for the latter since I decided to depict Lady Deadpool fully masked. Final fitting, etc. will be done over the next few days.

When the cost of a hobby exceeds the fun and doesn't attract new people, the game is over.” -
Oscar Koveleski, August 2003

18 September 2016

Demi-Deadpool Corps

I mentioned in my review of TKS' Ninja Lady that an optional head was provided. This was news to me as I had seen it mentioned nowhere else. Well, it got me thinking. . . what if we put that head to use and added an unique element to the project? That element being. . . HEADPOOL!


The optional head provided really doesn't lend itself to the conversion (too small, for one), so I have a few 75mm skulls on order that should provide an excellent base.

Before closing, I will hasten to point out that Kidpool and Dogpool are NOT being considered. . .

When the cost of a hobby exceeds the fun and doesn't attract new people, the game is over.” -
Oscar Koveleski, August 2003

17 September 2016

TKS' Ninja Lady - Review

The piece arrived today!

The kit is comprised of 11 pieces, including display plinth and an optional head(!). Casting-wise, I would give it a solid 8/10. Unfortunately, there are two minor air holes on the right katana blade; any number of sizeable air voids in the feet; and the same (right) blade, as well as the right scab- bard on the back mount, were "bent". Nothing out of the ordinary in this scale and this medium, mind you, but one expects more from pieces like this.

Packaging was secure and stylish. . . exceptional! There was no boxart provided, about which I am uncharacteristically torn.

So that's about it! A great kit, beautifully designed, but let down by sub-standard QC and--pos- sibly--haste.

When the cost of a hobby exceeds the fun and doesn't attract new people, the game is over.” -
Oscar Koveleski, August 2003

14 September 2016

TKS' Ninja Lady

Over the weekend, I stumbled upon CMON's clearance sale: there's something for everyone at very enticing--and generous!--prices

I have been hyper-critical of prospective acquisitions for quite some time now (bang for the buck AND likelihood of completion AND hedging against inflation/availability), but when I stumbled upon Terrible Kid Stuff's 75mm Ninja Lady, there was nothing to do but buy it!

This piece is--was!--a limited edition of 130 issues that has been closed (read: sold out) for some time now. I was sorely tempted to buy her when she was first released: she is, in a word, BRILLI- ANT!!! Sculpted by Joaquín Palacios, the only unanswered question revolves around the quality of the casting. . .

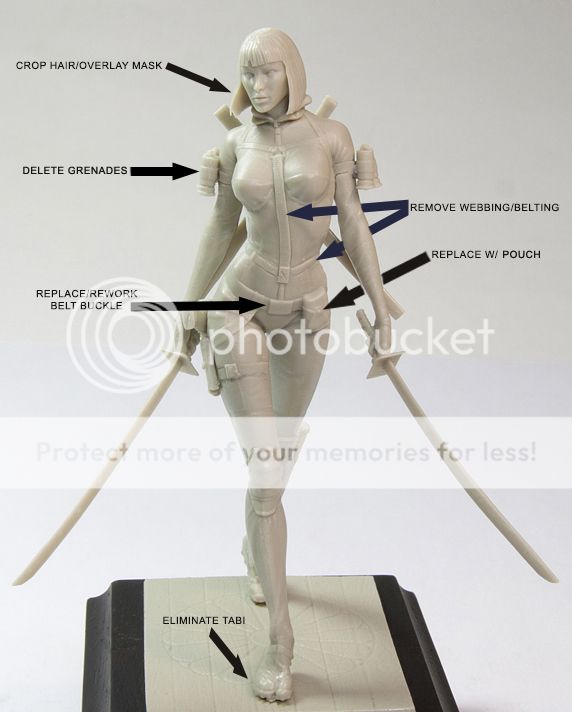
Full review to follow upon receipt; but in the meantime, what I propose to do with her. The boxart, by Fabrizio Russo, is inspiring--check the subtle camo pattern on the leathers! If memory serves, I originally thought to do her as either Black Widow or Domino. That was then. . . What prompted me to purchase this piece at this time were the pair of katana the kunoichi is wielding.

This beauty will be rendered as ... Lady Deadpool! Admittedly, a hyper-realistic Lady Deadpool, but. . . why not? This is my project TDL to date:


Stay tuned. . .

When the cost of a hobby exceeds the fun and doesn't attract new people, the game is over.” -
Oscar Koveleski, August 2003

12 September 2016

Hela: Prep II - The Cloak

The moment of truth has arrived: assembly of the cloak!

This is a rather involved process. The steps taken are as follows:
  1. Attached collar, and extended overall length--height--of same.
  2. Extensive reduction of the upper inner surfaces of the cloak.
  3. Re-contouring of said surfaces to accommodate the torso.
  4. Fitting the torso.
  5. Attaching the L&R sections of the cloak with the torso in situ.
  6. Filling and finishing  
All but the final step have been completed.

The bust is now comprised of 3 pieces: head, torso, and cloak.

More to follow. . .

When the cost of a hobby exceeds the fun and doesn't attract new people, the game is over.” -
Oscar Koveleski, August 2003

11 September 2016

Hela: Review & Prep I

Hela has been one of my favourite female characters in comics since she was introduced by Stan Lee and Jack Kirby in 1964. With the announcement that Cate Blanchett had been cast in the role in the forthcoming Thor: Ragnarok (2017), it was time to bring the Asgardian Goddess of Death to "life".

Hela has been largely 'avoided' in our world. That being said, the best rendition of Hela in minia- ture ever was a gk out of the UK (you can see her here).  While I have at least 2 Hela projects in mind, I wanted to start with a bust. And as there are no gk busts of the "Mistress of the Dark- ness", I dug out a bust of Moondragon from the same source as the Jones' "Vampire Bat", Harley Quinn, etc. Per usual, this bust is cast in my favourite PUR; however, in this instance, the casting--and the master!--are sub-par (B, at best). The master was relatively "unfinished": numer- ous areas required reduction; fingerprint elimination; etc.The castings had more air bubbles than we are used to seeing from this manufacturer; and all pieces experienced mold-shift. Finally, the design of the cloak leaves MUCH to be desired (see below). Nonetheless, for the iteration of Hela I had in mind, the bust is perfect!

The bust is cast in six pieces: head, torso/cloak, collar, L&R sections of cloak, and pedestal (nb: I did not receive the pedestal in my sample). The greatest weakness of this offering is that the torso and cloak are cast in one piece. Frankly, this is unacceptable unless you are willing to settle for a pre-paint look to your completed project. In spite of seeing one exceptional rendition (see link to bust above), I am hard pressed to see how the L&R portions of the cloak can be attached and finished (especially the inner seams) after the torso and inner surface of the cloak have been painted.

As I said, UNACCEPTABLE! So the first order of business was separating the torso from the cloak. This was accomplished by deep-scoring the perimeter of the torso with a tapered-cone bit and then "chiselling" the torso out. I will be the first not to recommend such an extreme approach unless you have a considerable amount of experience with resins and are very familiar with their physical properties once cured.

Now, I can proceed with the assembly and finishing of the cloak; and the torso. All major subas- semblies can now be painted individually and then easily assembled once dry. . .

More to follow. . .

When the cost of a hobby exceeds the fun and doesn't attract new people, the game is over.” -
Oscar Koveleski, August 2003

03 September 2016

HCFR Technician - UPDATE

I know it has been forever since I posted on this project - over 5 months! - but that does not mean that work has not been done on it! In fact, I hope to be priming the bust by this time next week!!

There has been one major deviation in the project as originally presented. Rather than do the bust as a firefighter, I decided to do it as a member of HCFR's Special Ops Team, of which the groom is a member. It is not only unique and colourful, but I felt it better represented the subject.

BACK TO THE BENCH!!!

When the cost of a hobby exceeds the fun and doesn't attract new people, the game is over.” -
Oscar Koveleski, August 2003

The Wasp - Intro & Review

Janet van Dyne, aka The Wasp, is one of my favourite Avengers! While she mostly operated in the shadow of her fellow-Avenger and partner, Ant Man/Goliath/Giant Man/Yellow Jacket, aka Dr. Hank Pym, she was one of the most influential members of the team.

In 2010, Eaglemoss released The Wasp as issue #137 in their Marvel Classic Figurine series. . .


Fortunately, this is my favourite Wasp costume of all time! So when her character was re-booted in last year's Ant-Man, it was time to acquire the figure. Which I did!

This is a graceful, simple pre-painted figure comprised of 4 "lead" pieces, plus the resin stand. After carefully sawing her off the pedestal, I immersed her in the "purple bath": 24 hrs. later I had a clean metal casting. Casting quality overall is VG+++: no complaints. And all the components released cleanly with moderate effort. Please note that patience and a light touch are key: the metal is quite soft by today's industry standards.

What I was not expecting is the fact that the yellow pattern on her costume was painted (air- brushed), not sculpted in-relief. Admittedly, there appears to be no canon rule regarding her distinctive markings: nevertheless I feel that painting the pattern is a "cop-out".

The TDL, to date, is as follows:
  • Rework the neck join. DONE
  • Sculpt the ventral plates (wasp pattern). In-progress All but done
  • Replace the metal wings with clear polystyrene. Possibly add smaller secondary pair.
  • 06.09.16 Reposition right foot.  All but done
  • 06.09.16 Rework both forefeet.  All but done

More to follow!

When the cost of a hobby exceeds the fun and doesn't attract new people, the game is over.” -
Oscar Koveleski, August 2003