Showing posts with label Doctor Doom-Painting. Show all posts

17 February 2011

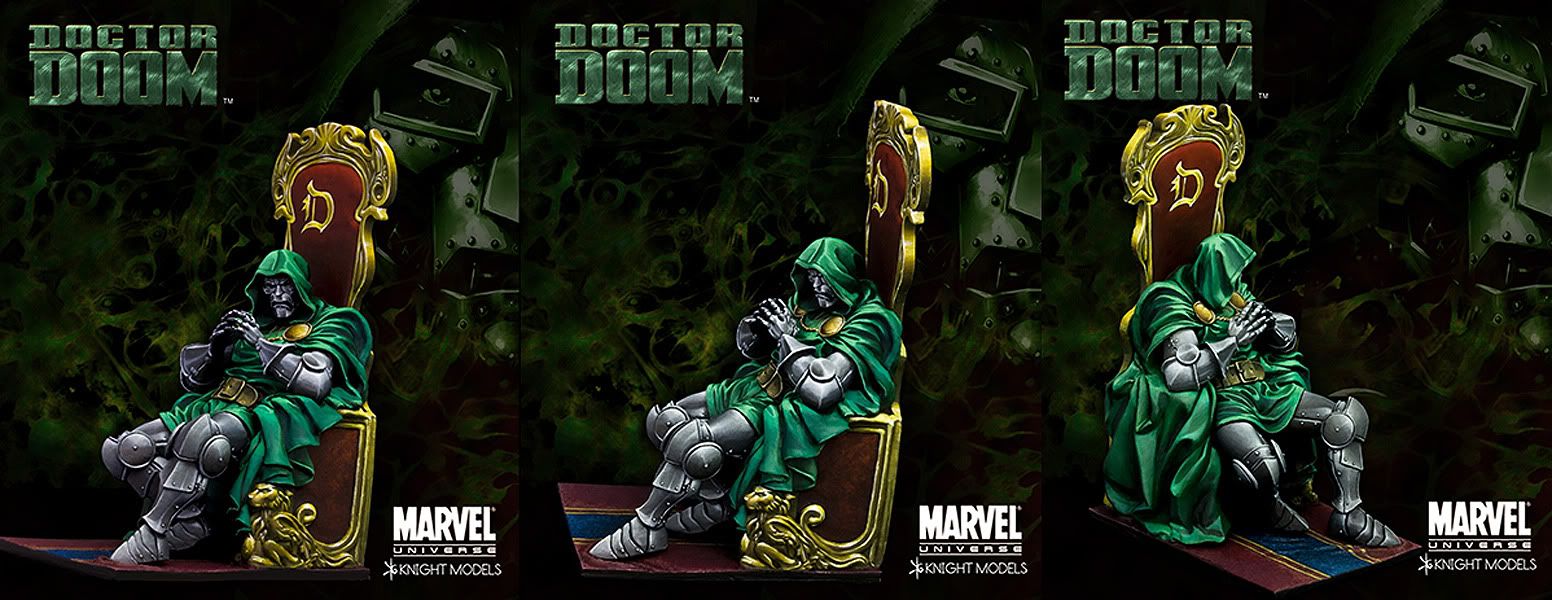
I give you. . .

Victor. . . von. . . DOOM!!!


14 February 2011

"Now let Mankind beware . . . "

. . . for Doom is DONE!!!

Or close enough to move the thread label to the Completed Projects "folder".

All that remains to be done is the outlining and detailing on the appliquéd "D" and the back of the throne. Tomorrow at the latest. Then the final once-over Friday morning, and this piece will be "in the books".

This project has been a four month-long ordeal. Allowing for the mods to the arm and leg harnesses, it should have taken no longer than 6-8 weeks (real time), start to finish. That being said, if one is sufficiently committed, it does yield a unique and attractive figure.

Finally, I have yet to see any build-up of this kit aside from the boxart. Should you run across any, please post as a comment to this thread, or email me.

One down. . . two to go!

BACK TO THE BENCH!!!

07 February 2011

Doctor Doom - Painting (VIII): PLATE

Phase III has begun!!!

This evening was the beginning of the wrapping-up of the figure itself. Which means the last 90 mins. or so were spent tweaking the armour, and most of my time was spent on the arm harnesses. These are now about 80% complete, though I will have to revisit them when I give the mantle a final once over.

More to follow. . .

UPDATE - 08.02.11. . . More of the same, with an emphasis on the leg harnesses. Almost there. . .

06 February 2011

Doctor Doom - Painting (VII)

Those of you following this thread know that this has been a less than stellar weekend for me; but I finally felt well enough this afternoon to at least suffer through what lay before me.

Before what passed for lunch, I set the eyes and attached the clasp chains--the former I will revisit later in the week to see what, if any, improvements might be had. The latter were challenging, but completed without complication. All that remains to be done is the highlighting and final hard-contrast reflective shading of the mantle's hardware.

After the afternoon repast, I decided to permanently attach the arms. In other words, I finally have a fully-assembled figure before me!!! Which means Phase II painting is now completed. The eighth installment in this project will launch Phase III and Final Wrap-up. . .

Until then. . .

01 February 2011

Doctor Doom - Painting: Intermezzo (2)

A short evening/night and a L-O-N-G day ahead of me tomorrow is not the makings of a blockbuster night at the bench, so I decided to keep it short and sweet . . .

Doom's groundwork has been completed! I was actually a bit unsure on how I was going to approach this, but once I broke out the oils, it was smooth sailing. Obviously there will be some retouching, recasting of the lights once the throne (read: figure!) has been permanently mounted; but for now, I couldn't be happier!

Speaking of the watershed transferal, I am hoping to have Doom permanently mounted on his display pedestal sometime this weekend. I want to have any gilding in contact with the groundwork finished before I proceed, but most of the gilding will be done once the figure is mounted.

The balance of the evening will be devoted to Doom's eyes, which have not been touched to date!

More to follow. . .

FOLLOW-UP. . . The "whites" of Doom's eyes have been blocked-in. Wrapping them up is gonna be tricky: there is very little room to maneuver, and given the penchant of acrylic painters for heavy shadows and "overhead light", I'm not too sure if the eyes were ever intended to be seen. BUT. . . the eyes themselves are fairly sharply rendered, so there will be eyes!

UPDATE - 05.02.11. . . The last few days have been spent in bed with an illness I would wish upon very few. Today is my first day at the bench since last Wednesday, and this has been the picture-perfect ill-timed illness: not only is the show less than a fortnight away, but I am slammed at work with unseasonable volume.

I am still at least a couple of days from being 100%, which means I will make no significant headway before next weekend. So I try to take baby-steps and work my way towards the ultimate goal. To this end, Doom has been permanently mounted on his display base. I have also painted and sealed the mantle clasp chains.

The gods willing, I will be able to set the eyes and attach the mantle chains tomorrow. That will at least make-up for some lost time. Otherwise. . .

31 January 2011

Doctor Doom - Painting (VI)

While Doom's hooded mantle continues to dry, I thought I'd proceed with the remaining metalwork on the figure--remember the gilt woodwork of the throne still awaits me!

This evening saw the successful finishing of the first round of metallics on the mantle clasps and the belt buckle. "First round" as I will wait for the printer's inks, using Liquin as the carrier, to cure before proceeding with the shading, and subsequent touch-ups to the highlighting. Should be ready by tomorrow. . .

I also began to super-highlight the armour, using the applied "glints" as catchlights. Restraint was the key throughout this process, and there is considerably more to follow, especially after the arms are attached. Finally, the scale chain that is to replace the crudely-modelled twisted "rope" connecting the clasps was painted gold. As it has yet to be attached, I fully expect judicious and careful touching-up to follow.

For better or worse, this has been the turning point in the project. Though far from completion, the piece is now approaching how I envisioned it when I first ordered it. Better late than never, I suppose. . .

30 January 2011

Doctor Doom - Painting (V)

Let Phase II begin!

The trademark hooded mantle of Victor von Doom was scheduled for this weekend; and though I got off to a late start today, the mantle is now done! At least the first go-round.

The mantle is a test of endurance and awareness. In short, it is not an easy item to paint. Nothing that is difficult per se; rather, the miniaturist's task is to make the overworked drapery appear as natural and realistic as possible. I'm pleased with what is now before me, but it ain't over yet. . .

With but three items on the bench now, I will try to get some ip pics up when the initial sheen burns off.

Back to the bench!

21 January 2011

Doctor Doom/Red Skull - Painting: Intermezzo & the Weekend

By way of transition to Phase 2, I all-but-completed the front panel of the throne yesterday: all that remains to be done is the decorative gilt border along the lower edge. Once that gets done, I can begin to seriously consider how and when to begin assembling the figure.

Today (this evening) was spent tearing down, cleaning, and re-assembling my tried-and-true relic Badger 200 airbrush (AB). This was my very first AB: it is now over 35 yrs. old and still suits my particular needs admirably! While my workhorse AB is a Paasche H, the Badger gets the call for those "special" applications, and I have just that coming-up shortly.

Looking forward to tomorrow--and the weekend, I plan to do the gilt border on the front panel, and the belt on Doom (hmm. . . black or classic brown?); and the belt on the Red Skull. Time and energy permitting, I will also do the boots of the latter tomorrow. . .

Until then. . .

FOLLOW-UP- 22.01.11. . . The belt is done! And I opted for black. A custom black mixed from Perylene Maroon and Pthalo Green, mid- tones "highlighted" with Burnt Umber. An interesting "black" that doesn't get overwhelmed by the bright Kelly green tunic.

Back to the bench!

FOLLOW-UP (2). . . Just wrapped up the gilt edging on the front quarter panel, and the lower sections of the carved lions on either throne half. Once dry, I should be able to assemble the throne/ figure, leaving just the arms to attach. The moment of truth is nigh!!!

Lunch break!

FOLLOW-UP (3). . . The belt and the boots on the Red Skull are now done! Save for finishing the EK1 and the collar insignia (both now basecoated), it too is now ready for secondary assembly.

UPDATE- 23.01.11. . . Doom is now assembled! Assembly was 95+% uneventful, with some minor re-working of the trailing edge of the left half of the throne required, which in turn necessitated some repainting of the upholstered area of the same. I may have to revisit this once the piece is permanently mounted.

WEEKEND WRAP-UP- 23.01.11. . . The rest of the afternoon was spent with Doom, correcting the anticipated shortcomings of the assembly process (in-situ modelling), re-u/c'ing those areas, and beginning the re-painting alluded to throughout the postings re: this project. Fortunately, it will not be as drastic as I originally envisioned--which is not necessarily a good thing. . .
19 January 2011

Doctor Doom - Painting (IV)

The "upholstered" areas of the throne are now "done" [NOTE: for the remainder of this project, it is to be understood that when I say "done" (in quotes), it means that it will re revisited, re-evaluated, and, if necessary, repainted once the piece is assembled.]. I used Perylene Maroon with a touch of Burnt Umber added; shaded with Ivory Black; and highlighted/stippled with Titanium White--all w-o-w, of course. These Phase I results far exceed expectations!

That will probably be it for Doom until the weekend, though I might try to finish the front quarter panel over the next couple of days.

Back to the Red Skull. . .

18 January 2011

Doctor Doom - Painting (III)

The second half of the "Green Day". . .

Doom's tunic is now done. . . sorta. . . kinda. . .

If it were a free-standing figure, it would indeed be done; but much as with the leg harnesses, all I have now is an approximation of the final goal. Which means, in all likelihood, I will end-up re-painting about half the tunic once the figure is completely assembled.

The only green remaining untouched is the mantle. I am tentatively scheduling this for the weekend, though I may start working on the front quarter of the throne tomorrow: the front quarter (panel under the legs incorporating mantle and throne) must be completely painted before final assembly can begin.

This type of engineering might work well for "graphic 3-D" paint jobs where there is but one shade of a given colour used, and any shortcomings are hidden from view by liberal applications of black washes (see here); but for those wanting a more complete/finished and vibrant rendition? Not so much. . .

17 January 2011

Doctor Doom - Painting (II)

On to the painting in earnest!

Today was dedicated to the shading and outlining of the leg harnesses. While I am extremely pleased with what is now before me, I am fully aware that the metallics are going to require repeated sessions to get the lighting and sheen just right, especially as I am working on a disassembled figure.

Those of you who know me might have been a bit shocked at my choice of metallic lacquer, namely Chrome Silver. I'll be the first to admit that it was a bit of a leap of faith, but since we are dealing with a nuclear powered, computer assisted, titanium-alloy battle suit forged by Tibetan monks (at least in the original version), I don't believe mere natural weathering would have been in order. . . In any event, careful shading reduced the toy-like glare to a rich, vibrant surface sheen.

I decided to forgo pushing on with the arm harnesses, as these are will require relatively little brushwork and are much more impacted by their permanent locations; hence they will be addressed during final wrap-up.

Tomorrow, I will spend some time with "greens": Doom's tunic and RS's breeches. Until then. . .

16 January 2011

Doctor Doom - Painting (I)

Please forgive the condensed nature of this reportage, but with time being of the essence, one must strike while the iron is hot (the brushes wet?).

U/C'ing of Doom was essentially completed early this morning before calling it a night (the only item that remains to be u/c'ed is the throne itself). With that done--and cured, it was time to break out the metallics.

Given the relatively small scale and the absence of "wiggle room" to manage free-hand buffing, the metallic lacquer (G-S Chrome Silver) was essentially dry-brushed on, burnishing as I went. This worked out quite well, save for the fact that I had to touch-up the u/c'ing on the tunic due to the powdery misting of metallic pigment over the lower half of the figure.

The figure is now in the oven to "set" the lacquer so that I can begin shading and outlining the leg harnesses tomorrow.

More to follow. . .

11 December 2010

On to Acts I. . .

The overtures are completed for two of our protagonists (with two waiting in the wings), so as stages are prepared for the respective first Acts (bka undercoating), I just wanted to let you know that the "Vampire Bat" and "Doom" are now primed, and curing. If it's not too cold or humid tomorrow, I might start blocking-in some acrylics. . .

07 December 2010

Doom's Overture

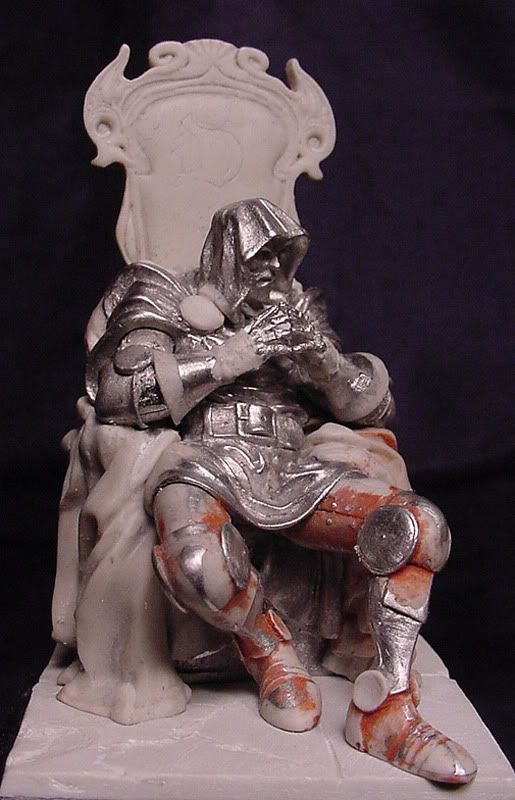
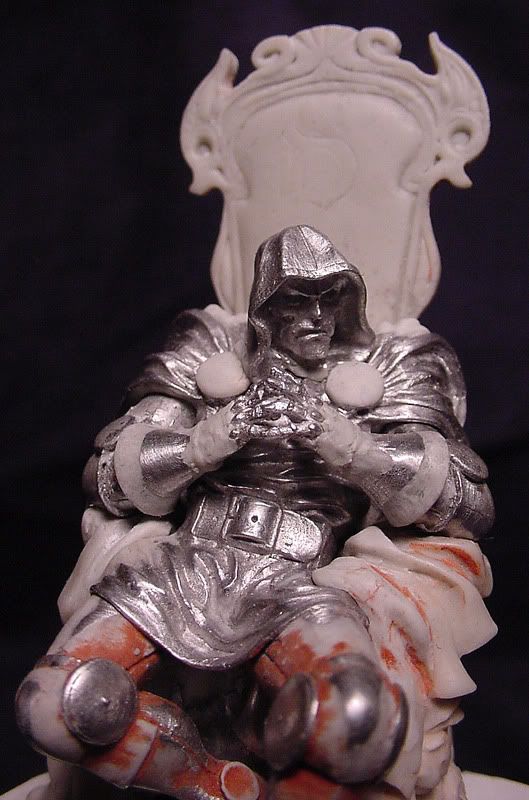
I give you. . . VICTOR. . . VON. . . DOOM. . .


All that remains to be done is some detailing on, and final finishing of, the gauntlets and arm harnesses. Priming will occur in the next week.

In the meantime, while most of the work done is relatively self- evident, should you have any questions please feel free to ask. That which is not altogether clear will be revealed when I post the primed sub-assemblies. Finally, those of you familiar with the character--or with a very sharp eye--will notice that I removed the crudely-modelled twisted "rope" connecting the clasps, to be replaced by scale chain.