29 December 2016

YS Masterpieces' Athanasios Diakos (HB-006; Bust)

Well, this one is admittedly a bit out of left field. . . check that, the ballpark!  

Or is it? 

I am a sucker for portrait busts, especially if they form a series, and are of a relatively obscure and interesting period/topic. The Greek War of Independence - 1821 - is certainly the latter; and YS Masterpieces has taken it upon themselves to honour their national heroes with the former. Still, in spite of some very attractive subjects, I have been a holdout for any number of reasons-- until now.

Why now, you ask? A friend and work colleague of mine sent me this "web article" on Athana- sios Diakos the other day. In a word. . . AWESOME! Then I vaguely recalled that someone had released a bust of this individual. I immediately checked Chuck's site and YS Miniatures. . . eh voilà!. . . their sixth release in the series: HB-006 - HELLENIC REVOLUTIONARY WARRIOR (ATHANASIOS DIAKOS), sculpted by Carl Reid.

At the risk of inciting the masses, I am not a fan of Carl Reid. As he has helmed this series through the first seven releases, I have been hesitant. Regrettably, this particular offering will not make me a fan. . .

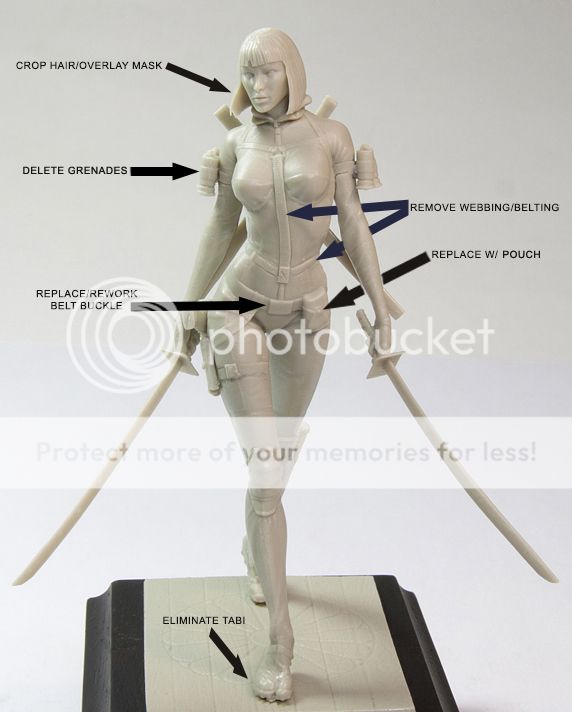
But first, the contents of the box. The piece is designed in 12 pieces, including the pedestal. Casting is VG+++, with but the occasional sub-surface air bubble on the mantle: most will not even recognize the discolorations as bubbles! Fit is likewise VG+++--I imagine that it was seam- less perfection when the molds were new(er)!! In short, this offering gets high marks with regard to production quality and qc. 

Now, the "design" of the piece. The bust is based on the cover illustration of the following Greek popular history journal: 


Personally, I have issues with this. Before I continue, I will freely admit that I do not have the actual journal before me (in spite of all my efforts to track one down!), so I do not know if there is corroborating period artwork or text in the article justifying the presentation (NOTE: I found a copy of the article, and it contains nothing to justify the cover illustration). Having said that, I have never seen a black fustanella from the first half of the 19th c.; and unless Diakos was ambidex- trous, I have a problem with the kilij/pala being wielded left-handed!

I am not exactly a newbie when it comes to Balkan and Ottoman fashion, but I am not familiar with an item of clothing in this part of the world at this time that would serve as a mantle/short cape: the same disclaimer applies, and I welcome any balanced and substantive input in response!

Finally, the right arm is too long, and the likeness leaves much to be desired. Admittedly, I am not particularly well-versed in Greek iconography of the period, but the sculpted visage is sorely wanting.

In spite of the shortcomings, I am quite pleased with my acquisition! The cutting and grinding has already begun, and I am enjoying delving into this period of history!

More to follow!

When the cost of a hobby exceeds the fun and doesn't attract new people, the game is over.” -
Oscar Koveleski, August 2003

26 December 2016

Top 15 Best Comic Book Superhero Films of All Time - Year-End 2016 Update

In order of release. . . 
  • X2: X-Men United (2003)
  • Spider-Man 2 (2004)
  • Hellboy (2004)
  • Batman Begins (2005)
  • The Dark Knight (2008)
  • Watchmen (2009)
  • X-Men: First Class (2011)
  • Captain America: The First Avenger (2011)
  • The Avengers (2012)
  • The Dark Knight Rises (2012)
  • Captain America: The Winter Soldier (2014)
  • Guardians of the Galaxy (2014)
  • Ant-Man (2015)
  • Deadpool (2016)
  • Suicide Squad (2016)

ENJOY!!!

24 December 2016

Holiday Greetings '16

Straight to the point. . . I just ain't feelin' it this year. I would attribute it to the unseasonably warm temperatures we have been--and are!--experiencing, but my lady reminded me that last year it was 75°F(!) on Christmas Day. I guess the bottom line is that 2016, as a whole, was a s**t year - PERIOD! And I'm afraid there isn't enough spiked egg-nog or coquito to make it right. . .

In the days ahead, reach out for "the best" and hang on tight. . . Enjoy--treasure!--whatever time you might have with family and friends, for they are the ones who willingly and selflessly will be at our side on the 365-day journey that is right around the corner.

In closing, I would like to take this opportunity to wish the readership a joyous, restful, and peaceful Holiday Season; and a healthy, happy and prosperous New Year.

Thank you for your patronage and support.

MERRY CHRISTMAS
HAPPY HANUKKAH
FELIZ NAVIDAD
BUON NATALE
FRÖLICHE WEINACHTEN
JOYEUX NOËL
WESOŁYCH ŚWIĄT BOŻEGO NARODZENIA
S'ROZHDESTVOM KRISTOVYM

Augie

When the cost of a hobby exceeds the fun and doesn't attract new people, the game is over.” -
Oscar Koveleski, August 2003

07 December 2016

"Die Fledermaus"--Prepwork I (cont. #2)

I was hoping to be further along than I am, but December is shaping-up to be a fitting conclusion to a less-than-stellar year. . . 

I followed-up the pencil plot-lines with a slightly-thinned coat of primer, hand-brushed. This worked-out perfectly! Proceed slowly, rest your eyes every 10-15 mins., and you should be able to eliminate all the very elusive seam lines in this exquisite casting!

I am hoping to be done with the surface prepwork by the end of the weekend. Hopefully, that will just leave the wrapping-up of the Geschwaderstock to be done. . . 

Almost there. . . !

When the cost of a hobby exceeds the fun and doesn't attract new people, the game is over.” -
Oscar Koveleski, August 2003

24 November 2016

"Die Fledermaus"--Prepwork III: The Face

Prepwork is rapidly coming to a close, so it was time to tackle the "elephant in the room": Kati's face.

If there is one thing about this offering that I have an issue with is the face! I love what M. Masson has done with it, mind you; however, it is definitely not Käte Otersdorf.  And herein lies the rub with alternate realities, etc.: where do you draw the line in the sand?

Since we know what Fräulein Otersdorf looked like in 1917, I personally feel we are beholden to Clio to honour--and celebrate!--the past and the source of our inspiration. Especially in this scale! That being said, the circumstances under which we "meet" Ltn. Otersdorf affords us sufficient wiggle room for us to avoid having to execute a portrait sculpt based on the sole [known] photo- graph of the subject that was taken 2 years earlier. 

The rework is now underway, and I am quite pleased with how it is unfolding. The primary target areas are the nose and the lips: once those are done, it is simply a matter of integrating the changes into the facial structure as provided.

Stay tuned!   

When the cost of a hobby exceeds the fun and doesn't attract new people, the game is over.” -
Oscar Koveleski, August 2003

23 November 2016

"Die Fledermaus"--Prepwork I (cont.)

This evening I fitted the head to the neck stump. The head will not be permanently attached until the collars (ulanka and flight-suit) and undersides of the head are painted.

And before calling it a night, I plotted the location of the seam-lines with a #2 pencil; and trans- ferred Kati to her work-base.

A very HAPPY THANKSGIVING to all who celebrate the holiday. . .

When the cost of a hobby exceeds the fun and doesn't attract new people, the game is over.” -
Oscar Koveleski, August 2003

20 November 2016

Yumiko "Arrow Girl", Imperial Zeppelin Defense Flight Commander

And now for Ltn. Otersdorf's ally--and traveling companion, Yumiko "Arrow Girl" (LUFT1604). Yumiko is the Flight Commander of the Pfalz Dr.I detachment aboard the Imperial Japanese Zeppelin.

Everything said about "Die Fledermaus" applies to this kit--and then some! Yumiko is a tad short- er than Kati, which I thought most à propos. The kit is cast in 9 pieces, which will allow you to build one of two versions: one will have 6 individual components, the other 7. My iteration of this masterpiece will use but 5 of the kit-provided parts.

Insofar as a rating for the stock kit goes, I will assign it a 10+/10 without any hesitation whatso- ever! The "+" is for the overall manifest quality, and the additional parts.

Now. . . some personal reservations. Richard has created brilliant backstories to the post-war activities of the chosen subjects, but IMHO he falls somewhat short of the mark with Yumiko:
  • The bow. This is a continental (Eurasian) composite bow, not a Japanese yumi
  • A more arguable point of contention is that the quiver is a yazutsu, not an ebira. Yazutsu were/are used to transport and protect arrows, limiting access.
  • Even more arguable--given the quasi-fantasy element of this series--is the ability to carry, access, and use a bow in a tight single-seater cockpit. If Yumiko were an ob- server in a pusher-type a/c, or a two-seater (Junkers CL.I?), it would be much more "palatable". 
  • Finally, Yumiko is wearing okobo, not geta. Okobo are associated with maiko--apprentice geisha.

    At this point, I am certain that the bow and quiver will not be part of my rendition. To this end, I have removed the bow from the right hand, and hollowed out the grip. As a sidebar note, to date, I have also assembled the body: careful clean-up--and critical, repetitive dry-fitting--will result in a seamless join; reduced the soles of the okobo; and fitted the head (loose-haired version) to the body--also a seamless join!

    When the cost of a hobby exceeds the fun and doesn't attract new people, the game is over.” -
    Oscar Koveleski, August 2003

    17 November 2016

    "Die Fledermaus"--Prepwork II: The Geschwaderstock

    OK. . . here is where I get off the beaten path and make the figure "my own". Käte Otersdorf was a real person: she was the nurse who tended to Manfred von Richthofen when he suffered a serious head wound in July 1917. . .


    Richard Andrews, the man behind Luftkrieg 1919, has come-up with a brilliant backstory to the Käte in the kit (see link in the previous posting); nonetheless, I wanted to incorporate additional elements of her "beloved Manfred". At first I considered sculpting Moritz, the Red Baron's beloved Deutsche Dogge; but I felt that given the scale, it would compete with, rather than enhance, the subject of the work. I quickly decided that the third most iconic item associated with Freiherr von Richthofen (after his red aircraft and Moritz) was the Geschwaderstock ("Wing Stick"--pictured above)! 

    First off, I carefully removed the glove held in the right hand--I still intend to use it on the figure. Then, I carefully widened the grip of the right hand, finally creating a clear channel with a  3/32" (~2mm) bit. 

    So far, so good. . . now comes the artefact! I settled on a piece of 2mm d. brass rod as the medi- um with which to reproduce the Geschwaderstock. While I was lightly tapering the rod, I began to notice a very organic pattern emerging. The Geschwaderstock has been represented at one ex- treme as having concentric rings down its length, to being studded. The former is definitely incor- rect, while the latter is most likely incorrect. As best I can tell, the Geschwaderstock was made from a straight length of blackthorn, with the "studs" being the de-thorned spur shoots. I do not intend to reproduce in miniature the "studs". Rather, I am leaning to a more organic, fluid appear- ance that will capture the essence of the blackthorn without distracting the viewer from the figure. 

    I am about 30% into the work. . .   

    UPDATE 24.11.16. . . The Geschwaderstock is now essentially done. The knob is made from MS, as are the rings representing the respective Geschwaderführer. All that remains to be done is the fine detailing and finishing. . . 

    When the cost of a hobby exceeds the fun and doesn't attract new people, the game is over.” -
    Oscar Koveleski, August 2003

    "Die Fledermaus"--Prepwork I

    As is my wont, before I even thought of picking-up my sprue cutters, I spent about an hour close- ly examining the kit and dry-fitting to the extent allowed by sprues, nubs, etc. The only flaw I found was in the lowest fold on the front of the right leg: it appears as if a stray particulate found its way into the mold or the resin and ended-up in the casting. Most would not even notice, but I took a moment to dig it out and refill the resultant hole.

    First step was to assemble the body: torso to legs. Careful clean-up--and critical dry-fitting--will result in a near-seamless join requiring no more than a quick swipe of epoxy-putty to make this perfect.

    Next, I shifted my attention to the right arm. The fit on this is less than perfect--but only just. You can certainly fill the minute gap at any stage of assembly--pre- or post-paint--but I wanted a clean, unequivocal fit going in. This was easily achieved by shimming the edge of the cavity on the torso with a worm of MS, and pressing the lubricated arm in place. Clean-off the excess putty, fair the edges of the shim on the torso and set aside to cure. You may have to repeat the step depending on how assiduous you were, but the end result is a perfect, seamless join, spar- ing you the hardship of having to paint around the arm when painting the flight suit. Now you can paint the overalls, paint the gloves and the inside of the arm, attach the arm, and finish your overalls. Nothing could be simpler. . .

    More to follow. . .    

    When the cost of a hobby exceeds the fun and doesn't attract new people, the game is over.” -
    Oscar Koveleski, August 2003

    15 November 2016

    Ltn. Kati Otersdorf, "Die Fledermaus"

    When I introduced this new manufacturer to the readership a little over a month ago, I claimed that it was providing "the most exciting releases of 2016. . . !" I was not kidding!!

    Earlier this week, I received my first order from Luftkrieg 1919: LUFT1601--Ltn. Kati Otersdorf "Die Fledermaus (smoking) and LUFT1604--Yumiko "Arrow Girl". Both are 1/16th scale figures (Kati measures approx. 105mm h.--in heels!) brilliantly sculpted by Patrick Masson, and exquisitely cast by GRX Créations in France.

    The kit is cast in 8 pieces of which you will use 7: an alternate left arm is provided that accom- modates the flash suppressor of a Spandau (available separately [LUFT1603] or as part of kit #1602). As I stated above: exquisitely cast! While some in the readership may disagree, I must applaud the manufacturer for electing not to include any groundwork/display plinth! Most kit- provided plinths end up in the "resin box"--or the circular bin--and serve little purpose but to increase cost and take-up valuable space in the box.

    Which brings me to packaging: BRILLIANT--and unique! The kits are contained in an approx. 2.5" x 4" lightly-tinted clear plastic box!! The contents are carefully packaged in a zip-lock bag with 1 or two styrofoam peanuts strategically placed in the box to protect and limit the shifting of the contents. There are quite a few delicate parts that survived the trek across The Pond unscathed.

    In conclusion. . . MOST HIGHLY RECOMMENDED!!!

    PS--Work is already underway, and at this rate she could potentially be ready for priming by month's end. . . More to follow!
      
    When the cost of a hobby exceeds the fun and doesn't attract new people, the game is over.” -
    Oscar Koveleski, August 2003

    06 November 2016

    DS Deadpool - PS

    All the sub-assemblies have been completed, and the figure is about 75% assembled--but more on this in another posting. . .

    Just a postscript in in the interest of complete transparency: the display figure that made the rounds in the trade shows earlier this year is NOT what you get in the box! Changes were made prior to molding that, while not "major", compels one to ask what else might have been changed.

    The major differences are: 1) the molding of the throwing knife on the right shoulder strap; and 2) the deletion of the cartridge pouch on the left shoulder strap. Personally, I think the cartridge belt was also tinkered-with before molding. . .

    It appears to me that what was displayed at the shows was a resin production-prototype. This is common practice in the industry; however, this is the first time I have seen such a deviation from prototype to production with such consequences.

    BACK TO THE BENCH!

    When the cost of a hobby exceeds the fun and doesn't attract new people, the game is over.” -
    Oscar Koveleski, August 2003

    02 November 2016

    Diamond Select's Deadpool Deluxe Model Kit

    Hot off the shelves is Diamond Select Toys' 1/8 scale (not 1/9th as earlier stated), injection-molded model kit of our favourite merc, DEADPOOL!!!

    As mentioned earlier, it appears as if Diamond Select has acquired Polar Lights' superhero figure line; however, Deadpool is their first proprietary release.

    Overall, I would have to grade this kit as an "A-". And this primarily because of the snap-together design of the kit, even though it is marketed as a "glue-together" kit. Snap-together kits are, very simply, a costly "FAIL". Fortunately, the casting and medium quality is excellent and the surface finish of the pieces is not marred by the snap-together buttresses. All you have to do is snip-off the buttresses and proceed as usual.

    The kit is cast in injection-molded light grey polystyrene. The polystyrene is excellent: better-than-average heat resistance, and near-perfect hardness. My only complaint is that the detail is somewhat "soft"; but given the workability of the plastic, this is largely a wash--unless you are less than adept at--or inclined to--undercut.

    The kit is comprised of 47 pieces, including 2 pcs. for the alternate, bare-faced head, and 9 pcs. for the base/scenic groundwork. While I appreciate the the former, the latter, to me, is a waste of plastic-- and money. Overall fit is VG+/Excellent.

    The instruction sheet. One sheet, 2 pages. Useful, but it falls significantly short of the mark: for example, in step 5, it instructs you to assemble the legs and "insert into torso". The problem is that, once the torso is assembled (step 4), you can't without modifying the leg pegs. It's as if the writer forgot that this kit is designed as a snap-together kit (more on this in the prep entries)! Fi- nally, I for one can do without the quips alluding to Deadpool, especially at the cost of meaningful directions.

    Stay tuned!

    When the cost of a hobby exceeds the fun and doesn't attract new people, the game is over.” -
    Oscar Koveleski, August 2003

    29 October 2016

    Hela CMFC - Review and Prepwork I

    In July (if memory serves) 2013, Eaglemoss concluded its Classic Marvel Figurine Collection with its 200th issue: Hela. While on my must-get list at the time it was announced, I had had my fill of Eaglemoss by the time it was released, primarily due to the deplorable production quality stan- dards. Of course, 3+ years later, I am scrambling to find one, and I was quite lucky to find one at a moderate mark-up. When one considers that this piece scales-out to 80mm to the eyes, the mark-up price was still eminently reasonable given the market.

    Hela is the "best of times" and "meh!". The figure is multi-media comprised of 8 pieces (+ the plinth): 7 of the pieces are cast in white metal (primarily lead), and the cape/neck is cast in resin. The white metal castings and the paint are typical Eaglemoss: "C-" castings, "D-" finishing, and "D" paint-job. Where the piece really shines is the face--and the quality of the resin casting: far from perfect, but overall an "A-". The quality of the resin itself leaves something to be desired, but that can be addressed in the overall pre-prime finishing.

    The figure has been stripped and completely disassembled. Now comes the painful task of completing the prepwork that was barely undertaken. I'm certainly in no hurry on this one, which is good as I intend to replace the "antlers" on her cowl with ones made from sheet aluminum. Other than that, most of the prepwork will involve working on the surface finishing of the figure.  

    Stay tuned!

    UPDATE 30.10.16. . . The figure has been pegged and is now mounted on its workbase. Head has been re-positioned and reattached to the cape . . 

    When the cost of a hobby exceeds the fun and doesn't attract new people, the game is over.” -
    Oscar Koveleski, August 2003

    20 October 2016

    Lady Deadpool - Prepwork VI: The Swords

    As I noted in the Phase IV entry, since the swords--and their scale-thin blades--are cast en-suite with the respective arms, I decided to remove the blades. . . 

    So much for the introduction. . . I will say at the outset that I am completely empathetic with any manufacturer that attempts to produce near-scale thickness blades in a relatively heat-unstable medium such as PUR. In this figure, the results are overly wide blades and warpage. Few, if any, of the build-ups I have seen have meaningfully addressed the former; and most have what can only be described as "wobbly" blades. Finally, the blades are longer than the scabbards. 

    Since the blades are fragile and obstructive, I decided to remove them. I can now reduce the width of the blades, re-size and reshape them, and make them "true" without having to work around the figure. Or, I can make entirely new blades from plastic or brass!

    To date, I have removed the blades; slotted the tsuba; resized the scabbards; and, I have also replaced the tsuka on both swords. The tsuka were too short: technically, if not visually, ade- quate for a short-ish [ko-]wakizashi, but not for anything longer.

    More to follow. . . 

    When the cost of a hobby exceeds the fun and doesn't attract new people, the game is over.” -
    Oscar Koveleski, August 2003

    17 October 2016

    Lady Deadpool - Prepwork V: The Left Arm

    The left arm is now permanently attached. . . 

    The left arm, relative to the right, is a piece of cake! Clean it thoroughly (watch out for the micro- seam lines!); dry-fit to your satisfaction, making sure you line up the opening for the locating peg on the grenades; and glue!

    Movin' right along. . .  

    UPDATE 19.10.16. . . The upper arm band has been modelled, and the brace of grenades fitted. 

    FOLLOW-UP 20.10.16. . . I have decided not to include the grenades in my interpretation of Lady Deadpool, if only because they disrupt the [visual] flow of the figure.

    When the cost of a hobby exceeds the fun and doesn't attract new people, the game is over.” -
    Oscar Koveleski, August 2003

    16 October 2016

    Luftkrieg 1919

    The most exciting releases of 2016. . . !

    http://www.luftkrieg1919.com/

    Think of a more historically grounded, scale-friendly, aviation-themed version of  Smart Max's Mauser Earth, and you'll be in the ballpark. . . Or, the long overdue precursor of the Luft '46 craze!!!

    ENJOY!!!

    UPDATE 25.10.16. . . Both of the 1/16th scale figures are now on order!!!  

    When the cost of a hobby exceeds the fun and doesn't attract new people, the game is over.” -
    Oscar Koveleski, August 2003

    11 October 2016

    Hela: Prep IV - The Head

    The main thrusts of this step will be 1) fitting and posing; and 2) the sculpting of Hela's iconic-- and elaborate!--mask/cowl.

    The head has been tentatively repositioned and fitted; however, this phase is an approximation by design as the position and the fit of the head will be impacted by the addition of the cowl. In the meantime, I have begun to lay the foundation of the mask itself, being very conscious of how, in the absence of a bare face, this will determine the character of the piece. 

    When the cost of a hobby exceeds the fun and doesn't attract new people, the game is over.” -
    Oscar Koveleski, August 2003

    10 October 2016

    Lady Deadpool - Prepwork VII: Misc.

    Tying-off loose ends:
    • 10.10.2016 -- Added the right upper-calf band/brace.
    • 15.10.2016 -- New circular belt buckle modeled. Added the left wrist band/brace.
    • 16.10.2016 -- Added the right wrist band/brace.  

    When the cost of a hobby exceeds the fun and doesn't attract new people, the game is over.” -
    Oscar Koveleski, August 2003

    09 October 2016

    Lady Deadpool - Prepwork IV: The Right Arm

    With the heads essentially all-but-done, it's time to shift my attention to the arms. 

    I decided to start with the more difficult of the two: the right. Neither arm is "easy", since the arms and their respective katana are cast as one piece; however, the right arm is more difficult since it is an unsupported arm. . . all the more so since I have eliminated the grenades, which served as a buttressing fixture. 

    To get things rolling, I carefully drilled a pair of ~1.5mm d. holes to accommodate the solder peg. I will have to add an upper arm band, which will mask the join, etc.: how I decide to go about this--and when!--will be evaluated in the days to come. . . 

    UPDATE 10.10.16. . . The right arm has been permanently attached, and the upper arm band has been modelled. I did decide to remove--and shorten! (more on this in another posting)--the katana blade. I am undecided as to whether I will follow a similar course with the left blade.  

    UPDATE 11.10.16. . . The upper arm band has been finished. 

    When the cost of a hobby exceeds the fun and doesn't attract new people, the game is over.” -
    Oscar Koveleski, August 2003

    06 October 2016

    HCFR Technician - Painting: WRAPPING-UP!

    With the blessed day 48 hrs. short of a fortnight away, I am well on the home stretch with the HCFR bust. . . 

    While things are drying and settling down for the final push this long weekend, I thought I'd share my experiences with DIY custom decaling--including PAPER-CALS!!!

    The Special Ops turnout gear is significantly different than the firefighter's bunker gear, at least in HCFR. One of the distinguishing aspects are the unit/departmental patches: while these provide abundant visual appeal, they are also virtually impossible to render in scale--at least for this ol' dinosaur!  

    Enter the custom decal--or in the case of the patches, the PAPER-CAL!!!

    Needless to say, you have to create an in-scale digital file of the item you want to reproduce. How you go about this, I will leave in your good hands; however, 1) not having access to vector graphics is not a deal-breaker in most instances; and 2) work at a minimum of 300 dpi.

    PAPER-CALS. It is always a good idea to print a trial run on regular paper before committing to the decal paper: this is where you will determine the acceptability of the size, color, and legibility of your creation. HOWEVER. . . in the case of patches, especially silk-screened patches, this is as far as you will need to go!

    Decals are great for reproducing painted "insignia"; but lose a significant amount of depth and relief when the item to be reproduced is a cloth patch. SO. . . just use your paper print-out! Sim- ply treat the plain paper exactly as you would the decal paper (see below), use white glue as an adhesive, and you should be good to go!

    Back to the decals. . . First and foremost: DO NOT handle decal paper with your bare fingers! The oils on your fingers will cause the ink to “smudge” and “bleed”. I would suggest wiping the printing surface down with a soft clean cloth prior to printing.

    Printer settings. Testor’s recommends Plain Paper, “Normal” (360 dpi) print quality. This appa- rently works with some printers and/or inks; but with an Epson Stylus Color 740 Printer, your settings should be: Photo-quality Glossy Paper, “Best” (720 dpi) print quality.

    Let dry at least overnight (I let mine dry 18 hrs.; some people swear on a minimum of 24, prefer- ably 48). Then apply the Decal Bonder Spray (many swear by Krylon, but I have zero experience with that product): I would recommend 2 light mist coats, allowing each coat to dry before apply- ing the next; let dry 24 hrs.; and then apply one wet coat. Eh. . . VOILÀ! As to the application, follow the instructions of the decal paper you are using. . . 

    In closing, as you might have read elsewhere, there is indeed a quite narrow window where paper, printer, and ink will synergistically work to yield decals that are not only usable, but better (read: more realistic) than their commercial counterparts! For small, specific applications, it is an invalu- able tool with a relatively flat learning curve. ENJOY!!!

    UPDATE 08.10.16. . . Bust is permanently mounted on display base. 

    UPDATE 10.10.16. . . Bust is DONE! 

    When the cost of a hobby exceeds the fun and doesn't attract new people, the game is over.” -
    Oscar Koveleski, August 2003

    28 September 2016

    Hela: Prep III - The Torso

    The torso requires some "enhancement" to capture the voluptuous malevolence of the subject. As bench time is extremely limited this week, I figured I'd spend the available time "roughing in" the mods.

    So far so good. Most of the work still lies before me, but a foundation has been more or less es- tablished. This is very much like sculpting an original: once key landmark structures are in place, the supporting details should go relatively quickly. 

    Stay tuned. . .

    UPDATE 11.10.16. . . The cups and extended gore have been roughed-in: the resculpting of the costume can now begin in earnest. . .

    When the cost of a hobby exceeds the fun and doesn't attract new people, the game is over.” -
    Oscar Koveleski, August 2003

    24 September 2016

    Lady Deadpool - Prepwork III: The Other Head. . . bka HEADPOOL

    The 75mm hollow-printed skulls arrived today, and I immediately started working on Headpool. . .

    I ordered 5 skulls, with the intent of sacrificing one to familiarize myself with the medium, etc. No need--the medium is quite forgiving and surprisingly "tough"! In short, you will have to go out of your way to ruin a skull.

    Headpool is now about 70% done. After a few more hours of touch-ups and detailing, he should be on the home-stretch. . .

    When the cost of a hobby exceeds the fun and doesn't attract new people, the game is over.” -
    Oscar Koveleski, August 2003

    22 September 2016

    Lady Deadpool - Prepwork II: The Head

    First things first. . . I freely admit that I lost quite a bit of my enthusiasm for this figure when I saw it 'in the resin' for the first time. . .  BUT, it grows on you quickly; and once you start assembly, the brilliance of the sculpture quickly dispels any doubts! I am enjoying this IMMENSELY!!

    The head is next on the agenda, as it will require the most modification. After repositioning the head, I finalized fitting to the neck by building-up the band collar which the head will now "plug-into". Next, I applied the eye patches of the mask, which will be finished off the head and then permanently attached before I proceed with modelling the mask itself. Finally, I drilled a [counter- sunk] hole in the vicinity of the terminus of the sagittal suture to accommodate the pony-tail.

    UPDATE 23.09.16. . . The pony-tail has been roughed-in over a copper armature. As I intend to support Headpool off of a loose strand of hair, this will be an ongoing concern until the very end 
    of the project.

    UPDATE 27.09.16. . . The pony-tail has been tentatively fitted to the head v-à-v Headpool. The mask is next. . . !

    UPDATE 28.09.16. . . Eye patches permanently attached.

    UPDATE 09.10.16. . . The mask and the pony-tail (including Headpool's attachment) are now all- but-done! 

    When the cost of a hobby exceeds the fun and doesn't attract new people, the game is over.” -
    Oscar Koveleski, August 2003

    20 September 2016

    Lady Deadpool - Prepwork I

    In spite of the manufacturer-supplied obstacles, I am rarin' to go on this project!

    To start off with, I "immersed" myself in the figure by careful removal of the ventral webbing on the torso and the waist belt. This confirmed a suspicion I had regarding the 'separatist' nature of the bodice, and I thus resculpted the breasts to bring them more in line with the character.

    Next, I permanently attached the right leg. This is a critical step that needs to be taken slowly and with the utmost patience, especially as the all-too-shallow key is little help in positioning the leg.  

    Then, I tentatively fitted the pistol to her right thigh. Fit was compromised by the expected cast- ing distortion/s, and--again--an all-too-shallow key. 

    Finally, I got the ol' girl up on her feet! First I bulked-up the severely s-a-s'd ankles and roughed-in the boots to replace the tabi. I then pegged the figure using 18ga. copper wire. Since she is walking on the balls of her feet, this required 'dog-legging' the wire down the arch of the foot. 

    She is now mounted on her work base!

     UPDATE 21.09.16. . . I tentatively fitted and pegged the optional head today. The main head is what we usually see--oriental features and coiffure, hood bundled at the neckline. The optional head is masked and wearing a skullcap:


    I opted for the latter since I decided to depict Lady Deadpool fully masked. Final fitting, etc. will be done over the next few days.

    When the cost of a hobby exceeds the fun and doesn't attract new people, the game is over.” -
    Oscar Koveleski, August 2003

    18 September 2016

    Demi-Deadpool Corps

    I mentioned in my review of TKS' Ninja Lady that an optional head was provided. This was news to me as I had seen it mentioned nowhere else. Well, it got me thinking. . . what if we put that head to use and added an unique element to the project? That element being. . . HEADPOOL!


    The optional head provided really doesn't lend itself to the conversion (too small, for one), so I have a few 75mm skulls on order that should provide an excellent base.

    Before closing, I will hasten to point out that Kidpool and Dogpool are NOT being considered. . .

    When the cost of a hobby exceeds the fun and doesn't attract new people, the game is over.” -
    Oscar Koveleski, August 2003

    17 September 2016

    TKS' Ninja Lady - Review

    The piece arrived today!

    The kit is comprised of 11 pieces, including display plinth and an optional head(!). Casting-wise, I would give it a solid 8/10. Unfortunately, there are two minor air holes on the right katana blade; any number of sizeable air voids in the feet; and the same (right) blade, as well as the right scab- bard on the back mount, were "bent". Nothing out of the ordinary in this scale and this medium, mind you, but one expects more from pieces like this.

    Packaging was secure and stylish. . . exceptional! There was no boxart provided, about which I am uncharacteristically torn.

    So that's about it! A great kit, beautifully designed, but let down by sub-standard QC and--pos- sibly--haste.

    When the cost of a hobby exceeds the fun and doesn't attract new people, the game is over.” -
    Oscar Koveleski, August 2003

    14 September 2016

    TKS' Ninja Lady

    Over the weekend, I stumbled upon CMON's clearance sale: there's something for everyone at very enticing--and generous!--prices

    I have been hyper-critical of prospective acquisitions for quite some time now (bang for the buck AND likelihood of completion AND hedging against inflation/availability), but when I stumbled upon Terrible Kid Stuff's 75mm Ninja Lady, there was nothing to do but buy it!

    This piece is--was!--a limited edition of 130 issues that has been closed (read: sold out) for some time now. I was sorely tempted to buy her when she was first released: she is, in a word, BRILLI- ANT!!! Sculpted by Joaquín Palacios, the only unanswered question revolves around the quality of the casting. . .

    Full review to follow upon receipt; but in the meantime, what I propose to do with her. The boxart, by Fabrizio Russo, is inspiring--check the subtle camo pattern on the leathers! If memory serves, I originally thought to do her as either Black Widow or Domino. That was then. . . What prompted me to purchase this piece at this time were the pair of katana the kunoichi is wielding.

    This beauty will be rendered as ... Lady Deadpool! Admittedly, a hyper-realistic Lady Deadpool, but. . . why not? This is my project TDL to date:


    Stay tuned. . .

    When the cost of a hobby exceeds the fun and doesn't attract new people, the game is over.” -
    Oscar Koveleski, August 2003

    12 September 2016

    Hela: Prep II - The Cloak

    The moment of truth has arrived: assembly of the cloak!

    This is a rather involved process. The steps taken are as follows:
    1. Attached collar, and extended overall length--height--of same.
    2. Extensive reduction of the upper inner surfaces of the cloak.
    3. Re-contouring of said surfaces to accommodate the torso.
    4. Fitting the torso.
    5. Attaching the L&R sections of the cloak with the torso in situ.
    6. Filling and finishing  
    All but the final step have been completed.

    The bust is now comprised of 3 pieces: head, torso, and cloak.

    More to follow. . .

    When the cost of a hobby exceeds the fun and doesn't attract new people, the game is over.” -
    Oscar Koveleski, August 2003

    11 September 2016

    Hela: Review & Prep I

    Hela has been one of my favourite female characters in comics since she was introduced by Stan Lee and Jack Kirby in 1964. With the announcement that Cate Blanchett had been cast in the role in the forthcoming Thor: Ragnarok (2017), it was time to bring the Asgardian Goddess of Death to "life".

    Hela has been largely 'avoided' in our world. That being said, the best rendition of Hela in minia- ture ever was a gk out of the UK (you can see her here).  While I have at least 2 Hela projects in mind, I wanted to start with a bust. And as there are no gk busts of the "Mistress of the Dark- ness", I dug out a bust of Moondragon from the same source as the Jones' "Vampire Bat", Harley Quinn, etc. Per usual, this bust is cast in my favourite PUR; however, in this instance, the casting--and the master!--are sub-par (B, at best). The master was relatively "unfinished": numer- ous areas required reduction; fingerprint elimination; etc.The castings had more air bubbles than we are used to seeing from this manufacturer; and all pieces experienced mold-shift. Finally, the design of the cloak leaves MUCH to be desired (see below). Nonetheless, for the iteration of Hela I had in mind, the bust is perfect!

    The bust is cast in six pieces: head, torso/cloak, collar, L&R sections of cloak, and pedestal (nb: I did not receive the pedestal in my sample). The greatest weakness of this offering is that the torso and cloak are cast in one piece. Frankly, this is unacceptable unless you are willing to settle for a pre-paint look to your completed project. In spite of seeing one exceptional rendition (see link to bust above), I am hard pressed to see how the L&R portions of the cloak can be attached and finished (especially the inner seams) after the torso and inner surface of the cloak have been painted.

    As I said, UNACCEPTABLE! So the first order of business was separating the torso from the cloak. This was accomplished by deep-scoring the perimeter of the torso with a tapered-cone bit and then "chiselling" the torso out. I will be the first not to recommend such an extreme approach unless you have a considerable amount of experience with resins and are very familiar with their physical properties once cured.

    Now, I can proceed with the assembly and finishing of the cloak; and the torso. All major subas- semblies can now be painted individually and then easily assembled once dry. . .

    More to follow. . .

    When the cost of a hobby exceeds the fun and doesn't attract new people, the game is over.” -
    Oscar Koveleski, August 2003

    03 September 2016

    HCFR Technician - UPDATE

    I know it has been forever since I posted on this project - over 5 months! - but that does not mean that work has not been done on it! In fact, I hope to be priming the bust by this time next week!!

    There has been one major deviation in the project as originally presented. Rather than do the bust as a firefighter, I decided to do it as a member of HCFR's Special Ops Team, of which the groom is a member. It is not only unique and colourful, but I felt it better represented the subject.

    BACK TO THE BENCH!!!

    When the cost of a hobby exceeds the fun and doesn't attract new people, the game is over.” -
    Oscar Koveleski, August 2003

    The Wasp - Intro & Review

    Janet van Dyne, aka The Wasp, is one of my favourite Avengers! While she mostly operated in the shadow of her fellow-Avenger and partner, Ant Man/Goliath/Giant Man/Yellow Jacket, aka Dr. Hank Pym, she was one of the most influential members of the team.

    In 2010, Eaglemoss released The Wasp as issue #137 in their Marvel Classic Figurine series. . .


    Fortunately, this is my favourite Wasp costume of all time! So when her character was re-booted in last year's Ant-Man, it was time to acquire the figure. Which I did!

    This is a graceful, simple pre-painted figure comprised of 4 "lead" pieces, plus the resin stand. After carefully sawing her off the pedestal, I immersed her in the "purple bath": 24 hrs. later I had a clean metal casting. Casting quality overall is VG+++: no complaints. And all the components released cleanly with moderate effort. Please note that patience and a light touch are key: the metal is quite soft by today's industry standards.

    What I was not expecting is the fact that the yellow pattern on her costume was painted (air- brushed), not sculpted in-relief. Admittedly, there appears to be no canon rule regarding her distinctive markings: nevertheless I feel that painting the pattern is a "cop-out".

    The TDL, to date, is as follows:
    • Rework the neck join. DONE
    • Sculpt the ventral plates (wasp pattern). In-progress All but done
    • Replace the metal wings with clear polystyrene. Possibly add smaller secondary pair.
    • 06.09.16 Reposition right foot.  All but done
    • 06.09.16 Rework both forefeet.  All but done

    More to follow!

    When the cost of a hobby exceeds the fun and doesn't attract new people, the game is over.” -
    Oscar Koveleski, August 2003

    21 August 2016

    Mista' J - Prepwork III: "Boxing Harley"

    I am pressed for time, so images will follow at a later date. In the meantime. . . 

    First things first, I removed Harley's legs just below the hips. I then removed the "popgun", and cut through her left wrist, freeing the left arm. 

    With Harley prepped, I shifted my focus to the box. Initially, I planned to construct the box out of sheet plastic, but I had a block of resin lying about, and went with that instead, if only because of the thermal stability of the resin. The box will be comprised of three pieces + the spring: box, lid, and crank handle. All but the crank handle are essentially done. The spring was made from a paper clip wrapped around a brass rod. 

    Back to Harley. . . The arms are thin enough that repositioning can be accomplished by simply bending carefully; ditto for the head. The right hand, however, required pegging, and this is, to say the least, challenging in this scale. 

    And that's about it. Scratchbuilding the hammer and sculpting the left hand are next in line; but so far, so good. I am still uncertain about how good of a "fit" the jack-in-the-box is, but at least the prop is well underway. 

    More to follow. . .

    UPDATE 03.09.16. . . After pondering on the title of this posting for a few days, it hit me: I am not doing a "bust" of Harley Quinn, but a Harley jack-in-the-box! So forget about the hammer, forget about sculpting a left hand. . . All that was left to do was sculpt a pair of boxing gloves!! The gloves are now well into the final turn before the home stretch. . . 

    UPDATE 16.04.17. . . The crank handle is now at the finishing stage. 16ga. copper wire for the crank, and MS for the handle. . . 

    When the cost of a hobby exceeds the fun and doesn't attract new people, the game is over.” -
    Oscar Koveleski, August 2003

    20 August 2016

    Mista' J - Intermezzo: The Project

    A bit of background to this latest 'wild-card' on the bench. . .

    Conceptually, the project was inspired by the season finale of TWD: Negan is essentially a post- Apocalyptic Joker. Originally, I planned to replace the walking stick with a DC-esque "Lucille"-- think Harley's bat wrapped in barbed wire. And I may still make that swap. . .

    With the figure in hand, and seeing what I had to work with, the possibilities had to be [re-]consi- dered. And any possibility involved Harley: how could I incorporate the Joker's better half without introducing a second full[-sized] figure? In keeping with the theme of manic levity, I decided to explore the inclusion of a Harley Quinn-themed jack-in-the box!

    So I ordered the Knight Models' 35mm Harley Quinn from the Animated Series (35DC114). As with most KM products, buying sight unseen is no small risk: images I had seen of the mini were unacceptably rough. But I again lucked out: the casting was excellent! A little surface granularity, especially below the hips, but since the legs were to be removed, nothing to worry about.

    So far, so good. . . There will be a bit of a detour to design and scratchbuild a jack-in-the-box, and execute all the required mods on a very reduced scale, but I am looking forward to it. . .

    More to follow. . . 

    When the cost of a hobby exceeds the fun and doesn't attract new people, the game is over.” -
    Oscar Koveleski, August 2003

    17 August 2016

    ICM's Swiss Papal Guard - REVIEW

    I apologize for the delay of this review. . . trying to stay focused on the stuff on the bench (i.e., non-historical) . . . 

    I am very, very impressed! Packaging, casting, painting guide . . . this is a complete package!! Comprised of 42 pieces + 6 (base[2] + 4 terrain options), the quality of the casting--and engineer- ing!--is superb. Having said that, the prospective end-user must keep in mind that this is an injection-molded kit, and this means that the inherent limitations of the production process preclude many of the things that today's miniaturists appear to clamor for--and "insufferably" take for granted! Whatever. . . 

    My initial reservations  proved to be largely unfounded! Yes, it could use some tweaking--what miniature can't?  But all in all, it is an excellent treatment of a long neglected subject.

    This is an amazing piece that amply warrants the additional effort that will make it a show- stopper. Do your research and have fun!

    When the cost of a hobby exceeds the fun and doesn't attract new people, the game is over.” -
    Oscar Koveleski, August 2003

    14 August 2016

    Mista' J - Prepwork I & II: Review & The Head

    I decided to spend some time today on the focal point of this piece, indeed, any Joker piece(!), the head.

    The casting on the face was excellent! A little surface granularity, but nothing to lose any sleep over--and quickly resolved! The coiffure, on the other hand evinced moderate mold deterioration. Again, nothing to fret over; but nothing to be ignored, either.

    I started by attempting to restore the the original design, but this did not work: there was either too much metal, or not enough. So I reduced the excess metal to a more classic Joker do, and then enhanced the head-sculpt with MS strands.  PERFECT! Hopefully, the MS will withstand handling, etc., otherwise I will have to replicate the work in Duro.

    The Joker's hairstyle is anything but dogmatic, so there is plenty of maniacal latitude! It's also a relatively easy way to make the piece truly your own. And the research is sooooo much fun!!!
    _____________________________________________________________________________
    [NB: The following is the recovered introductory posting lost during the debacle of 14/03/2017.]

    Mista' J - Review & Prepwork I (10 August 2016)

    I've been in a bit of a Joker mood of late. . . And no, I haven't seen Suicide Squad!

    So today I received Knight Models' Joker Comiquette (KDC004) after finding it on eBay at an unbeatable price! Other than the fact that this 2013 release is in their 1/28th scale/70mm range, and the kit is comprised of 8 white-metal pieces (including display plinth), there is no additional introductory information to add.


    Despite this being one of the later iterations of this kit, the casting quality is remarkably good! In fact, I would say that the castings comprising this kit are some of the best metal castings that I have from this company!! Regrettably, others have not been so fortunate. . .

    As of this writing the foot lugs have been removed, and the legs have been pegged and mounted on the workbase. The coat tails have been permanently attached to the torso, and the torso has been fitted to the legs--in that order! The latter required moderate putty work to maximize the fit and effect a seamless join.

    So far, so good. . .

    When the cost of a hobby exceeds the fun and doesn't attract new people, the game is over.” -
    Oscar Koveleski, August 2003

    12 August 2016

    Ant-Man - Prepwork: The Manifold

    With some left-over putty, I filled in the three random air holes in the casting, and rebuilt the portion of the collar that broke-off while removing the helmet. I would point out that the collar would have required reworking regardless, but more on this when the time comes. . . 

    I had enough putty left to rough-in the shape of the "backpack"--the Pym Particle manifold. This will be the main additive element of the figure, and--as of this writing--the only item that will be scratchbuilt. 

    The putty is now curing in the oven. . .

    When the cost of a hobby exceeds the fun and doesn't attract new people, the game is over.” -
    Oscar Koveleski, August 2003

    02 August 2016

    Ant-Man, part I

    One of Gentle Giant's 2015 San Diego Comic Con exclusives was a limited edition (500), pre- painted collectible figurine of Ant-Man as portrayed by Paul Rudd in the eponymous film. Price- wise it was a steal! And even at the price that I luckily managed to pick one up long after they were sold-out, it was a steal. . .


    The figurine is comprised of  5 pieces: helmet, body, arms, and the display pedestal. Overall height sans pedestal is ~90mm. Casting quality: EXCEPTIONAL!

    I would say that it is ~75-80% screen accurate; which afaic means that you get to start the race on the final lap! The main restorative focus will be on the helmet and the Pym Particle manifold (i.e., the "backpack", which was given rather short shrift on the figure), with secondary consider- ation given to the gauntlets and bracers, and the belt. The rest of the piece is more than accept- able: it could use with additional detailing, etc., however, that remains at the discretion of the miniaturist.

    So much for the figure, which is now 90% paint-free going into its second day in "the bath". Part II of this introductory review will hopefully follow within the fortnight.

    Stay tuned!  

    When the cost of a hobby exceeds the fun and doesn't attract new people, the game is over.” -
    Oscar Koveleski, August 2003

    01 August 2016

    Top 15 Best Comic Book Superhero Films of All Time - 2016 Update

    It has been just under two years since I have updated this list. And these last two years have been well above-average given the overall quality of the releases. So much so, that I am com- pelled to expand the slots to fifteen! As before, please feel free to comment, agree--or disagree!, and express your preferences. . .

    In order of release. . . 

    • X2: X-Men United (2003)
    • Spider-Man 2 (2004)
    • Hellboy (2004)
    • Batman Begins (2005)
    • The Dark Knight (2008)
    • Watchmen (2009)
    • X-Men: First Class (2011)
    • Captain America: The First Avenger (2011)
    • The Avengers (2012)
    • The Dark Knight Rises (2012)
    • Captain America: The Winter Soldier (2014)
    • Guardians of the Galaxy (2014)
    • Captain America: Civil War (2015)
    • Ant-Man (2015)
    • Deadpool (2016)

    ENJOY!!!

    19 July 2016

    "Hand of the Queen" - Prepwork II: The Doublet

    The doublet is the"pedestal", the foundation if you will, for the portrait, hence I will begin by re- working the garment.

    The garment as provided is superbly sculpted! It is a perforated and tooled leather shell with silver clasps, covering a patterned fabric lining, This will be reworked to represent black-dyed full-quill ostrich leather.

    As I indicated yesterday, I had already removed the "Hand". But before I filled-in the sizeable divot, I began by filling-in the sculpted pattern of the doublet with glazing putty. After applying a medium coat of putty and curing it in the oven, I then proceeded to fill the divot with MS. The MS is now curing. . .

    Finally, the "Hand" is over 85% cleaned-up. . . 

    More to follow. . .

    UPDATE 06.08.16. . . Phase I of the doublet is now done! It took three coats of glazing putty to effectively fill sculpted tooling and establish the foundation for the full-quill ostrich leather. 

    When the cost of a hobby exceeds the fun and doesn't attract new people, the game is over.” -
    Oscar Koveleski, August 2003

    18 July 2016

    "Hand of the Queen" - Prepwork I

    The bust arrived today (thanks, Chuck!), and it meets--arguably exceeds!--the self-imposed pro- duction standard/s of NutsPlanet. In a word. . . EXCEPTIONAL!

    And I was very gratified by the fact that my conclusion re: the apparent shortcomings of the like- ness was spot-on: this is a VG++ likeness of Peter Dinklage as Tyrion Lannister. It could use some tweaking here and there depending on how demanding you might be, but it is more than acceptable straight OOB. As noted earlier and elsewhere, the challenge to realize a convincing likeness will be in the painting. 

    The sprues have been removed, as has the "Hand" (to be relocated to the left upper breast). I have also removed the exposed edge of the neckwrap, as well as the visible portion between the edges of the mandarin collar.

    More to follow. . . 

    When the cost of a hobby exceeds the fun and doesn't attract new people, the game is over.” -
    Oscar Koveleski, August 2003

    17 July 2016

    Sign(s) of the Time. . .

    I have been lamenting the decline of this hobby for over two decades, and yet here we are--and so is the sky. So why waste your time reading yet another rant from a "Chicken Little"?

    Good question. And one that I am hard-pressed to counter. Nonetheless, the fact remains that the hobby has taken yet another step back on a ledge that grows ever narrower.

    There are no new "twists" that are looming to be the proverbial straw. That is at once good--and bad! Bad in that while the patient appears to be resting comfortably on the whole, it is showing no signs of significant, even appreciable, improvement. And while many would take this as ac- ceptable, it is a 'glass half full' viewpoint ignoring the fact that the glass is more than half-empty! For example:

    • Releases are down this year. I would normally welcome this as a long-overdue cor- rective measure; but it is being prompted by significantly diminishing returns. And it does not appear to be forcing the manufacturers, as a whole, to critically evaluate their release schedule. 
    • The diversity of subject matter/selection appears to be contracting radically. This is quite understandable given the decline in revenue (go with the known from known names); however, it limits the accessibility of/to the hobby.  
    • Attendance at shows is down. Fewer spectators, exhibitors, and vendors! Show at- tendance can be rationalized to death . . . and that is precisely what I am afraid of. 
    • For the first time, I am hearing from vendors and manufacturers that there is very little "new blood" emerging to fill the vacancies in the ranks. Again nothing new; but the fact that this is being seen as a causative agent by the providers speaks volumes. 
    • While the niche vendor population has been relatively stable for the last 10-15 years, it is, for whatever reason/s, declining of late. 
    • A whole new competitive sub-industry has emerged in the last 3-5 years: supplies. It's as if the consumer base is being prompted to moult (i.e., replace their current arsenal) to reveal/facilitate a bigger, better self--at a greater cost!
    • Other scale/historical craft hobbies are experiencing an unprecedented resurgence!

    Personally, I don't see anything that can be done to reverse the trend within a familiar context. . .

    When the cost of a hobby exceeds the fun and doesn't attract new people, the game is over.” -
    Oscar Koveleski, August 2003

    16 July 2016

    "Hand of the Queen"

    I indicated in my introduction to the Daenerys Stormborn/Khaleesi project that  "I was not parti- cularly taken with [NutsPlanet's third and fourth Game of Thrones offerings], considering them a significant decline in the excellence manifest in the first two." As with Dany, I have come to the conclusion that any deviation from the likeness is due primarily to the paint application/photo- graphy, and not the "canvas"; thus, I will shortly have a complete set of NutsPlanet's GoT busts!

    "Hand the Imp" was the third 1/10th scale bust of a Game of Thrones' subject released by NutsPlanet--as with the first two, it is sculpted by Jun-Sik Ahn. The 3-piece kit (including the pedestal!) is based on Tyrion Lannister--"the Imp"--as acting Hand of the King in season 2. I intend to "convert" the bust to Tyrion at the conclusion of season 6, when he is appointed to the position of Hand of the Queen by Daenerys Targaryen.

    This will be a relatively minor conversion, which is at once a relief, as well as no small source of trepidation. Details will be presented as the project unfolds.
     
    Unless there is a significant departure from the standard set by NutsPlanet, there will be no hands-on review forthcoming.  


    When the cost of a hobby exceeds the fun and doesn't attract new people, the game is over.” -
    Oscar Koveleski, August 2003

    ICM's Swiss Papal Guard

    ICM has released their second offering in their 1/16th scale World's Guards series: a Vatican Swiss Guard, and mine is on order!

    In addition to making its availability known to the readership, I would like to take this opportunity to point out two noteworthy options in the kit:
    • There are two heads provided. One wears the typical black beret; the other a [three-piece!] morion. The morion is usually worn for ceremonial duties. Both items of headwear are provided as separate items.  
    • There are four "terrain" options provided.

    Full review to follow upon receipt. . .

    When the cost of a hobby exceeds the fun and doesn't attract new people, the game is over.” -
    Oscar Koveleski, August 2003