What would a "classic" Monster collection be without a full figure of the creature that to many started it all, the iconic image of a--if not THE--Hollywood monster?
Up until 2-3 weeks ago, my designated choice for the Frankenstein Monster project had been Moebius' 1/8 scale forthcoming release. I'll not agitate the hornet's nest on this site--enough of that going on on any number of other discussion forums; but I will say that this piece is a crushing disappointment. I was resigned and prepared to resculpt the head, but to do this piece justice would require virtually an entire resculpt! I've already embarked on one of those projects (the Wolf Man) simply because there were no reasonable alternatives, and I did have a unique presentation in mind. To resculpt an entire figure that [allegedly] had been rushed into production(?) in order to correct the obvious shortcomings of its design is not my idea of a fun time at the bench!
Before going on, let me just interject that there is only one Monster for me--the Karloff Monster. Karloff had numerous opportunities to reprise his role after SoF, but he chose not to. If for no other reason than to honour this laudable declination, Karloff--and no other--IS the Monster.
So. . . where would I find an available, affordable, and acceptable Monster? Unfortunately, neither of the two items on the list is in production; and if you can find one, they are priced as collectibles. Fortunately, a dear friend had a MIB Horizon Frankenstein Monster stashed away, and after we both finally got over what Moebius accepted and Universal had approved/demanded?, he offered me the Horizon kit without hesitation. That kit is now before me.
Cast in 7 pieces in the familiar light grey vinyl, this is a typical Horizon kit; i.e., a G+/VG- vinyl kit. The vinyl is somewhat "light" and the wall thickness relatively thin; hence, distortion (not readily apparent) and compromised fit will have to be dealt with from the outset. Another consequence of the medium and how it was cast is the proliferation of air bubbles: virtually every piece will require some degree of corrective work to deal with these.
That being said, this is one of the best representations of the Karloff Monster ever produced, being sculpted by the talented Steve Wang. Some argue that the Billiken Monster is marginally better: I've only seen the Billiken offering once up close--and that was nearly two decades ago; but even then I remember being partial to the Horizon version.
So. . . the project is a GO! This is slated for 2010--or beyond, so there is no immediacy. But keep an eye out for updates, as I will be cleaning and prepping the pieces as time and inclination permit [note: torso, legs, and head have already been cleaned :-)]. . .

25 July 2009
24 July 2009
Frankenstein (Son of) Monster GEOmetric FF--or--Cleaning-up a vinyl kit
I spent yesterday evening "cleaning-up" the kit. What does "cleaning-up" a vinyl kit actually entail? Well, that depends on the modeler and the kit.
RE: THE KIT. As I indicated in the initial posting, this (my sample) is one of the best vinyl kits I have ever seen! I know that not a few of those who came before complained about the over-engineered hands, but this is a none-issue AFAIC. Total air bubbles could be counted on two hands--with fingers left over: this is no small feat, especially with the relatively "light-weight" vinyl used by GEOmetric.
"CLEAN-UP" À LA AUGIE. Clean-up for me begins with a thorough inspection of the kit. This includes a parts count and checking for any miscasts. With a vinyl kit, one should also check for distorted pieces. Note that a distorted piece is not a miscast! Distorted pieces can usually be restored by placing in hot water or applying heated air from a hair dryer: vinyl, much like resin, has "original memory" and will usually revert to its original conformation with judiciously applied heat. Finally, I do a preliminary inspection for air bubbles.
Assuming all is as it should be, the next step is to remove the pour cones, wholly or in part. The standard practice is to heat (air or water) the area to be removed, and then carefully removing it with a fresh X-acto blade. Not for me. I slap a fibreglass cutting-wheel into the Dremel, and go to town. I might have some minor fine-tuning remaining to be done with an X-acto blade, but I can usually get the kit 98% clean with the cutting wheel.
Now comes the "fun" part. Once all my pieces are "de-coned", I fill them with PUR, in this case standard Alumilite. I can usually do two 1/8th scale kits with a a 28 oz. set. Some people might argue that it's expensive, wasteful, and makes the kit too heavy (?????); but the simplicity and effectiveness of this approach is unbeatable.
Once this is done, I will then dry-fit all the pieces, tweaking and adjusting the fit as required, and opening all remaining air bubbles--these will be filled during assembly. At this point all that is left to do is wash all the pieces in warm soapy water, and setting them aside to dry . . .
21 July 2009
"The Wolf Man"--Wrap-Up (3)
With the new Karloff head behind me, and with the Mummy at a good stopping point, it's time to get back to The Wolf Man. . .
I made very good progress over the weekend as the overall finishing is now beyond the halfway mark. I've begun to detail the shirt (seams, button holes, stitching, etc.), and the trousers are not far behind.
My main progress since resuming the project has been on the hands. After going back and forth, I decided I would rework both hands--as opposed to doing one, casting it, and transplanting fingers. The left hand has been 100% roughed-in, and the right will be roughed-in before the weekend. The hands will be completed and permanently attached before the figure gets primed.
The only aspect of the project that has yet to be worked upon is the trap. The research is done, and the design is just about there, but I've yet to begin cutting and bending.
Back to the bench. . .
16 July 2009
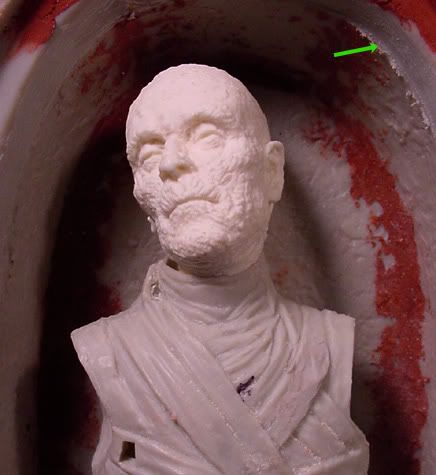
Moebius' The Mummy: An IP shot
Thought I'd share a close-up of The Mummy with its new [resin] head. . .

Back to the grind. . .
A~
PS--By way of follow-up, the neck join has now been filled and finished, and the replacement head snaps on/off as if it were part of the original design.
Back to the grind. . .
A~
PS--By way of follow-up, the neck join has now been filled and finished, and the replacement head snaps on/off as if it were part of the original design.
15 July 2009
Frankenstein (Son of) Monster GEOmetric FF
Having recently rediscovered the Son of Frankenstein, the third part of the Karloff/Universal Frankenstein trilogy, I was quickly reminded of the iconic nature of this incarnation of the Monster--as well as why Gene Wilder and Mel Brooks used this film as the cornerstone for the classic Young Frankenstein!
In any case, last week I was lucky enough to stumble upon a venerable classic in its own right: GEOmetric's 1/8 scale "Son of Frankenstein"--in vinyl! This kit was superbly sculpted by William Paquet, and IMO epitomizes the art of vinyl kit production.
I had great plans for this kit, when much to my [pleasant] surprise they were dashed! You see, I had visions of scratchbuilding the prosthetic right arm of Inspector Krogh, etc. etc. etc., when lo and behold, it is included in the kit!!!
Equally as surprising is that this iconic accessory is rarely seen in/on write-ups and/or build-ups of this kit. Certainly it can not be considered too gruesome? Or potentially offensive?? This is definitely a head-scratcher. . .
This kit is targeted for next year some time, though preliminary clean-up and staging (anyone who has ever worked a vinyl kit knows of what I speak) will begin soon . . .
A~
13 July 2009
Moebius' The Mummy: Reworking the Head--Conclusion
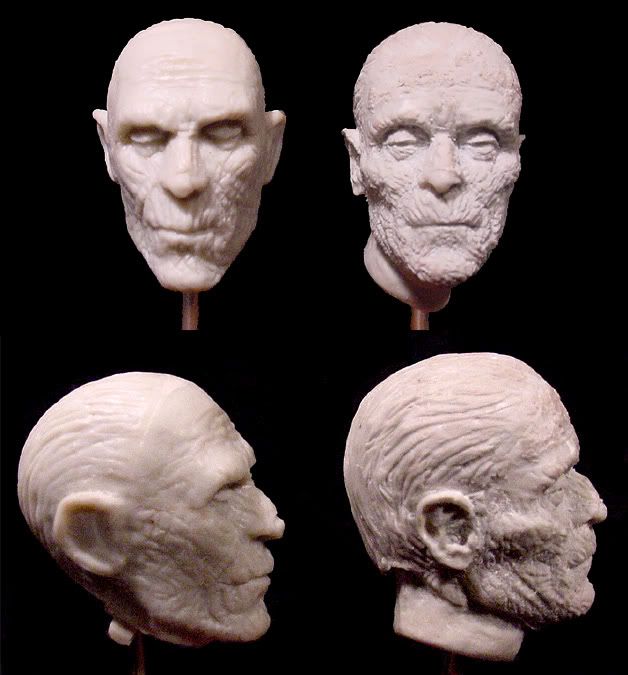
I give you Im-ho-tep’s new head. . .

On the left is the stock head, which IMO bears a stronger resemblance to Rondo Hatton than Karloff. As you might recall, I removed the back side of the head from the dorsal body half with a jeweler's saw, and assembled the head as a stand-alone unit. The head was then filled with polyurethane resin (PUR), and pegged with 1/8" tin solder.
The head on the right is my resculpt--and I am VERY pleased. There might be some very minor tweaking still to be done before it is primed, but for all intents and purpose, it is done.
Given Karloff’s trademark features, this is not a difficult undertaking once one accepts how much of the underlying plastic needs to be removed before reworking the facial landscape can begin.
PS--The head is now in rubber, and I will hopefully have a first pour by Wednesday.
04 July 2009
The Mummy--Step 3: The Sarcophagus
With Im-ho-tep essentially done, I figured I might as well start on the largest element of this self-contained diorama: the sarcophagus.
It is hard to say whether or not this was over-engineered; what I can say without reservation is that an extra hand (or two) would not have gone amiss; and the fit is less than precise.
The sarcophagus is comprised of three sub-assemblies, totaling 12 pieces: the lid (2pcs), the coffin exterior (5pcs), and the coffin interior (5pcs).
Everything goes together fairly well, though as mentioned above, assembly would have been much easier with either an extra set of hands; an assembly jig; or had the parts been designed to be joined with greater precision. As it is, one is practically forced to use superglue in the assembly, and some filling will be required.
All the sub-assemblies have been assembled, and I am in the process of puttying and finishing the coffin interior. Once that is done, I will permanently join the two components of the coffin and begin final finishing.
More to follow. . .
05.07.2009
The sarcophagus is now fully assembled. I am now reinforcing joins and tweaking the fills. . .
08.07.2009
Finishing work has commenced in earnest on the sarcophagus. All the joins have been filled, and the sanding-and-fitting is about 90% complete. I have also leveled the mummy's "pedestal" so that the feet are squarely planted in the coffin. There's quite a bit of "clean-up" to be done, prepping if you will, that should make life infinitely easier once the paint starts going on. I'm shooting to have this one ready to move to the painting bench in 4 weeks, give or take. . .
Subscribe to:
Posts (Atom)