The next step--and the last major deviation from the stock kit--is "adjusting" the proportions.
This type of reconstruction is never "easy", irrespective of medium, subject, or scale. One should never dive into this blithely, and the old saw of "measure twice, cut once", is especially apropos. In this instance, it wasn't so much the cutting, as where to cut. After repeated measurings--head-to-toe and vice-versa--I determined that the indicated place to section the legs was slightly below mid-thigh, just past the locating hole for the loose wrapping (see green-tinted area in image in Step 1). This was done with a fibreglass-reinforced cutting wheel on a Dremel: remember that I am cutting through not only the polystyrene "shell", but the PUR core.
Once sectioned, I proceeded to drill a 1/8" d. hole into either section and then inserted a tin-solder spacer, effectively increasing the length of the femurs. Assuring myself of the new proportions and adjusting the pose ever so slightly, I then packed the gap with MS. Filling the space is a minimum two-step process: pack the gap and lock the pose; and then finish the surface in successive steps. One down. . .
Finally, I removed all traces of what passes for the scarab ring. The relief is perfunctory and the detail sketchy at best. With the remaining MS I carefully created a slightly oversized "blank" that will be sized and carved in the days to come.
More to follow. . .

25 June 2009

23 June 2009
The Mummy--Step 1: Solving the Riddle of the Mummy. . .
With the head now well on its way, and knowing that I was nowhere near a stopping point, it was time to consider my next step.
The coffin is not a very good candidate, as this is a project-within-a-project. . . or is it the other way around? So that leaves me with the mummy itself, and the issue of arm lengths vs. proportions.
The respective arm lengths are correct. The problem lies in the fact that the figure is but 7 heads tall--BUT the proportions are for that of at least a 7 1/2 heads-tall figure! Again, I don't know if there was intermediary shrinkage during pre-production; or production shrinkage. And it is irrelevant: the body is at least a half-head too short, and it is up to the end-user to determine if it is worth correcting or not. Obviously, you know which path I will take.
The first step is to assemble the mummy's body. The fit is excellent and very "positive" (thanks to medial "locking pegs" down the length of the body halves), and assembly of the four components was accomplished in no time. . .The assembled body--minus arms, head and stray wrappings--was filled ~3/4 full with PUR (100cc).

Above you see the assembled body with the scaling grid "Sharpie"'d in, and the Phase II head tentatively positioned on a length of tin solder. By way of follow-up, the arms have been assembled and positioned, with MS used as a filler in the small space between the arms and the torso.
The coffin is not a very good candidate, as this is a project-within-a-project. . . or is it the other way around? So that leaves me with the mummy itself, and the issue of arm lengths vs. proportions.
The respective arm lengths are correct. The problem lies in the fact that the figure is but 7 heads tall--BUT the proportions are for that of at least a 7 1/2 heads-tall figure! Again, I don't know if there was intermediary shrinkage during pre-production; or production shrinkage. And it is irrelevant: the body is at least a half-head too short, and it is up to the end-user to determine if it is worth correcting or not. Obviously, you know which path I will take.
The first step is to assemble the mummy's body. The fit is excellent and very "positive" (thanks to medial "locking pegs" down the length of the body halves), and assembly of the four components was accomplished in no time. . .The assembled body--minus arms, head and stray wrappings--was filled ~3/4 full with PUR (100cc).
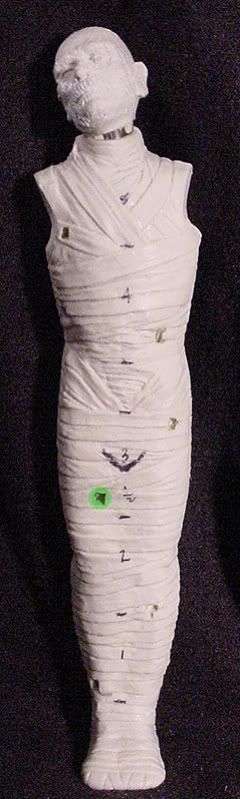
Above you see the assembled body with the scaling grid "Sharpie"'d in, and the Phase II head tentatively positioned on a length of tin solder. By way of follow-up, the arms have been assembled and positioned, with MS used as a filler in the small space between the arms and the torso.
21 June 2009
Erik, the Opera Ghost--Act I: [Curtain]
The head is finally done. . .

Or as done as it is going to get at this time. There is still some minor clean-up, tweaking, and detailing left to be done, but I will leave that for when I begin to work on the project in earnest.
Now it's on to Karloff and back to the Wolf Man. . .
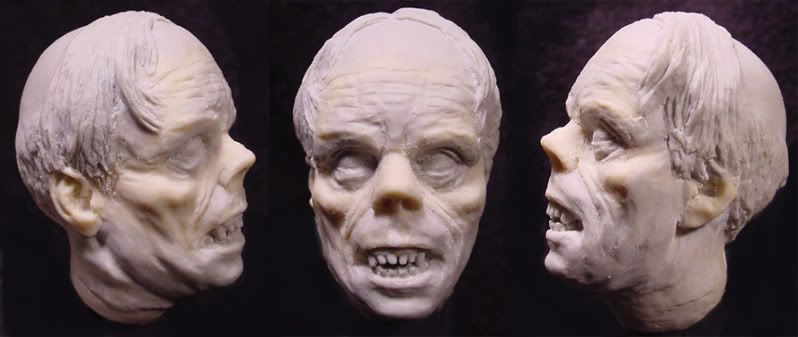
Or as done as it is going to get at this time. There is still some minor clean-up, tweaking, and detailing left to be done, but I will leave that for when I begin to work on the project in earnest.
Now it's on to Karloff and back to the Wolf Man. . .
20 June 2009
Moebius' The Mummy: Reworking the Head
With the Phantom's head all but done, I was ready to resume the finishing on the Wolf Man. . . that is, until I began examining Moebius' latest in the course of preparing the review. As I indicated:

The dorsal (back) half of the head was molded en suite with the body: the first step was to separate it with a jeweler's saw. I then glued the head halves together, and once dry, filled the head with PUR.
The right side of the head is now about 80% done; the left side has barely been touched to provide a comparative view. Note the "original" ear on the latter! I have also reduced the back of the head by about 20% to correct a noticeable parieto-occipital distortion: while cranial deformation was practiced in Ancient Egypt, this was not an aspect of the Pierce makeover.
Check back often for updates to this mini-project. . .
". . . it is not a very good likeness of Karloff--and the ears are HUGE!"I am not sufficiently familiar with the process of injection molding to speculate if the head-as-provided was a product of distortion that occurred during production; nevertheless, that would be the best way to describe what is before us.
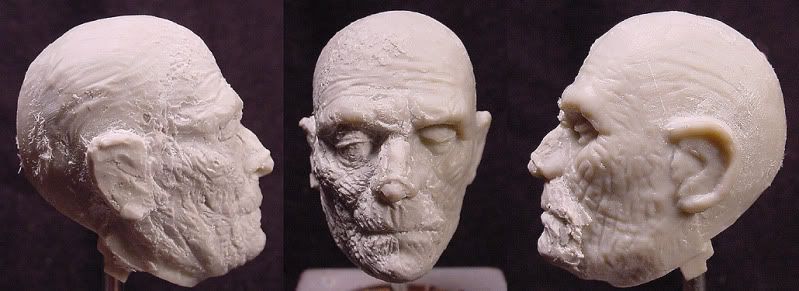
The dorsal (back) half of the head was molded en suite with the body: the first step was to separate it with a jeweler's saw. I then glued the head halves together, and once dry, filled the head with PUR.
The right side of the head is now about 80% done; the left side has barely been touched to provide a comparative view. Note the "original" ear on the latter! I have also reduced the back of the head by about 20% to correct a noticeable parieto-occipital distortion: while cranial deformation was practiced in Ancient Egypt, this was not an aspect of the Pierce makeover.
Check back often for updates to this mini-project. . .
19 June 2009
Moebius' The Mummy

This is the dazzling Basil Gogos boxart for Moebius' latest addition to the dungeon of 1/8th scale polystyrene Universal monsters. While undoubtedly one of the finest releases ever in this genre and medium, is it everything we could have hoped for?
The first thing that strikes you--after the artwork, of course--is the size of the box: it is a whopping 12.5 x 9.75 x 5.25 ins.! Inside you will find 43 pieces cast in pale-grey polystyrene. VG+ casting throughout, with zero flash (yes, it is a new kit and flash should not be an issue; but unfortunately we all know better) and minimal "fade". This is most noticeable on the ears, but more on this later... Rounding off the impressive contents is a 4pp, 4-color refsheet by Jeff Bond and Dave Metzner. TOP NOTCH!
The design of the sculpture is very reminiscent of Janus's l-o-n-g OOP Im-ho-tep and Sideshow's Premium Format "The Mummy and Sarcophagus" offerings. The one telling difference is the price. . . and the fact that this is is readily available!
PLUSES:
1) Excellent styrene! I have taken Dremel and blade to it, and it responds beautifully! You won't be able to ramp up the rpm's--any more than you could on any styrene--but it is hardier than most. Quick response to liquid cement--in most instances, you shouldn't need to resort to clamps, tape, or rubber bands: hold for a few minutes, finalize the position, and set aside.
2) EXCELLENT fit with "positive lock" on many of the major subassemblies. There will be some filler work required, but compared to most "large-scale" styrene figure kits, this one can be described as "filler free".
3) SUPERB engineering/design! I was somewhat apprehensive over how the kit would be broken down, especially as I have "plans" which would have been easily derailed if the kit had been engineered otherwise. No worries whatsoever! The kit is designed to allow us, the modeller, to take it as far as our abilities and imagination will permit.
MINUSES:
Really only one. Unfortunately, it (collectively, they) all involve the titular subject. First of all, it is not a very good likeness of Karloff (I appear to be in the distinct minority in this, as most reviews have raved about the likeness. . . go figure)--and the ears are HUGE! I have already commenced the re-modelling of the head, and I will post images shortly to illustrate. Secondly the proportions are off: either the overall length of the body is too short; and/or the arms are too long. Something will have to be done to eliminate, or at least mitigate, the knuckle-dragging look, and hopefully allow the mummy to fill out the coffin a bit more.
This is a MUST HAVE kit! If it is your first monster model, you're in for a treat! If you're an old 'Monster Kid' who remembers the days when you could pick up an Aurora kit for 8 bits, this will take you back to those halcyon days with none of the downsides.
Augie
10 June 2009
The week of 6/7. . .
1) The Phantom head--Phase III, posted below, has been further refined and enhanced with every component, including the hair (!), either finished or well in-progress. [UPDATE: save for a few enhancements, tweaks, and [relatively] minor points of detail, which are being worked upon assiduously, the head is DONE!]
2) After much thought and deliberation, ordered and received the Image Entertainment edition of the Phantom of the Opera. A definite improvement over my decades old VHS copy!
3) Ordered Moebius's new kit of The Mummy, arguably the most exciting new injection-molded kit of the UMs in over 25 years!
PS--Item received today (18/06/09). In a word. . . AWESOME!!!!!!
4) Ordered and received Philippe Faraut's eagerly anticipated follow-up volume to Portrait Sculpting: Anatomy & Expression in Clay: Mastering Portraiture: Advanced Analyses of the Face Sculpted in Clay.
5) Ordered PL's Headless Horseman from Burton's Sleepy Hollow. This is obviously a long-OP kit, and based on everything I have seen and read, not a particularly good one. . . but what can I say: I love the subject matter; enjoyed the movie immensely; and the kit is not likely to be reissued/redone.
PS--Item received today (17/06/09). My example was cast in the off-white polystyrene (same as The Wolf Man and Phantom)--I have read in reviews, etc. that some [early?] runs were produced in ABS? If the Phantom is a long-term project, this is a lifetime project! MUCH work to be done . . .
6) Finally, Doyusha has released a 1/4 scale kit of Naoe Kanetsugu's "Love" kabuto. This is the first new addition to their helmet line since I don't know when. . . and hopefully not the last! It is on order.
PS--Item received today (26/06/09). Arguably the best in the series, though I would be hesitant to argue the point too stridently. This might not be my favourite of the Sengoku kabuto, but it is undeniably one of the most interesting. MUST HAVE!
This ought to keep me busy for a while. . .
2) After much thought and deliberation, ordered and received the Image Entertainment edition of the Phantom of the Opera. A definite improvement over my decades old VHS copy!
3) Ordered Moebius's new kit of The Mummy, arguably the most exciting new injection-molded kit of the UMs in over 25 years!
PS--Item received today (18/06/09). In a word. . . AWESOME!!!!!!
4) Ordered and received Philippe Faraut's eagerly anticipated follow-up volume to Portrait Sculpting: Anatomy & Expression in Clay: Mastering Portraiture: Advanced Analyses of the Face Sculpted in Clay.
5) Ordered PL's Headless Horseman from Burton's Sleepy Hollow. This is obviously a long-OP kit, and based on everything I have seen and read, not a particularly good one. . . but what can I say: I love the subject matter; enjoyed the movie immensely; and the kit is not likely to be reissued/redone.
PS--Item received today (17/06/09). My example was cast in the off-white polystyrene (same as The Wolf Man and Phantom)--I have read in reviews, etc. that some [early?] runs were produced in ABS? If the Phantom is a long-term project, this is a lifetime project! MUCH work to be done . . .
6) Finally, Doyusha has released a 1/4 scale kit of Naoe Kanetsugu's "Love" kabuto. This is the first new addition to their helmet line since I don't know when. . . and hopefully not the last! It is on order.
PS--Item received today (26/06/09). Arguably the best in the series, though I would be hesitant to argue the point too stridently. This might not be my favourite of the Sengoku kabuto, but it is undeniably one of the most interesting. MUST HAVE!
This ought to keep me busy for a while. . .
02 June 2009
"The Monster 1931"--INTRO
Thanks to the help of a colleague and fellow UMA and Clubhouse member, my Grailquest for Mike Hill's 1/4th scale bust of the Frankenstein Monster (1931) was successfully concluded this week.
IMHO, this is the best rendition of the Monster in the "smaller" scales. Exquisitely cast in 3 pieces (plus 3 pieces for the base--base, nameplate, and a length of clear lexan rod) by Earthbound Studios, and released by Forbidden Zone, this is some of the finest casting I have ever seen(!): ZERO bubbles; no seam lines to speak of, save for a slight shift at the sprue mouth; and the finest resin I have ever encountered.
While I had some difficulty in locating and acquiring the kit, it is still available via Forbidden Zone. Though some patience will be required, it will be worth it!
IMHO, this is the best rendition of the Monster in the "smaller" scales. Exquisitely cast in 3 pieces (plus 3 pieces for the base--base, nameplate, and a length of clear lexan rod) by Earthbound Studios, and released by Forbidden Zone, this is some of the finest casting I have ever seen(!): ZERO bubbles; no seam lines to speak of, save for a slight shift at the sprue mouth; and the finest resin I have ever encountered.
While I had some difficulty in locating and acquiring the kit, it is still available via Forbidden Zone. Though some patience will be required, it will be worth it!
30 May 2009
Erik, the Opera Ghost--Libretti
In addition to the film itself (various editions and formats) and a modest selection of stills, I have turned to these published works for additional background, insight and inspiration:
Kay, Susan. Phantom. NY: Delacorte Press, 1991.
Riley, Philip J. The Making of The Phantom of the Opera (Classic Silents, vol. 1). Absecon, NJ: MagicImage Fimbooks, 1999.
Wolf, Leonard, ed. The Essential Phantom of the Opera. NY: Plume, 1996.
Kay, Susan. Phantom. NY: Delacorte Press, 1991.
Riley, Philip J. The Making of The Phantom of the Opera (Classic Silents, vol. 1). Absecon, NJ: MagicImage Fimbooks, 1999.
Wolf, Leonard, ed. The Essential Phantom of the Opera. NY: Plume, 1996.
26 May 2009
Erik, the Opera Ghost--Act I: The Face/Head
Erik. . . the Opera Ghost. . . the Phantom of the Opera. . . call him what you will. Though Claude Rains (Universal 1943 remake), Herbert Lom (Hammer 1962), Michael Crawford (stage), and [countless?] others have breathed life into this iconic character, Lon Chaney, Sr. undeniably made Erik his own. To paraphrase his son, the Phantom was his baby.
Or should that be babies? I have recently discovered how challenging it can be to sculpt a credible likeness of the Opera Ghost. Unlike other subjects, primary and secondary references abound: from movie stills to excellent 3-d likenesses--sculpture, masks, etc. Yet while they are all recognizable as the Phantom, they can all be noticeably, even significantly, different. So I will rephrase my original question. "Can there be a definitive likeness of Chaney's Phantom?"
The answer is, "Yes". . . and decidedly, "No!" Few will argue that Chaney was a master of his craft elevating it to an art form. But only upon researching this silent classic was the genius unveiled. Very simply put, there can be no definitive Phantom because the Phantom was not only a multitude of ad hoc expressions, but most importantly an illusion--truly an apparition!--created by variegated makeup and lighting. One can give form to what we see, but we have to accept that the image captured in putty or clay probably never truly existed!
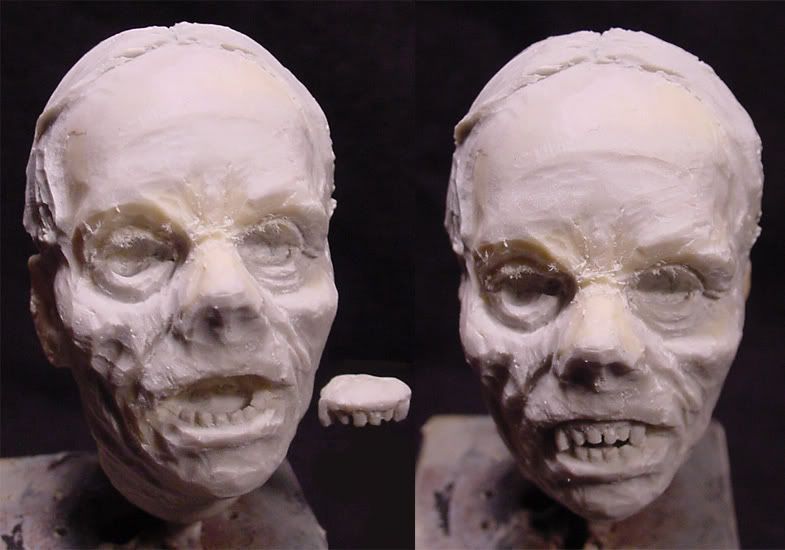
I now present the Phase II head with the the facial reconstruction at a still [somewhat] crude, semi-finished-but-still-rough stage. While I have sculpted the lower teeth in situ, the maxillary dentition has been sculpted as a separate appliance [NOTE: the separate appliance has now been permanently attached and the upper lip slightly extended.].
I am not quite there yet, but it is gradually emerging. . .

30.05.2009
I am now well into Phase III, and I am comfortable saying that I am fast upon the home stretch. There is still some tweaking to be done, but the overall "lines" are now present, and I think that once the hair and eyes are done, it will all come together splendidly.
31.05.2009
The left eye (orb, lids, etc.) is all but done; the right eye has been modelled and awaiting the lids, etc. I should have a final--or near-final--image to show you by this time next week. Then the wretched Erik will be returned to his box to await his turn on the bench. . . The performance will in all likelihood resume with Act II sometime next year.
03.06.2009
I am so pleased with the way the headsculpt is turning out that I am considering exploring what options might be available to me to broaden its "distribution". It would certainly be an 1/8th scale bust--yes, I have a particular depiction in mind. Once the head is completely done, my next step will be to contact Chaney Entertainment: I would not pursue this without their blessing and permission. Stay tuned!
06.06.2009
The Phase III head. . .

The headsculpt is now all-but-done. Clean-up has begun in earnest, and I should have no more than an hour or two of work remaining before the face is completed. I am as of yet undecided whether to cut an intermediate mold at this point; or proceed with the hair. . .
12.06.2009
Just about there. . . There was something not quite right with the mandible and chin that, in spite of the fact that a significant degree of any Phantom likeness will be brought about by the paint job. I think I've "fixed" the problem and I'll certainly know by this time tomorrow. In any event, my goal is to have this completed--and hopefully in rubber!--by the end of the weekend.
Or should that be babies? I have recently discovered how challenging it can be to sculpt a credible likeness of the Opera Ghost. Unlike other subjects, primary and secondary references abound: from movie stills to excellent 3-d likenesses--sculpture, masks, etc. Yet while they are all recognizable as the Phantom, they can all be noticeably, even significantly, different. So I will rephrase my original question. "Can there be a definitive likeness of Chaney's Phantom?"
The answer is, "Yes". . . and decidedly, "No!" Few will argue that Chaney was a master of his craft elevating it to an art form. But only upon researching this silent classic was the genius unveiled. Very simply put, there can be no definitive Phantom because the Phantom was not only a multitude of ad hoc expressions, but most importantly an illusion--truly an apparition!--created by variegated makeup and lighting. One can give form to what we see, but we have to accept that the image captured in putty or clay probably never truly existed!
I now present the Phase II head with the the facial reconstruction at a still [somewhat] crude, semi-finished-but-still-rough stage. While I have sculpted the lower teeth in situ, the maxillary dentition has been sculpted as a separate appliance [NOTE: the separate appliance has now been permanently attached and the upper lip slightly extended.].
I am not quite there yet, but it is gradually emerging. . .
30.05.2009
I am now well into Phase III, and I am comfortable saying that I am fast upon the home stretch. There is still some tweaking to be done, but the overall "lines" are now present, and I think that once the hair and eyes are done, it will all come together splendidly.
31.05.2009
The left eye (orb, lids, etc.) is all but done; the right eye has been modelled and awaiting the lids, etc. I should have a final--or near-final--image to show you by this time next week. Then the wretched Erik will be returned to his box to await his turn on the bench. . . The performance will in all likelihood resume with Act II sometime next year.
03.06.2009
I am so pleased with the way the headsculpt is turning out that I am considering exploring what options might be available to me to broaden its "distribution". It would certainly be an 1/8th scale bust--yes, I have a particular depiction in mind. Once the head is completely done, my next step will be to contact Chaney Entertainment: I would not pursue this without their blessing and permission. Stay tuned!
06.06.2009
The Phase III head. . .
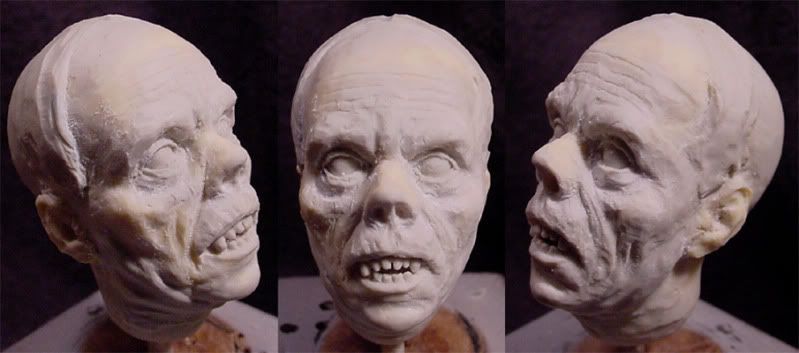
The headsculpt is now all-but-done. Clean-up has begun in earnest, and I should have no more than an hour or two of work remaining before the face is completed. I am as of yet undecided whether to cut an intermediate mold at this point; or proceed with the hair. . .
12.06.2009
Just about there. . . There was something not quite right with the mandible and chin that, in spite of the fact that a significant degree of any Phantom likeness will be brought about by the paint job. I think I've "fixed" the problem and I'll certainly know by this time tomorrow. In any event, my goal is to have this completed--and hopefully in rubber!--by the end of the weekend.
25 May 2009
Erik, the Opera Ghost--Divertimento?
Not hardly. . . but this may certainly mark a transition in the first Act. . .
While the project on the whole is unfolding splendidly, I have just about resigned myself to doing away with the mantle. As I've oft mentioned in previous postings, I am by no means an Aurora purist, and the one glaring weakness of any Aurora/Aurora-like release has been the drapery. The greater the volume of fabric, the greater the eyesore.
I was prepared to rework the drapery to some degree or another. In fact, a not-insignificant amount of time and effort was spent reinforcing those areas where a 'breakthrough' would be most likely to occur. However, after spending some 3 hours attempting to situate the mantle, it became clear to me that there was no way that the mantle as designed and cast could be successfully integrated with the kit. A good deal of the problem lies with the sculptor's apparent lack of familiarity with the period opera cloak/mantle--though I will hasten to concede that the limitations of the casting process most likely played a significant role in the more glaring shortcomings.
Is this my final word? No. . . not quite. I will have to spend some time watching the original and closely examining the stills at my disposal before I make my final decision. In the meantime, I will continue working on the head, shirt and cravat. . . and begin considering sculpting a dressing gown on our tormented "ghost".
While the project on the whole is unfolding splendidly, I have just about resigned myself to doing away with the mantle. As I've oft mentioned in previous postings, I am by no means an Aurora purist, and the one glaring weakness of any Aurora/Aurora-like release has been the drapery. The greater the volume of fabric, the greater the eyesore.
I was prepared to rework the drapery to some degree or another. In fact, a not-insignificant amount of time and effort was spent reinforcing those areas where a 'breakthrough' would be most likely to occur. However, after spending some 3 hours attempting to situate the mantle, it became clear to me that there was no way that the mantle as designed and cast could be successfully integrated with the kit. A good deal of the problem lies with the sculptor's apparent lack of familiarity with the period opera cloak/mantle--though I will hasten to concede that the limitations of the casting process most likely played a significant role in the more glaring shortcomings.
Is this my final word? No. . . not quite. I will have to spend some time watching the original and closely examining the stills at my disposal before I make my final decision. In the meantime, I will continue working on the head, shirt and cravat. . . and begin considering sculpting a dressing gown on our tormented "ghost".
24 May 2009
Erik, the Opera Ghost--Act I
Still not feeling quite at 100%, but well enough to venture a bit farther afield than I did yesterday. . .
All subassemblies--head, torso, legs, shoes and cloak/mantle--were assembled, and filled with PUR where applicable.

In the first image, you can see what I've done with the head and torso to date. The torso is about 80% blank. As the mantle does not fit anywhere near as snugly as it should, the torso will have to be built-out: lapels, etc. I have already begun to build out the shirt: this was largely driven by the fact that the cravat was some 4 scale inches below the neckline with no visible means of attachment. Also the shirt was collarless! You can see the roughed-in-standing collar in the image above; as well as the beginning of the right lapel. Finally, I hollowed out a neck opening which will receive the head.
I wish I had taken a photograph of the stock head. For those who would like to get a general idea of what the stock head looked like, you can go to this site. In any case, the only changes I have made to date are: ground-out the eyes and mouth; added 2-3 mm (MS) to the top of the head (if you look closely at the surviving stills, it can be clearly seen that Chaney applied a wig/skullcap that effectively extended the length of his forehead), and ground-off the hair to reshape the calvarium; and added a neck stump (MS). I have begun to tentatively reshape the head and some of the features (e.g., nose), but this is very much in the preliminary stages.
Ironically, for all the head's shortcomings, once a little bit of work is done on it, it begins to take on a startling likeness to Chaney sans makeup! This is rather exciting as now the modeller gets to play Chaney, if only for a little while. . .
And now for the infamous mantle. . . As you can see on the left half of the image, the front right panel is engineered in two pieces. All of the horror stories re: this kit revolve around benighted engineering-- and I would agree 100%. Most if not all of the build-ups I have read about have the modeller assemble the mantle in situ: my hat is off to these gentlemen as that would be a deal-breaker for me if there weren't an alternative.

The mantle can obviously be assembled as a stand alone unit. I assembled mine with liquid cement, and then reinforced all seams with superglue; allowing the entire assembly to set and cure overnight.
The trick now is how to locate the torso inside the mantle. First, one must remove the locating pegs molded on the back half of the cloak that attach this piece to the back half of the torso. Next, one must remove all the extraneous lugs, numbering "plates", etc. that populate the inner surfaces of the pieces comprising the mantle. Once that is done, one can cajole the torso past the waist of the mantle until it pops into the chest area. This is not as difficult as it sounds. Kudos to PL for providing us with a one-piece back half: the entire mantle can be gently pried apart until the torso pops into place.
I will have several options by which to secure the mantle to the torso: at this point I am still undecided as to which will work the best for me.
More to follow. . .
All subassemblies--head, torso, legs, shoes and cloak/mantle--were assembled, and filled with PUR where applicable.
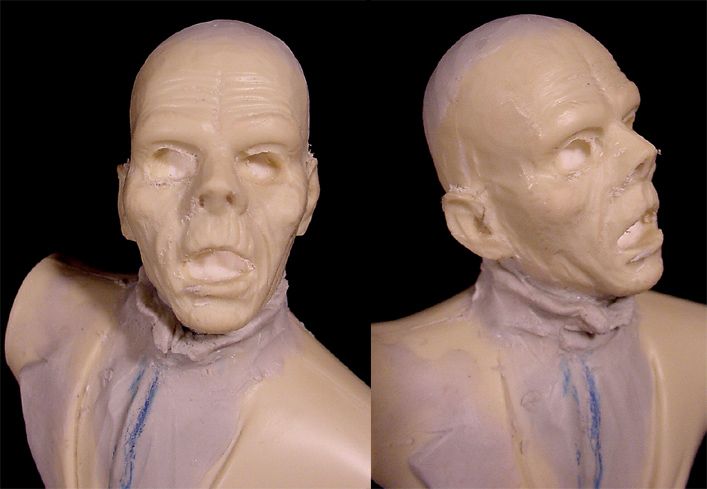
In the first image, you can see what I've done with the head and torso to date. The torso is about 80% blank. As the mantle does not fit anywhere near as snugly as it should, the torso will have to be built-out: lapels, etc. I have already begun to build out the shirt: this was largely driven by the fact that the cravat was some 4 scale inches below the neckline with no visible means of attachment. Also the shirt was collarless! You can see the roughed-in-standing collar in the image above; as well as the beginning of the right lapel. Finally, I hollowed out a neck opening which will receive the head.
I wish I had taken a photograph of the stock head. For those who would like to get a general idea of what the stock head looked like, you can go to this site. In any case, the only changes I have made to date are: ground-out the eyes and mouth; added 2-3 mm (MS) to the top of the head (if you look closely at the surviving stills, it can be clearly seen that Chaney applied a wig/skullcap that effectively extended the length of his forehead), and ground-off the hair to reshape the calvarium; and added a neck stump (MS). I have begun to tentatively reshape the head and some of the features (e.g., nose), but this is very much in the preliminary stages.
Ironically, for all the head's shortcomings, once a little bit of work is done on it, it begins to take on a startling likeness to Chaney sans makeup! This is rather exciting as now the modeller gets to play Chaney, if only for a little while. . .
And now for the infamous mantle. . . As you can see on the left half of the image, the front right panel is engineered in two pieces. All of the horror stories re: this kit revolve around benighted engineering-- and I would agree 100%. Most if not all of the build-ups I have read about have the modeller assemble the mantle in situ: my hat is off to these gentlemen as that would be a deal-breaker for me if there weren't an alternative.
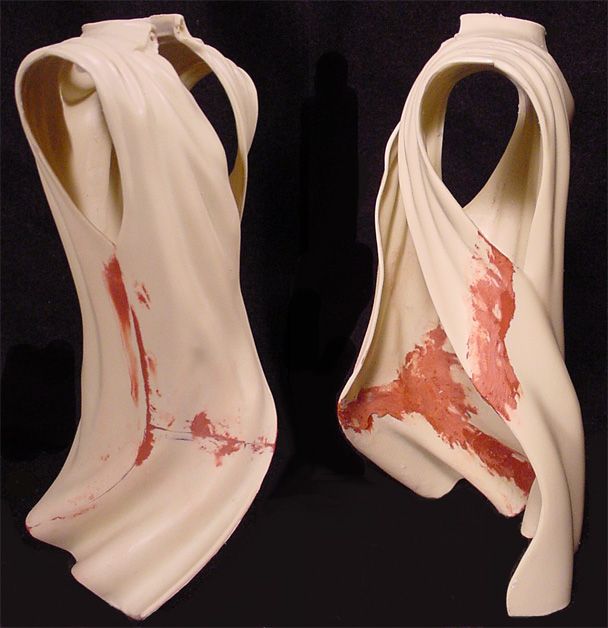
The mantle can obviously be assembled as a stand alone unit. I assembled mine with liquid cement, and then reinforced all seams with superglue; allowing the entire assembly to set and cure overnight.
The trick now is how to locate the torso inside the mantle. First, one must remove the locating pegs molded on the back half of the cloak that attach this piece to the back half of the torso. Next, one must remove all the extraneous lugs, numbering "plates", etc. that populate the inner surfaces of the pieces comprising the mantle. Once that is done, one can cajole the torso past the waist of the mantle until it pops into the chest area. This is not as difficult as it sounds. Kudos to PL for providing us with a one-piece back half: the entire mantle can be gently pried apart until the torso pops into place.
I will have several options by which to secure the mantle to the torso: at this point I am still undecided as to which will work the best for me.
More to follow. . .
A Star for Jack Pierce on the Walk of Fame
I'm usually not one for this type of thing, but I believe an exception can--and should!--be made in this case.
I would direct your attention to the following thread in the UMA forum:
http://www.universalmonsterarmy.com/forum/index.php?topic=1319.0
If you would like to cut straight to the chase, the on-line petition can be found here:
http://www.petitiononline.com/jppierce/petition.html
23 signatures in three days. . . LET'S MAKE THIS HAPPEN!
Heartfelt thanks in advance,
Augie
24.05.2009, 1552
2990. . . 10 to go!
24.05.2009, 1905
4 to go!
24.05.2009, 2120
3000!!! Thanks to all who voted. And if you haven't, please do! The more votes, the better the chances that this will become a fait acommpli!
I would direct your attention to the following thread in the UMA forum:
http://www.universalmonsterarmy.com/forum/index.php?topic=1319.0
If you would like to cut straight to the chase, the on-line petition can be found here:
http://www.petitiononline.com/jppierce/petition.html
23 signatures in three days. . . LET'S MAKE THIS HAPPEN!
Heartfelt thanks in advance,
Augie
24.05.2009, 1552
2990. . . 10 to go!
24.05.2009, 1905
4 to go!
24.05.2009, 2120
3000!!! Thanks to all who voted. And if you haven't, please do! The more votes, the better the chances that this will become a fait acommpli!
23 May 2009
Erik, the Opera Ghost--Ouverture
I underwent a root canal on Thursday, and while the procedure was remarkably pain-free, the aftermath has been somewhat uncomfortable and draining; in other words, I was in no condition to engage in precision, delicate work. But as I am not one to squander an otherwise perfectly good opportunity to get some work done by laying about trying to guess when the next wave of pain would hit, I decided to break into a kit that I've had for nearly a decade.
Back in the day, Polar Lights released some remarkable kits. First and foremost, in this modeller's opinion, was their Phantom of the Opera. This wasn't a re-pop of the venerable Aurora release, but an entirely new tooling (#5027) that included the organ! This kit was a self-contained diorama the likes of which had never been seen in the styrene world!! (Perhaps a bit of an overstatement, but not by much. . . )

PLUSES:
1) Excellent styrene! Immediately responsive to liquid cement, albeit somewhat softer than I'd like. [NOTE: Care should be taken when using "hotter" putties/fillers (incl. RGP): apply and build-up using thin layers; DO NOT use liquid cement as a thinner; and let dry at least 24 hrs. before working the surface!]
2) Positive lock fit. This is as close to a snap-together kit as I have ever seen! By way of illustration, the organ has been assembled without a single drop of cement and without benefit of blue-tack.

MINUSES:
1) Engineering of the subject figure leaves much to be desired. The bane of this figure is the two-part right front panel of the "cloak".
2) Sculpting shortcuts and simply poor sculpture and design abound (e.g., the cravat, the head (horrible likeness! And not in a "good" sense!!), the shoes, the jacket, etc.).
To summarize, this figure is a modeller's figure--an advanced modeller's figure. This is not a weekend project if you want to realize all this figure has to offer. Fortunately, I'm in no hurry. . .
Back in the day, Polar Lights released some remarkable kits. First and foremost, in this modeller's opinion, was their Phantom of the Opera. This wasn't a re-pop of the venerable Aurora release, but an entirely new tooling (#5027) that included the organ! This kit was a self-contained diorama the likes of which had never been seen in the styrene world!! (Perhaps a bit of an overstatement, but not by much. . . )
PLUSES:
1) Excellent styrene! Immediately responsive to liquid cement, albeit somewhat softer than I'd like. [NOTE: Care should be taken when using "hotter" putties/fillers (incl. RGP): apply and build-up using thin layers; DO NOT use liquid cement as a thinner; and let dry at least 24 hrs. before working the surface!]
2) Positive lock fit. This is as close to a snap-together kit as I have ever seen! By way of illustration, the organ has been assembled without a single drop of cement and without benefit of blue-tack.
MINUSES:
1) Engineering of the subject figure leaves much to be desired. The bane of this figure is the two-part right front panel of the "cloak".
2) Sculpting shortcuts and simply poor sculpture and design abound (e.g., the cravat, the head (horrible likeness! And not in a "good" sense!!), the shoes, the jacket, etc.).
To summarize, this figure is a modeller's figure--an advanced modeller's figure. This is not a weekend project if you want to realize all this figure has to offer. Fortunately, I'm in no hurry. . .
Subscribe to:
Posts (Atom)