11 October 2009

"Tzitzimitl" - Phase II: The Torso

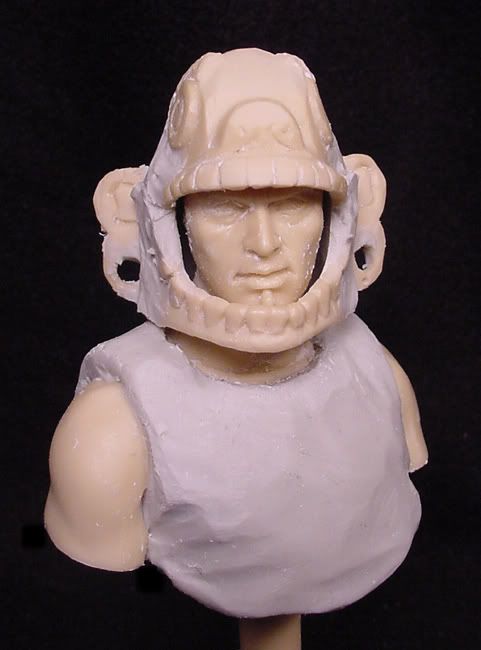
Those of you who have been following this project will know that the first step is to model the ichcahuipilli, which will be applied in two pieces, poncho-style. Normally, I would quilt the garment, but since it will be all-but-hidden from view by the tlahuiztli (overall), my primary goal is to add the necessary volume to the torso.


The torso is now curing in the oven. The next step will be to cover the arms with the sleeves of the tlahuiztli, and add the integrating drapery.

12.10.2009
The sleeves and collar of the tlahuiztli have been roughed-in. I have now commenced working on the drapery and surface finishing.

13.10.2009
This evening, I attempted to model the padding on the inside of the m-h while still retaining the stand-alone capability of the same, but it is simply not possible. Thus, the visible padding will be modelled and painted in situ once the m-h is permanently attached. I did, however, successfully restore the fringe/bangs on the forehead of the subject.

14.10.2009
The reconfiguration of the h-m has begun in earnest. I am trying to take it slow and easy in anticipation of the receipt of the MdT, although this invaluable reference will not come into its own until it comes time to surface detail the tlahuiztli and break out the paints. However frustrating working the h-m might be, it is also the part of the project I enjoy the most.

More to follow. . .

"Tzitzimitl" - Phase I: The Mask-Helmet -- GRAPHICS


10 October 2009

"Tzitzimitl" - Phase I: The Mask-Helmet

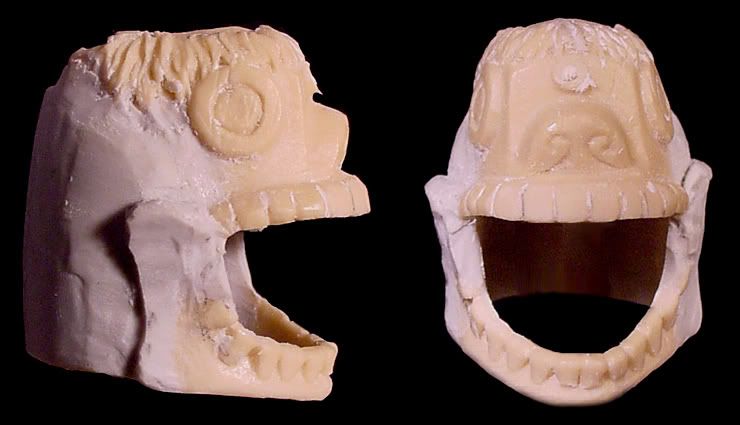
The tzitzimitl mask-helmet (hereafter, m-h) is as defining as it is iconic, thus it stands to reason that it has to be "right". It not only has to be right (i.e., display the characteristic appointments that were associated with the deity); but it has to look right when worn... This is as good a time as any to underscore that the Mexica "mask-helmets" were full helmets, "great helmets" if you will: the way Young has designed the helmet suggests, at least to me, that this was more of an open-backed mask than a helmet.

I spent a couple of productive hours at the bench yesterday, and the m-h makeover is well underway. I'll post some images in the next 72 hrs., but in the meantime, let me touch upon some highlights of what's been done to date.

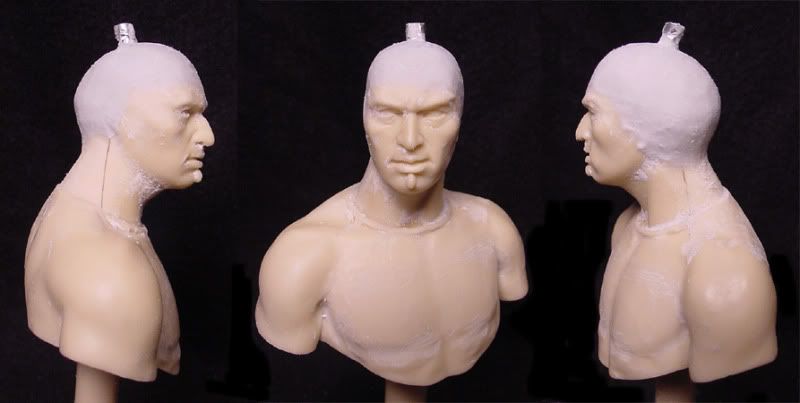
1) I have reduced the necklace (which will serve nicely as the edge of the collar of the tlahuiztli), and eliminated the claw-like spacers--I have no idea what these are intended to represent. This served as a preliminary to the initial judicious reduction of the pectorals: so far I would say I have reduced them by 1-1.5mm. I may go a bit further, I may not. To prepare for what follows, I permanently attached the face/neck, and reduced all visible hair.

2) Eliminated the mantling of feathers across the shoulders, and the bindings, etc. on the back of the head. The tzitzimitl m-h does have a quetzal-feather crest attached to the top of the m-h; and the back of the helmet is adorned with hair and/or quetzal feathers arranged to look like disheveled hair. Some sources indicate that the entire m-h was covered with featherwork, and this will be examined and considered in the days to come.

3) Eliminated the fangs. It might look "cool" and "horrific", but we're talking about a flesh-eating, skull-headed demon: what more do you need?! Fangs were limited to mask-helmets depicting natural creatures (e.g., jaguars (ocelotl), coyotes (coyotl)). The same may be said of pronounced "overbites", where the mandible of the h-m is markedly underslung relative to the maxilla.

4) The talon ear-pendants and the carved "forelock", for lack of a better term, have already been discarded. The former will be replaced by the characteristic ear spools of the tzitzimitl: to accommodate these, I have drilled a 3.5mm hole in the ear lobes of the m-h's ears. But before that is given its due consideration, the ears must be relocated: to this end, they have already been removed.

ADDENDUM
A most productive day! I have restored the calvarium to the head, and the h-m is now a stand-alone, removable item. Next I will fit the h-m by adding the internal padding. I have not decided whether I will depict the h-m ties (omitted in the kit) tied or un-.

11.10.2009
The ears on the h-m have been reattached. I have begun the surface finishing on the m-h, and started tweaking the overall shape in anticipation of the addition of the shell (forehead) and the hair/feathers.

03 October 2009

Where did September go?

A brief catch-up posting that will hopefully mark a turn for a semblance of normalcy, if not the better all around.

September was pretty much a write-off. Between the historic floods that slammed the metro Atlanta area and attendant home repairs; being laid-up with the "Flu from Hell" (no, I did not get a flu shot; nor was there enough time to get any of the post-exposure anti-virals-- no regrets on either count!), something that I am still working my way through; AND dealing with Q3 end at work, the ninth month was effectively deep-sixed!

Which brings us to the beginning of the last quarter of 2009. Traditionally this is a relatively unproductive period due to holidays and work. Hopefully, I'll be able to make this year an exception and get things off the workbench and on to the painting table by the Christmas holidays.

In the meantime, however, there remains MUCH to be done. . . hope you'll drop by often to check on the progress.

Best regards,

Augie

01 October 2009

"Tzitzimitl" - Planning

With the excellent graphic breakdown of the kit presented here, planning can begin in earnest.

The first order of business will be to reduce and "dress" the torso. I've always had a problem with the "ripped" physique usually found on indigenous subjects; hence the initial reduction. I would say that the necklace and the sculpted feathers on the torso will have to be removed as well, but this might be taken care of by. . .

the modelling of the ichcahuipilli, the stuffed and quilted vest that was the "foundation" piece of defensive wear around which the Mexica garniture was assembled. While not all warriors went armoured, all armoured warriors wore an ichcahuipilli as the tlahuiztli did not possess any defensive properties beyond what a sturdy denim overall would provide.

I will add to this thread over the following days. . .

07.10.2009

Mine arrived today! For whatever it's worth, Young continues to provide the best and most stylish packaging in the business. And in case anyone is wondering, there is no refsheet of any sort included with the kit. . . Regardless, I have now requested the facsimile edition of the Codex Moctezuma (bka the MdT) through ILL. . .

10 September 2009

Monarch Nosferatu -- UPDATE

Hard to believe that it has been nigh unto a fortnight since I last posted anything. . .

Fortunately, that does not mean that things have been idle on the bench, though regrettably progress has been somewhat limited.

Most of the putty work is now done, with but a few areas still demanding additional attention. I have begun clean-up of the seams, and I would say I am about 60% done at this point. The key(s) are on the agenda for next week, though I suspect that this aspect of the project will not be completed until the figure has long been transferred to the painting bench. I have done but two of the buttons. . . saving the worst for last.

Hopefully things will resume a semblance of normalcy after month's end; but in the meantime, rest assured that progress will continue--painting "season" is fast approaching!

26 August 2009

Monarch Nosferatu (2)

Things are moving right along, and I am now working on the upper torso, namely the arms.

The right arm is all but done. Little work to be done save for a slight repositioning at the shoulder (lowered) and elbow (forearm raised and rotated into body). The shoulder joint is now finished.

The left arm will take considerably more work. The arm will essentially mirror the right, while the forearm will swing slightly away from the body, gesturing. The arm has already been sectioned mid-bicep, and has been tentatively "assembled", now awaiting final positioning.

Modifications to the left hand have already begun. The right hand will remain essentially stock though it will be reworked and redetailed as called for.

That's about it for now. Images will follow sometime next week: I don't want to lose the momentum, and things are somewhat hairy at work with month-end coming up.

27.08.2009
A flurry of activity in anticipation of the weekend. . .

The left arm is now completely roughed-in and positioned. With the leftover MS, I began to rough-out the collar build-up. The collar appears to be the lynchpin article in this project: the difference is striking!

30.08.2009
"Best laid plans. . . " and all that. This weekend got kiboshed by end-of-month work 'stuff', so time at the bench was all but eliminated. Still. . . the two arms are now all-but-done (NOTE: there was a bit more work than anticipated on the right arm--all good). And the mods to the upper torso--save for the cravat--are all roughed in.

All that really remains to be done are the keys, the cravat, the buttons (all 26 of them), and the pleats on the back of the frock.

Gettin' there. . .

22 August 2009

Monarch Nosferatu--Intermezzo: The Keys

With the head all but done; and the legs reduced, roughed-in and re-positioned, I am now able to get a preview of what the final piece will look like. Still rough, but a preview nonetheless.

This revealed a shortcoming that some might consider relatively minor, but which I feel limits the presence and atmosphere of the piece: namely, the keys. Kudos to Monarch for providing [seven] individually- and finely-cast keys (!); the problem revolves around the fact that they are all the same size--and undersized at that. Thus, they all fit perfectly on the "key ring", giving one the impression of an orderly janitor/building superintendent who took it upon himself to re-key all the locks!

I have been unable to shake this latter image for about a week, and I finally decided that I would rework the keys. I have yet to do the first key (there will be between seven and ten), so I don't know if I am going to do each one individually; or if I will make a master key, put it into rubber, and cast the required number of copies. Unless it is inordinately time-consuming (or boring!), I will attempt the former approach.

More to follow. . .

13 August 2009

Monarch Nosferatu

I've been playing with this one since I received it (Monday), and all the subassemblies have been assembled and the working-out has begun. To date, this has been an absolute joy, and it would receive my most emphatic and enthusiastic recommendation as a first-kit for anyone who wants to experience a little of what it was/is to be a "Monster-Kid"!


15.08.2009
To date. . .

As I mentioned, the subassemblies have been completed since Thursday, and I have been playing with the pose since then. Not exactly the easiest thing in the world considering the piece is hollow, but a few things were revealed--most importantly, the right leg is significantly longer than the left! This is easy enough to fix, whichever way one chooses to go about it.

With that done, the next step was filling the subassemblies with PUR. Once that was done, I drilled and pegged the legs and boots. Now any repositioning can be done with a fair degree of certainty. The repositioning of the legs will be relatively minor; the arms, quite the contrary!

18.08.2009
A few 'bites by way of progress made. The head is now well underway. The main enhancement has been the addition of the sleeping cap. This is turning into quite the project as there are limited views of the item in question. Thankfully, my experience with sculpting Renaissance headwear will come in very handy.

With the cap blocked-in, it was time to start reworking the face. First step: removing the ears. Next step was fleshing out the face a bit more. Save for his nose, Shreck's actual face was enhanced relatively little for his early scenes, hence it is more of a straight embellishment of portraiture.

Finally, with the left over putty, I began to enhance the "hump". This will lead to a more natural relocation of the arms and achieving the characteristic "no neck", hunchbacked look of Orlok.

22.08.2009
Much has been accomplished in the last four days. The head is now all but done. More importantly, the legs have been entirely reworked and repositioned.

Monarch is to be applauded for their design of the legs/feet: the boots fit into a cuff recess of the pant leg, providing not only a positive fit which still allows for some minor adjustment by the modeller if deemed necessary; but creates a convincing undercut. The problem lies in that the pant legs are stirruped and the stirrups are attached to. . . what? The second problem is that the essentially featureless legs are significantly and noticeably roomy--think tuxedo trousers.

I thought I could solve the problem by stovepiping the distal portion of the legs and introducing some much needed "landscaping" (i.e., drapery). By the time I was half-way through the reduction of the right leg, I had broken-through to the PUR filler in so many places that I decided to strip away the polystyrene shell completely. . .

Now I have two replacement legs made of PUR. While I will have to essentially resculpt both legs (reduce and "landscape" the PUR cores), the end result will be a significant improvement over the stock items.

That just about wraps-it up for this installment. As a sidebar note, these are enhancements and modifications that I feel are necessary to realize my vision of this subject: OOB, this would be a worthy addition to ANY collection.

09 August 2009

"Bride's head Revisited"

After a somewhat less-than-sure start, I can see the light at the end of the tunnel! The face is now about 85% done and I couldn't be more pleased!!

As anyone who has attempted a likeness of Elsa Lanchester knows, this is advanced portraiture! Few if any of the commercial likeness truly do her justice: most appear to rely on one one or two trademark features to carry the day. In her role as the Bride, this is usually pared down to her hairdo and her eyes and/or full lips. But while these provide three of the four critical anchors for the exercise, they alone will not provide a convincing likeness.

I hope to be able to post images of the all-but-completed face by week's end. If all proceeds as planned, all that will remain to finish the head will be reworking the hairdo. It is the tousled fullness of the latter that provides the keystone to the alluring beauty that it frames.

07 August 2009

The week of 8/3. . .

1) "Bride's head Revisited". I can't take credit for this brilliant pun: dear friend and colleague--and lurker!--Rich cracked me up with this inspired comment in an email today. But yes, the work on the BoF's head progresses, and I believe I'm just about at the turning point of the exercise. I'll know more in a few hours. I'll try to get photos up in the next week or so. . .

2) After much going back and forth, I broke down and ordered Monarch's 1/8th scale Nosferatu. This kit has been the rave of the Aurora-philes and has been touted as the "true" successor of the Aurora Monsters series. Personally, I don't know if this is a compliment or not; but the kit has obvious potential, and since it appears that it may not be readily available for much longer (and prices for the original release are already beyond the 100% markup), I decided to add it to the styrene army.

PS--Item received today (10/08/09). With the collectible glamour firmly in place in the original release, I went for the "Frightening Lightning" glow-in-the-dark version of the kit. And why wouldn't I? No, I never liked the glow-in-the-dark versions of ANY kit. . . (collective gasp), BUT in this instance, one gets a full kit with select duplicate parts in glow-styrene. The best of both worlds AND an at-hand supply of spare parts! Full review to follow in the days to come. . .

3) Ordered Sideshow Collectibles' second rendition of Schlitzie the Pinhead from the Tod Browning classic, Freaks (1932). This is a long OP kit (released in 1998) that is a classic in GK-dom. Of the two, this is a vastly superior likeness of this gentle soul.

PS--Item received today (08/08/09). Though the casting as a whole was somewhat less than I had anticipated, my experience with bonded porcelain/marble should make short work of most of the shortcomings. All in all, I am very pleased and very happy to add this piece to my collection. Once the corrections and touch-ups are completed, this will be my first selection for a pure painting project.

4) Dusted off (literally!) my IP, 1/10 portrait bust of Filippo Buondelmonte degli Scolari, better known as "Pippo Spano". The historical midges are beginning to swarm and this is a near-perfect subject to bridge my current interests.

And that wraps it up for what has been a trying and draining fortnight. Hopefully things will normalize soon, and I can return to regular sessions at the bench.

01 August 2009

Dark Horse 1/8 Bride of Frankenstein

The so-called Bride of Frankenstein--as we all know she was intended to be the mate of the Monster--is one of my favorite Universal Monster characters. It is certainly my favorite of the Universal Monster films of the "Golden Age".

I already have GEOmetric's 1/4 scale bust of the Bride in-progress on the bench. Yet ever since I decided to immerse myself in my own version of a "Monster-Fest", I've been looking for a full-figure of the Bride. Yes, of course I have the Aurora classic (the PL reissue); but I was looking for a gowned Bride. The Horizon piece I don't care for at all; the Billiken offering, while arguably the best likeness of Elsa Lanchester, also doesn't do much for me, which is just as well as it damn near impossible to find and priced as a collectible. That leaves but one in 1/8th scale or larger: plainly, the full-figure selection is slim, and I, in fact, had resigned myself not to have a full-figure of the Bride in my "portfolio".

The other day I stumbled upon the opportunity to acquire a MIB Dark Horse 1/8 BoF cast in bonded (cold-cast) porcelain. In total candor, I like this kit little more than the ones mentioned above. But as the subject is not likely to be redone--and even if it were, who knows what would be foisted upon us--I decided to take the plunge after considerable deliberation, not lightly influenced by the most generous asking price.


So, what do we get for our money? Nothing less than a superbly cast, meticulously packaged figure comprised of 9 cold-cast porcelain pieces: 4 for the figure; 5 for the scenic groundwork (which will not be incorporated in my rendering). A couple of observations if I may: 1) The one-piece body is hollow/roto cast! This zero-compromise weight- and medium-saving measure is to be applauded; however, securing the figure to the base may prove problematic. And 2) Based on the Aurora-like instruction leaflet, this figure was originally [to be] produced in vinyl: I was not aware of any vinyl DH products.

And now for the subject of this kit. As I mentioned above, I do not particularly like this kit. Why? Very simply, the head/face is a very poor likeness of the subject. The sculptor, Michael Trcic, is an extremely talented artist with solid Hollywood credentials, so he was either off his game; this is really not his cup of tea; or the licensors (Universal) ensured that the likeness was off. The presence of jagged, broken dentition suggests the latter. In any case, I am currently remodelling the face with the goal of achieving a recognizable likeness of Ms. Lanchester.

Back to the bench!

03.08.2009

PS--I failed to mention that there is another aspect of this kit that might put some miniaturists off: the gown has an uneven grainy texture. I can't imagine that this surface texture was reproduced in vinyl IF this kit was ever released in that medium. I suspect that this was added to aid with the drybrushing of the kit: a "white" gown (I'll call it "white" for now) in this scale with a smooth surface and convoluted drapery would be a deal-breaker for most miniaturists of the genre. In any case, annoying yes, but if I can't find a way to work work around it, it will remain. UPDATE--I have begun to reduce the surface texture as, no matter how I attempted to rationalize its presence, there was no way it could be painted around. My approach will be broad-to-specific: I intend to begin with a general surface clean-up, followed by dividing the gown into 1-2" squares, and finishing each square in an orderly fashion. Once I get the overall texture reduced to a manageable relief, I will probably resurface the entire gown with glazing putty prior to the final finishing sanding. Stay tuned. . .

14.08.2009

If you are ever faced with having to surface-finish a heavily contoured surface, you can do no better than doing your gross reduction with Scotch-Brite's Heavy Duty Hand Pad #7440. I was beginning to doubt whether I could ever get the surface of the gown reduced to even a reasonable smoothness when I ran across the aforementioned product. Impregnated with a medium-grit AlOx abrasive, this will mitigate much of the pain and frustration of removing all the ill-conceived texture. My only caveat would be go slowly: this will remove A LOT if one is not careful!

Back to the bench!