First of all, while certainly "presentable" as provided, my patronage of Eaglemoss is driven by my desire to acquire depictions that "strike a chord" of my favourite comic book characters at extremely reasonable prices with the intent to strip and repaint the subject. Let's face it, what is more cost-effective: a US$15-20.00 80-85mm pre-paint; or a US$65-70.00 65-75mm poorly cast and designed kit?
First up. . . Hawkgirl! Growing up, Hawkman and his lady wife and/or companion were one of the few characters that would have me cross into DC territory. They were not only cool looking, but they were armed with ancient/medieval weapons! What more could one ask for?
But I digress. . . Eaglemoss's Hawkgirl is their 63rd DC release (you can get an idea of what you get here). Ironically, this is the poorest example of an Eaglemoss figurine I have received to date: the paint job was well below average, there were glue-streaks on the figure, and the spear arrived broken. The first two are non-issues as the figure will be stripped; the latter come to think of it, is a non-issue as well, as I always intended to replace the spear. So. . . no harm, no foul.
Eaglemoss is very conscientious about cautioning the prospective buyer that these are LEAD figurines! Well, they might contain lead, but the alloy being used is significantly harder than the Marvel kits I have been working on during the second half of the year! RE: health concerns, anyone who has been in the hobby for over 25 years has handled a LOT worse: just use common sense and follow best- modelling practices. These figures obviously contain lead, but no more than the most popular--and common--casting alloys of the 80s and early 90s.
AND. . . this is a multi-media kit! As I was agonizing how to best separate the figure from its base, and the wings from the figure (the spear is provided separately), I discovered that the DC-logo'd plinth and the wings were cast in polyester resin! What might have been a 2-3 hour job was completed in less than 20 minutes! And I found but a single(!) air bubble on one of the wings. The figure is now ready for stripping, clean-up, and detail enhancement!
Before closing, this offering measures 80mm to the eyes.
More to follow!
FOLLOW-UP. . . The figure is now stripped!!! While I will elaborate in the days to come, I just wanted to point out yet another [WELCOME!] surprise: the cheek pieces on the helmet are custom-cut shims of brass individually epoxied/Gorilla-glued? in place prior to painting! This degree of attention to detail on a "mass-market" pre-paint? Boy, is our industry behind the pace!!!

29 December 2010
Eaglemoss???
Allow me to cut to the chase. . . I am a huge fan of Eaglemoss. After the arrival today of my latest acquisition, I can say I am an ardent fan of Eaglemoss!
For those of you not familiar with this UK publishing house, Eaglemoss is a partworks publisher. At its simplest, partwork is like a Time-Life series where the publications are "magazines" (more at folios), usually accompanied by a cover-mounted item, which over time will yield a complete set or complete object. While I cannot give you an American example, there are notable part- work publishers in the UK, Italy and Spain.
I've never been very big into the partwork scene--if only because the quality of the cover item is usually quite sub-standard. Enter Eaglemoss. This publisher is producing under license a series of DC and Marvel collectible pre-paints averaging 80-85mm in height that are really quite remark- able--all the more as the average item upon release will retail for less than US$15.00(!), and remember that includes a 20pp profile of the featured character. Now, in today's hyper-inflated figure market, where can you find an 80-85mm figure--to say nothing of a decently sculpted and cast 80-85mm figure--for less than $15.00???!!!
For those who are interested, I will let your fingers do the Google-ing. There are LOADS of sites devoted to these little gems. Feeling less inquisitive? Try Eaglemoss's Classic Marvel Figurine Collection or DC Comics Super Hero Collection.
I am currently the "proud" owner of six releases: 4 Marvel and 2 DC. In the days ahead, I will review my latest acquisition: Hawkgirl, and the surprises therein. . .
28 December 2010
Ragin' Cajun -- UPDATE (4)
I was hoping to be a bit further along than I am, but "tis the Season" indeed. . .
As I said in my last update, the clean-up and re-detailing are not going to end any time soon. . . BUT they will end, and progress IS being made.
The overall clean-up is essentially done. I am still struggling with re-scribing the seemingly de-rigeur "bands" on Remy's boots (what is it with all the "banding" on comic book costumes?), but I'm almost there. Otherwise, the legs are all but done.
I am still hoping to have the figure ready for priming by the end of the weekend, though I don't imagine it will get primed 'til next week some time. . .
Until then, my best wishes for a safe and Happy New Year's celebration, and all the very best in 2011.
20 December 2010
Ragin' Cajun -- UPDATE (3)
By way of update, clean-up and re-detailing continue. It's not going to end any time soon. . .
I have reworked the waist-belt so that the left third is now an add-on piece. Time well spent, as it would probably not have survived the first couple of days of painting. The head, after reworking the coiffure to my satisfaction (definitely a short-cut expedient on KM's part as provided!), is now permanently attached and the neck reworked to account for the re-positioning. I had to resculpt the index finger of the left hand (using ProCreate) after losing it in a pre-attachment dry-fit run of the bō and left arm. Finally, the legs are well on their way to completion, and I hope to have them wrapped-up this weekend.
Back to the bench. . . !
FOLLOW-UP. . . Left hand completed and left arm permanently attached and drapery adjusted. Save for final finishing and spot re-detailing, torso is now all-but-done.
18 December 2010
Holiday Greetings '10
Do as I say, and not as I do. . .
Take some time for yourselves this Holiday Season, and plot out a new project; or make some inroads on an ongoing venture; or simply wrap-up that poor soul that has been desperately clamoring for completion!
But above all, enjoy whatever time you have with family and friends. We're less than a fortnight away from wrapping-up the first decade of the 21st c., and, depending on your perspective, it just keeps getting more and more "interesting"--or downright scary. . .
And with that, I would like to take this opportunity to wish the readership a joyous, restful, peaceful--and, yes, productive!--Holiday Season; and a healthy, happy and prosperous New Year.
MERRY CHRISTMAS
HAPPY HANUKKAH
FELIZ NAVIDAD
BUON NATALE
FRÖLICHE WEINACHTEN
JOYEUX NOËL
S'ROZHDESTVOM KRISTOVYM
SUNG TAN CHUK HA
WESOŁYCH ŚWIĄT BOŻEGO NARODZENIA
Augie
16 December 2010
Ragin' Cajun -- UPDATE (2)
I would say that the putty-work--save for minor touch-ups and "seam swipes"--can now be deemed done!
Over the last couple of days, I have all-but-finished the surface finishing of the trench coat (save for the sleeves/arms), AND added the three-piece waist-belt. Surface finishing of the metal has tentatively begun, employing a coarser buffing pad and burnisher. A lighter touch while using the latter underscores the softness of the metal!
At this rate, this piece might be primed by the first week of the New Year. . .
14 December 2010
Red Skull--FINE
Not quite, but close enough. . .
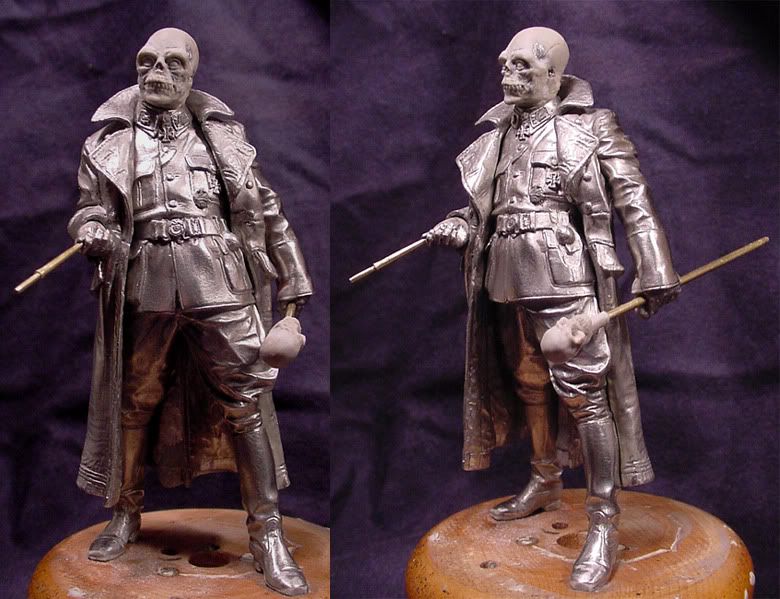
There is still quite a bit of fine detailing and finishing to be done (and, yes, the holstered pistol and the shoulder boards have yet to be added), but these minor tweaks would hardly be noticeable in a digital image unless it were a detail shot. So, as I head off to the bench, I leave you with the "Red Skull". . .

There is still quite a bit of fine detailing and finishing to be done (and, yes, the holstered pistol and the shoulder boards have yet to be added), but these minor tweaks would hardly be noticeable in a digital image unless it were a detail shot. So, as I head off to the bench, I leave you with the "Red Skull". . .
Smart Max has gone BIG! -- Follow-Up
Smart Max has just announced the release of their third 1/12th scale (150mm) offering: Hauptsturmführer Konrad von Kardsten. Much like Captain-Deacon Zaitseva, this piece is in their Mauser Earth range, and it is an up-scaled derivative of their original 1/35th scale offering. I'm gonna have to try to get a hand's-on look at this one at the upcoming Show as it offers many possibilities. . .
Having said that, I was hoping the next 150 would have been from the Smog 1888 range. When I asked Cedric about it on pF, he did not respond. . .
Having said that, I was hoping the next 150 would have been from the Smog 1888 range. When I asked Cedric about it on pF, he did not respond. . .
12 December 2010
Red Skull--Update (2)
I'm roughly on-track with this one, though given what lies before me, I don't expect to have him primed before the Holiday weekend. In any event, began the detailing of the corrected boots this afternoon, as well as working on the collar patches and the badge to the right of the Eisernes Kreuz, 1 Kl.
The right collar patch has had the Sigrunen removed to be replaced with a Totenkopf on a red background--this has no historical precedent AFAIK. The left collar patch has been converted to represent the rank of Oberst-Gruppenführer, again with a red background. The General Assault Badge is being "converted" to an Anti-Partisan Badge: how well I succeed is yet to be seen. I chose the BA as I felt its design not only [strongly] alluded to HYDRA, but incorporated a skull--as well as reflecting the historical canon.
Back to the bench!
UPDATE 13.12.10. . . The Red Skull should be ready for priming by the weekend: all the insignia, awards, and decorations are now done! And the left arm has been attached and 'filled'--quick swipe of MS will do ya. I still have to "update" the shoulder boards (cast separately), but these can be set aside until an opportune moment arises. Aside from that, all that remains to be done this week is final finishing and giving the figure a thorough once over. . .
Bring on Le Diable Blanc !!!!!!!. . .
PS--In case anyone was wondering, the RK has been enhanced with oak leaves and swords.
Thumbnails
This might be old hat to most, but given the number of visitors we attract on a daily basis, I think it might be worth highlighting.
The majority of images you see on the blog are "thumbnails". No, not your classic thumbnail, but thumbnails nonetheless: smaller versions of the original image. The blog limits the user to a width of 400 pixels. This might be sufficient--and it has indeed proved itself to be so--on standing figures smaller than 120mm, give or take, with relatively small footprints; but for everything else, it is woefully inadequate.
Not a problem! In those instances where I feel a 400-pixel wide image is insufficient, I simply link the thumbnail (350-400 pixels wide) back to the source image. How do you know if the image is linked? Simply run your cursor over the image and if the arrow changes into a hand with an outstretched index finger, it's a linked image! Click on the image and you will be taken to the full-sized image.
Now, depending on the dimensions of your monitor, you might have a reduced-sized image before you. In these instances, when you run the cursor over the image, you will see the arrow change into a magnifying glass with a + sign in it: click on the image and it will go to full-size.
If you have any problems, please don't hesitate to comment.
ENJOY!
Augie
Vampire Bat (I)-- Priming
As I won't know day-to-day when I will have the opportunity to string a thread of meaningful posts together, I am going to [try to] break these sbs's down to their structural components. Thus, step 1 is Priming, and the Vampire Bat is now ready to accept the acrylic undercoating. . .

11 December 2010
On to Acts I. . .
The overtures are completed for two of our protagonists (with two waiting in the wings), so as stages are prepared for the respective first Acts (bka undercoating), I just wanted to let you know that the "Vampire Bat" and "Doom" are now primed, and curing. If it's not too cold or humid tomorrow, I might start blocking-in some acrylics. . .
10 December 2010
Doom TOO???
It goes without saying that not only will this be a 201? project; but that it will not involve the source of the travails I have yet to put behind me. . .
I was spending some time on eBay the other day, when I ran across Verlinden's 120mm "Eve before the Battle" (#1356) in their Agincourt series. . .

I'm sure most of you can see where this is going. . .
As a man-at-arms/knight of the period--much less a protagonist at Agincourt, there is no way I can recommend this piece. But as the basis for an extreme "makeover" into the Lord of Latveria, it has potential to spare!
The casting was on par with what we have come to expect from Verlinden, perhaps even a little better! The resin quality is certainly a noticeable improvement--and clearly some thought went into the engineering and design! The self-contained vignette is comprised of 29 pieces (including two printed maps) + a sizable chunk of proportionate groundwork--very nicely done, btw! 14 of these have already been culled, 8 of which will end up in the spare parts bins along with the base.
I am rather excited about the promise evinced by this kit. We'll see how things unfold. . .
FOLLOW-UP. . . While waiting for some putty to cure, I began the general clean-up, more at familiarizing myself with the kit. Most of the "block" sprues have now been removed; and the camp chair, the future throne, cast in two halves (r & l), has been assembled. To this point, no real surprises or revelations.
The main hurdle before me is deciding whether to add bulk to the armour. This is a tricky propo- sition, as increasing the surface area of the plate could effectively distort the proportions of the figure. Still there is a happy medium: the question is whether it is worth the additional effort. . .
I was spending some time on eBay the other day, when I ran across Verlinden's 120mm "Eve before the Battle" (#1356) in their Agincourt series. . .
I'm sure most of you can see where this is going. . .
As a man-at-arms/knight of the period--much less a protagonist at Agincourt, there is no way I can recommend this piece. But as the basis for an extreme "makeover" into the Lord of Latveria, it has potential to spare!
The casting was on par with what we have come to expect from Verlinden, perhaps even a little better! The resin quality is certainly a noticeable improvement--and clearly some thought went into the engineering and design! The self-contained vignette is comprised of 29 pieces (including two printed maps) + a sizable chunk of proportionate groundwork--very nicely done, btw! 14 of these have already been culled, 8 of which will end up in the spare parts bins along with the base.
I am rather excited about the promise evinced by this kit. We'll see how things unfold. . .
FOLLOW-UP. . . While waiting for some putty to cure, I began the general clean-up, more at familiarizing myself with the kit. Most of the "block" sprues have now been removed; and the camp chair, the future throne, cast in two halves (r & l), has been assembled. To this point, no real surprises or revelations.
The main hurdle before me is deciding whether to add bulk to the armour. This is a tricky propo- sition, as increasing the surface area of the plate could effectively distort the proportions of the figure. Still there is a happy medium: the question is whether it is worth the additional effort. . .
09 December 2010
ATLANTA 2011--FANTASY CATEGORY: Update (3)
The Show site has been updated as of today, so everything is more or less in place. To get to the site, simply click on the Show banner at the top of the page.
Hope to see you there!
Hope to see you there!
07 December 2010
Doom's Overture
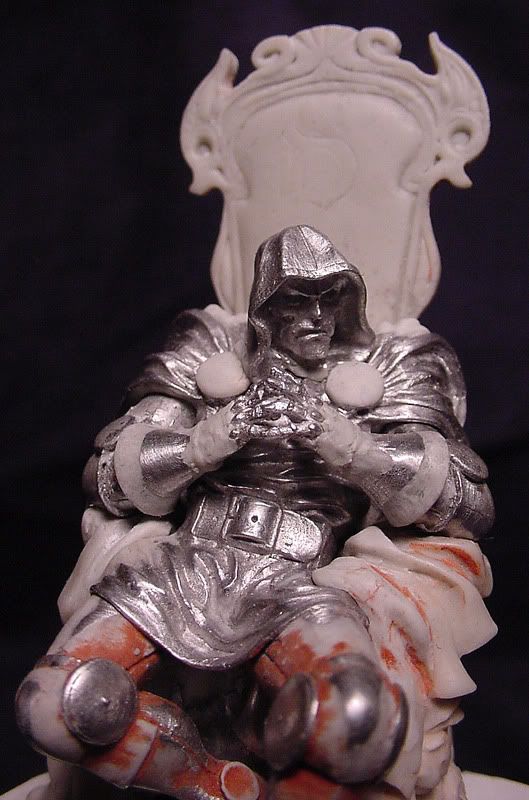
I give you. . . VICTOR. . . VON. . . DOOM. . .


All that remains to be done is some detailing on, and final finishing of, the gauntlets and arm harnesses. Priming will occur in the next week.
In the meantime, while most of the work done is relatively self- evident, should you have any questions please feel free to ask. That which is not altogether clear will be revealed when I post the primed sub-assemblies. Finally, those of you familiar with the character--or with a very sharp eye--will notice that I removed the crudely-modelled twisted "rope" connecting the clasps, to be replaced by scale chain.
06 December 2010
Kelley Jones' Vampire Bat-PAINTING
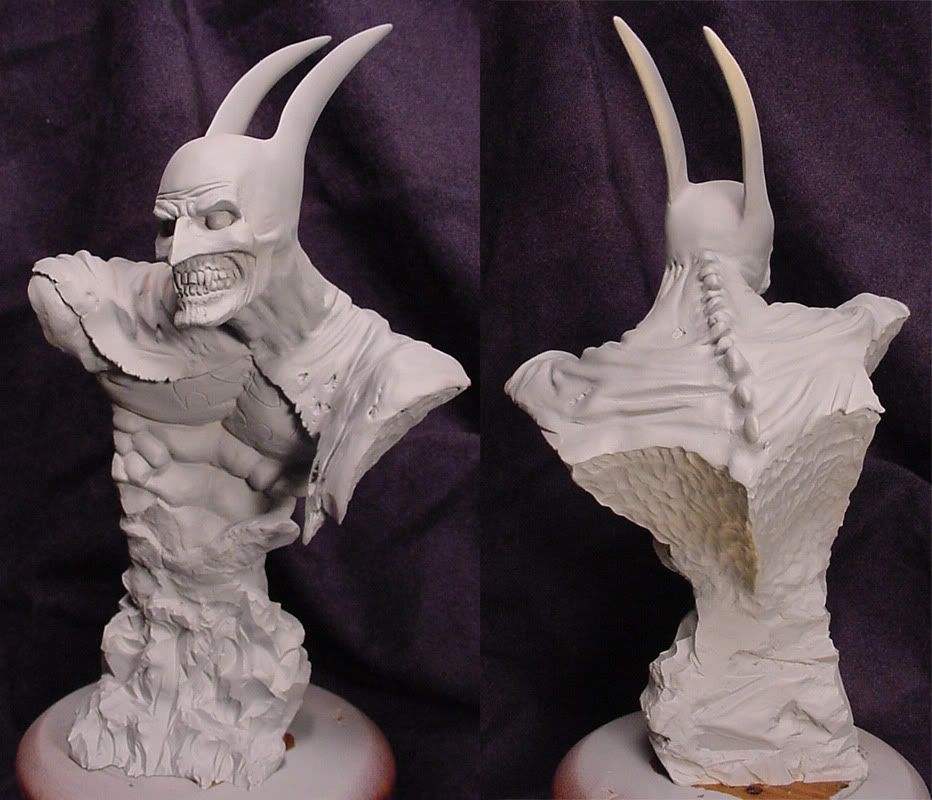
As priming will not be done until the weekend--later in the week at best--I thought I'd get the ball rolling with images of the pre-primed bust. . . Consider this the overture to what is to come. . .


As I mentioned earlier, the only real modifications to the stock piece was the reduction in height of the base, and the adjustment of the attachment of the bust--and thereby the "pose"of the bust--to the same.
As I mentioned earlier, the only real modifications to the stock piece was the reduction in height of the base, and the adjustment of the attachment of the bust--and thereby the "pose"of the bust--to the same.
PAINTING SEASON HAS BEEN OFFICIALLY DECLARED OPEN!
04 December 2010
Doctor Doom -- UPDATE
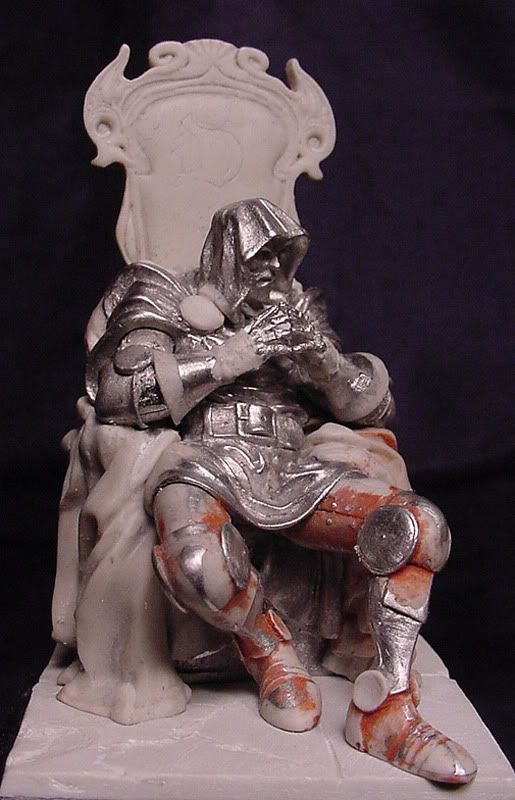
Save for the usual touch-ups, etc., the putty work on Doom is done!
All that now remains to be done before priming is attaching the right leg to the body. The reworked gauntlet cuffs still have to be finished; but since the arms are to be painted pre-attachment, once I confirm the fit, I can set these aside until the time comes.
What will have to be done prior to priming is the groundwork. Since there are no mounting pegs on the throne itself , the assembled piece will be secured by a central brass rod into the body, and the slight indentations of the outline of the throne on the MS ground- work.
I'm about half-a-day behind schedule--priming is slated for next weekend, give or take.
FOLLOW-UP. . . The "groundwork" has been roughed-in using MS, and the assembled seated figure set upon it so as to leave an impression. Once the MS is cured, the "groundwork" will be surface-finished and detailed. Almost there. . .
FOLLOW-UP (2) . . . The "groundwork" is DONE! And with that, once the final once-over is completed, the figure will be ready for priming.
The gauntlets are all-but-done; just some minor touch-ups and final clean-up remaining. . . Back to the bench!
What will have to be done prior to priming is the groundwork. Since there are no mounting pegs on the throne itself
, the assembled piece will be secured by a central brass rod into the body, and the slight indentations of the outline of the throne on the MS ground- work.I'm about half-a-day behind schedule--priming is slated for next weekend, give or take.
FOLLOW-UP. . . The "groundwork" has been roughed-in using MS, and the assembled seated figure set upon it so as to leave an impression. Once the MS is cured, the "groundwork" will be surface-finished and detailed. Almost there. . .
FOLLOW-UP (2) . . . The "groundwork" is DONE! And with that, once the final once-over is completed, the figure will be ready for priming.
The gauntlets are all-but-done; just some minor touch-ups and final clean-up remaining. . . Back to the bench!
Ragin' Cajun -- UPDATE
Remy's head, which is provided as a separate piece with a rather tenuous attachment, has been pinned, the collar hollowed, a neck added to the head with MS, and the head repositioned. . . everything has finally come together!
02 December 2010
Spidey Noir in 2011
You might recall my less than enthusiastic review of Pegaso's 90mm SS-Sturmbannführer of Artillery, 2nd SS Panzer Division ''Das Reich'', France 1944 in my introductory posting to the Red Skull project. Well, today I received a "used" kit of the same subject from a trusted friend and colleague, and the differences are overwhelmingly obvious! I won't launch into a well-worn rant, but what has the hobby come to when you have to pay more--and get less!!!--with a late-run casting? Maybe this "driving" (as in hunting) approach is the latest marketing theory (read: ploy) in order to recapture the initial investment as quickly as possible. . . 
Be that as it may. . . I acquired a second Sturmbannführer as it will serve as the base for a somewhat more ambitious conversion: Spider-Man Noir. This project is green-lighted for next year, and I am very much looking forward to seeing this one unfold.
More on Marvel's Noir alternate reality (S-mN is set in 1933-34) when the project is launched; but in the meantime, those not familiar with this setting can check out the usual sites, or simply Google "Marvel Noir" or "Spider-man Noir".
01 December 2010
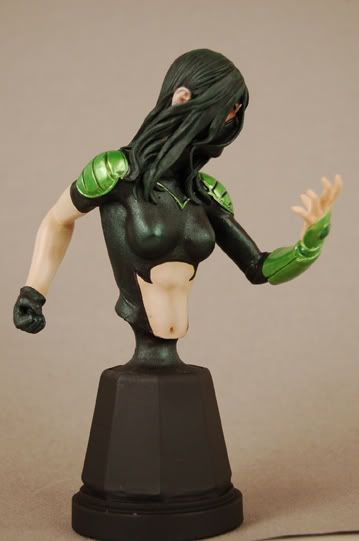
The Scorpion (Carmilla Black)
I'll keep this short and sweet, but I just wanted to share with you that I have just received a bust of Marvel's female Scorpion, Carmilla Black (picture), from the same source as the Jones "Vampire Bat".
As with the latter, this five-piece bust is cast in my favourite PUR and the casting quality is a solid A. Only one or two spots require extra-ordinary attention and these are quickly dealt with.
As this will be a 2011 project, I intend to make a few minor changes/additions here and there; and I am considering reworking the left arm to depict an expanded gauntlet--but more on this when the time comes.
Back to the heel plates on Doom. . . !
30 November 2010
Doctor Doom -- Home Stretch. . .
Just something to tide those who are following this thread over 'til the weekend. . .
THE THRONE IS DONE!!! Anyone who is intimately familiar with the kit knows that the kit is now dry-assembled. I might have a few tweaks remaining here and there, but for all intents and purposes, it is done!
All that remains to be done is finishing the lames on the right sabaton; heel plates and "besagews" on both sabatons; and attaching the right leg to the body. I hope to have all this done over the weekend; but I have a feeling priming will have to wait until sometime next week.
Almost there. . .
28 November 2010
Ragin' Cajun. . .
. . . is on the front burner once again. Updates will now follow on a more regular basis.
26 November 2010
Doctor Doom (III)
Since then, I have finished all the prepwork on both sides of the throne/cape, and all but completed the left sabaton--still have the heel cap to do. The gauntlets are about 70% done, give or take; but they shouldn't take longer than a weekend to finish.
If I can get the left leg and the right sabaton completed this weekend, I should have this piece ready for priming in 2-3 weeks.
FOLLOW-UP. . . The head has been permanently attached, and the figure clean-up is all but done. The final fitting and filling of the back of the throne, a most critical step considering that the back will have to be painted--at least undercoated--as a separate piece is well underway: I will hopefully have this completed before the end of the day tomorrow.
FOLLOW-UP (2) 28.11.10. . . The turning point of this project occurred earlier this afternoon: the back of the throne was permanently attached to the figure! It now "works": major sub- assemblies are reduced to three (plus the two arms), and all are inherently stand-alone stable.
As to my earlier statement that the back would "have to be painted--at least undercoated--as a separate piece", there is no doubt that in an ideal world that would be the indicated call; how- ever, given the problematic design and fit of this piece, I'd rather face some careful painting (conveniently calling for essentially self-shading complementary colours!) than the potential mishaps of post-painting assembly, etc.
The next posting should be graphic update of the assembled--and disassembled--piece, before and after priming.
Until then. . .
21 November 2010
ATLANTA 2011--FANTASY CATEGORY: Update (2)-AWARDS
Just received this from Dave Wiggins, the Show's PR Chairman, and unofficial "Fantasy Category Coordinator":
AMFS works on the Open System - so each participant has an opportunity to win a certificate, bronze, silver, or gold on their best judged work in each category entered. Additionally, an exhibitor may win a specialty award.
Fantasy Specialty Awards that have been added for this year's show are:
- Phoenix Award - best of category award - sponsored by Reaper.
- Horror Award - best judged modern or classic figure(s) or bust.
- Super Award - best judged hero, villain, heroine, villainess, or combination
- Reaper Award - best judged stock or modified Reaper figure(s)
- Games Workshop Award - best judged stock or modified figure(s) or model(s) - sponsored by Games Workshop
In honor of AMFS creating Fantasy as a separate category, Reaper will be awarding each of the first 200 participants a 3 pack of their award winning Reaper paints ($1600 value) as well as sponsoring the best of category, Phoenix Award. Games Workshop will be awarding an Emperor's Fist Tank Company ($300 value) and 3 Golden Demon tickets! AMFS is grateful for the strong support showed by these two fantasy giants.
As always, I would direct you to the Club/Show site for all the latest news, but this is a bit of a "scoop", and the Show site will not be updated for a week or so. So in the meantime, spread the good word, and. . . get to work!!!
17 November 2010
Kelley Jones' Vampire Bat
"The Many Faces of the Bat" is a very limited series commissioned by a private collector of 1/9th scale busts sculpted by Jim Maddox depicting the "Dark Knight" in five of his more famous—or infamous— guises, including my favourite—and the subject of this review and project—the Kelley Jones' Vampire Bat(man) from Crimson Mist, the third installment in the “Vampire Trilogy”.
The kit is comprised of four pieces: bust, two ears, and the pedestal base. It is cast in a high- grade, buff-coloured PUR—think Ft. Duquesne or UEM!—that is a dream to work. The casting quality is a solid A: the only reason it did not receive an A+ was due to a slight mold-shift along the right side of the bust. In the interest of thoroughness and full disclosure, I found but a single air bubble of any kind: this was at the base of one of the ears, hardly worth mentioning as it will not be seen once the ears are attached [MODELLING NOTE: despite its hidden nature, it should definitely be filled prior to mounting.]
By way of follow-up (20.11.10) the bust is now assembled, filled (business-as-usual fairing of the joins where the ears attach to the cowl), and in final finishing and clean-up. . . of which there is very little. In fact, I could very well have this ready for priming by the end of the weekend, but I prefer to let it "simmer" for a few days and then reassess. [UPDATE 28.11.10--Now ready for priming!]
So. . . have I reworked the kit in any way? No. . .and yes. I have not made any changes whatso- ever to the bust itself; however, I have reworked the pedestal base considerably. The base would work fine as is IF one accepted that it would serve as the display base as well. And that is unac- ceptable. Thus, the overall height of the base was reduced by at least a third and somewhat "squared" to fit on a 2 x 2 x 2 1/2 stained burl display pedestal. I also had to adjust the fit of the bust to its base. As provided, the bust was looking down: it was marginally acceptable using the base as it was; once reduced in height, the face was effectively hidden from view and in profile-- so what was the Bat looking at? I corrected this by reworking the attachment join of bust to base, effectively slightly repositioning the bust.
And that about wraps this up! THIS is what figure prepwork should be: short and sweet. My next posting will launch the painting of this piece, with before-and-after-priming images. Until then. . .
14 November 2010
Red Skull--Update
With a little over three months to the Atlanta Show, it is time to start finalizing projects (i.e., getting them to priming stage)--or putting them away until next year. . .
The Red Skull is one of the "finalists", and he is all but done. The skull handle on the swordstick has been modeled and is awaiting final finishing. The right hand has been pegged and fitted, and is awaiting finishing and the cigarette holder.In fact, the latter, along with the reworking of insignia and decorations, and the detailing of the reworked boots, is all the remains to be done before priming.
Maybe another 3-4 weeks before priming?
FOLLOW-UP. . . The cigarette/cigarette holder is now all but done: I "machined" it in one piece out of brass rod with a 1mm tapered burr on a cordless Dremel. I have also all-but-finished the right hand, including fitting the cigarette holder.
The Red Skull is one of the "finalists", and he is all but done. The skull handle on the swordstick has been modeled and is awaiting final finishing. The right hand has been pegged and fitted, and is awaiting finishing and the cigarette holder.
Maybe another 3-4 weeks before priming?
FOLLOW-UP. . . The cigarette/cigarette holder is now all but done: I "machined" it in one piece out of brass rod with a 1mm tapered burr on a cordless Dremel. I have also all-but-finished the right hand, including fitting the cigarette holder.
11 November 2010
ATLANTA 2011--Pre-registration Form
The 2011 Show pre-registration form is now available on-line.
While the Atlanta Show's registration process has undergone dramatic improvement over the years, registration remains the most tedious aspect of any show. Hence, I would strongly recommend taking advantage of this service.
Not sure of how many figures you will be bringing? Not a problem. Order a few (operative word, f-e-w) extras.
Any questions, etc. may be directed to the Show Chairman, who will forward them to the Registration Chairman.
10 November 2010
Olog-hai
This will be the last project I initiate this year, and its completion deadline is the Atlanta Show in February. More to follow in the days to come, including a full review of the base polystyrene kit; however, in hopes of whetting interest, reanimation is all but done, and assembly is now about 60% complete.
FOLLOW-UP. . . Just completed filling the body with PUR. The repositioning of the head and left (shield) arm requires are more secure anchor than PS pegs into a hollow cavity. No biggie--all in a day's work!
FOLLOW-UP (2) . . . All the "loose" pieces, save for the shield, have now been pegged. And the joins have been filled, though the pieces have not been permanently attached yet. This just about concludes Phase 1 preparations. . .
UPDATE . . . After serious consideration over the weekend, the list of pieces I hope to take to Atlanta has been finalized, and this piece, by virtue of the amount of work left to do, did not make the cut. Still, you never know. . . In any event, this project will be resumed in earnest after the Show.
07 November 2010
Doctor Doom (II)
BENCHNOTES (2) 06.11.10 The raw putty work has been virtually completed. The critical areas remaining to be finished are the gauntlets, the sabatons, and the right poleyn: everything else is 80% complete or better.
The throne has been squared, and the back finished. Painting strategy vis-à-vis assembly has yet to be finalized.
I estimate an additional 7-10 days of work before the figure can be considered ready for priming.
The throne has been squared, and the back finished. Painting strategy vis-à-vis assembly has yet to be finalized.
I estimate an additional 7-10 days of work before the figure can be considered ready for priming.
06 November 2010
Smart Max has gone BIG!
Our favourite purveyor of steampunk has just announced the release of their first two figures in 1/12th scale (150mm). As you can see, these are in their Mauser Earth range--in fact Captain-Deacon Zaitseva is an up-scaled version of their earlier 1/35th scale release.
Will there be similarly sized offerings in their Smog 1888 range. . . ?
Will there be similarly sized offerings in their Smog 1888 range. . . ?
04 November 2010
ATLANTA 2011--FANTASY CATEGORY: AFM Update
Just in from the Fantasy Coordinator:
"Our initial ad is at the bottom of page 68. . . "
I've yet to see it, but he adds: ". . . They doctored it up from what we sent in. "
Can't wait!
FOLLOW-UP. . . And here it is, courtesy of my good friend and colleague, Rich. . .

"Our initial ad is at the bottom of page 68. . . "
I've yet to see it, but he adds: ". . . They doctored it up from what we sent in. "
Can't wait!
FOLLOW-UP. . . And here it is, courtesy of my good friend and colleague, Rich. . .

31 October 2010
Doctor Doom (I)
First of all, a Happy All Hallow's Eve to one and all.
While the kit is definitely not worth salvaging, I can not see my way clear to throw away $75.00! And as I know if I simply put it away, it will never get built, I've decided to press on until I can go no further. Fortunately, I just received a resupply of MS last week!
Progress reports to follow as warranted. . .
BENCHNOTES (1) 01.11.10 The one virtually insurmountable hurdle to be overcome is the differential in shrinkage between the PUR and the white metal. This is not only the primary cause of the deplorable fit, but due to the non-keyed joins, makes it virtually impossible to assemble intuitively.
The basic structure is now assembled. It took over 4 sessions of buttressing the undersides of cape/throne sides with MS. It also demanded that the drapery of the cape be restored to what I presumed were its original dimensions, again with MS: the left side is all but done; the right awaits. Needless to say, the miniaturist best be thinking about how he or she will tackle the painting of this "puzzle", lest all this work--and all that remains--amount to naught!
The sabatons have been ground down, roughly shaped, and the right one repositioned. The poorly cast floor, useless as provided, will not be used. The mantle clasps have been redone: the left one in my sample was missing a section of the turned edge: so much for quality control. Which is just as well as Doom's clasps were not turned! The gauntlet cuffs have been beefed up, and now await finishing.
Before closing for the day, should you venture to acquire this disaster, the key to it all is the back of the throne. Figure out what you're supposed to do with this, and everything will more or less begin to come together. . .
BENCHNOTES (1a) 01.11.10 I have just completed fitting the back of the throne to the assembled 3-pcs. "structure" described above. As there is a considerable gap between the back of the throne and the figure (cf. the green), the first thing I did was fill the hollowed back of the figure with MS. I then drilled two holes in the back of the throne, which when pressed into the MS, would create two male locater pegs. The assembled throne was then set aside to cure. Please note that this is but step one, albeit the most critical, of what will be a rather prolonged process to give the throne a finished look from any perspective.
29 October 2010
Knight Models' Doctor Doom (KMV018)--REVIEW
It has arrived (from The Red Lancers, of course)!!! Issue #56(!)/500.
I consider myself a somewhat experienced, logical miniaturist who can think "outside the box" (literally and figuratively) and overcome just about any problem that a manufacturer can throw at me. Well... either I have an overinflated impression of myself; or don't expect to see many Doctor Dooms on the show tables in the near future--if ever!
The kit is comprised of 11 pieces: 4 PUR and 7 white metal. The PUR pieces and one of the white metal pieces comprise the throne and floor; the balance of the white metal pieces make up the titular subject: head, torso, 2 arms and two legs. The metal casting quality is overall Good: for a new casting it is, at best, Fair; in one notable instance, Poor. The PUR castings are decidedly below average, with mold deterioration obvious and an unacceptable amount flash present. I will say that most of the molding problems point to a less than "finished" master sculpt and/or production prototypes.
The design is deplorable! Neither the throne nor the figure is a stand alone item: the figure has no back, the throne has no seat, and most of the voluminous cape is part of the respective arms of the throne!! What makes this worse is the fact that there is no way to assemble a PUR throne around a white metal figure and hope to be able to correct any mistake/s! And given the different shrinkage coefficients of the respective mediums, how can any manufacturer expect to reproduce the fit--to say nothing of a seamless fit --of the master? [NOTE: If you look closely at "the green", the master's fit was anything but seamless!]
This will be the last Knight Models release I will buy. This company desperately needs to reassess its production design and capabilities-- AND its quality control!--if it expects to capitalize its niche market position, to say nothing of survive. Unless, of course, their true target audience is the collector, not the miniaturist--which would explain a lot!!!
FINAL VERDICT: After spending most of the afternoon trying to find "the key" that would unlock the mystery behind assembling this kit and making it fit, and discovering a number of production deviations from the master, I have come to the conclusion that this is very possibly the worst designed kit vis-à-vis its production quality I have ever had the displeasure to have purchased!
Knight Models: you have lost a patron and a fan. In the days to come, I will decide if it is worth salvaging, or if I've just thrown away $75.00!
I consider myself a somewhat experienced, logical miniaturist who can think "outside the box" (literally and figuratively) and overcome just about any problem that a manufacturer can throw at me. Well... either I have an overinflated impression of myself; or don't expect to see many Doctor Dooms on the show tables in the near future--if ever!
The kit is comprised of 11 pieces: 4 PUR and 7 white metal. The PUR pieces and one of the white metal pieces comprise the throne and floor; the balance of the white metal pieces make up the titular subject: head, torso, 2 arms and two legs. The metal casting quality is overall Good: for a new casting it is, at best, Fair; in one notable instance, Poor. The PUR castings are decidedly below average, with mold deterioration obvious and an unacceptable amount flash present. I will say that most of the molding problems point to a less than "finished" master sculpt and/or production prototypes.
The design is deplorable! Neither the throne nor the figure is a stand alone item: the figure has no back, the throne has no seat, and most of the voluminous cape is part of the respective arms of the throne!! What makes this worse is the fact that there is no way to assemble a PUR throne around a white metal figure and hope to be able to correct any mistake/s! And given the different shrinkage coefficients of the respective mediums, how can any manufacturer expect to reproduce the fit--to say nothing of a seamless fit --of the master? [NOTE: If you look closely at "the green", the master's fit was anything but seamless!]
This will be the last Knight Models release I will buy. This company desperately needs to reassess its production design and capabilities-- AND its quality control!--if it expects to capitalize its niche market position, to say nothing of survive. Unless, of course, their true target audience is the collector, not the miniaturist--which would explain a lot!!!
FINAL VERDICT: After spending most of the afternoon trying to find "the key" that would unlock the mystery behind assembling this kit and making it fit, and discovering a number of production deviations from the master, I have come to the conclusion that this is very possibly the worst designed kit vis-à-vis its production quality I have ever had the displeasure to have purchased!
Knight Models: you have lost a patron and a fan
. In the days to come, I will decide if it is worth salvaging, or if I've just thrown away $75.00!
26 October 2010
Jack O'Lantern--Prepwork. . . continued
Just by way of update, I think I have all-but-completed roughing-in the replacement scales. I have not reworked the entire scaled jerkin. . . I would say about half, give or take. If I am indeed done, then I should be able to start final finishing this Halloween weekend. . . 

23 October 2010
News from Moebius!!!!!
It was announced at last week's iHobby Expo that Moebius will be releasing an injection-molded kit of Natalia Romanova, bka Black Widow, based on the Scarlett Johansson character in Iron Man 2.
http://culttvman.com/main/?p=14093
There will be a third Iron Man kit released along with the Black Widow, though I am surprised there was no mention of a War Machine offering. . .
Those who scroll down the entire on-site report will also notice the painted build-up of the new Dracula prototype. Apparently there will be a deluxe version of the kit that adds a female figure to the model. Obviously, the projected Halloween release date is not going to happen, but that's OK. . . 2011 is shaping up quite nicely.
FOLLOW-UP. . . Tooling on Dracula has begun, and a tentative release target is Q1, 2011. Hope to have a ballpark release date for Black Widow soon. . . UPDATE: BW is tentatively scheduled for a late Q1-early Q2 release. . .
16 October 2010
Knight Models' Doctor Doom (KMV018)
As I mentioned in a comment to an earlier posting, KM's October releases will feature--on the Marvel side--the ruler of Latveria, Victor von Doom, bka Dr. Doom.
The presentation is classic: a pondering Doom, slouched on his throne, hands steepled before him. The only thing that might have been better would be one arm across an arm of the throne, holding a bejeweled goblet. . .
But I digress. The drapery of belted tabard and voluminous cloak is extravagantly exquisite. And there is a wrinkled rug, that while defying logic, serves a masterful purpose.
Why then have I not already placed an order for this kit? Two reasons: the leg harnesses and the cuffs of the gauntlet.
I am not particularly taken with the shape of the sabatons; but there is a canonical provenance to the style, if not the mass. The leg harnesses, especially the left one, is a different story altogether: the cuisse does not line-up with the poleyn; and the medial ridge of the greave is not straight. The right leg harness suffers from its own shortcomings, though not as dramatic, if not simply less visible.
The cuffs of the gauntlet are simply nonsensical: massive forearms are reduced to wrists less than half their diameter!
If these kits were not €50 srp, I might consider buying one and putting it away for an inspired rainy day; but at over US$70 srp--before customs; shipping; etc.--that is too much money to acquire an unfinished product.
FOLLOW-UP. . . Just saw "the greens" (read: masters) of the two new Marvel releases, and while my appraisal has not changed one iota, my estimation of the piece's build-up potential has. The necessary corrections can be made relatively simply, and I now have this piece on order. . . Full, hand's-on review to follow. . .
04 October 2010
Jack O'Lantern--DETOUR!!!
I can hear the chorus of, "I KNEW IT!!!" echoing in my ears. . .
What can I say. . . ? I must be true to myself, and the aesthetics of the bust were driving me nuts! Some of you in the readership can pretty much guess what is about to follow, so please, no spoiling it for the rest.
Here goes. My issue was with the right arm. . .


[Images courtesy of KitKong Model Mansion]
IMHO, the bust was not only "flattened" by the 'third point' in the 180° plane; but once I reposed the bust, the right arm was effectively dissociated from the body.
There were two options: 1) crop the right arm to the triceps, following the line of the lats; or, remove the arm, section it, extend/straighten it, and relocate it on the torso. The minimalist in me immediately gravitated towards option #1; but it just didn't work. Or, rather, it created ambiguities in the subject of the work. Furthermore, whereas the arm gave the bust a "lopsided" appearance, the absence of an arm created a spatial void.
So option #2 it was. . . is! The arm is now sectioned, tentatively reassembled, and pegged to the torso. The arm opening of the scaled jerkin will have to be reconstructed around the repositioned arm. As to how I've repositioned the arm. . . pictures to follow.
What can I say. . . ? I must be true to myself, and the aesthetics of the bust were driving me nuts! Some of you in the readership can pretty much guess what is about to follow, so please, no spoiling it for the rest.
Here goes. My issue was with the right arm. . .
[Images courtesy of KitKong Model Mansion]
IMHO, the bust was not only "flattened" by the 'third point' in the 180° plane; but once I reposed the bust, the right arm was effectively dissociated from the body.
There were two options: 1) crop the right arm to the triceps, following the line of the lats; or, remove the arm, section it, extend/straighten it, and relocate it on the torso. The minimalist in me immediately gravitated towards option #1; but it just didn't work. Or, rather, it created ambiguities in the subject of the work. Furthermore, whereas the arm gave the bust a "lopsided" appearance, the absence of an arm created a spatial void.
So option #2 it was. . . is! The arm is now sectioned, tentatively reassembled, and pegged to the torso. The arm opening of the scaled jerkin will have to be reconstructed around the repositioned arm. As to how I've repositioned the arm. . . pictures to follow.
03 October 2010
Jack O'Lantern--Prepwork
As I mentioned in the lead post, I have already executed some mods on the bust. The most significant mod is lopping off the pedestal and reducing the height of the actual bust. Those of you who have known me for a while are well aware of my sensitivity to proportional aesthetics when it comes to busts. Add to this the fact that the pedestal was moderately distorted (common on busts with en suite pedestals!), and the dice were cast!
Since I would have to resculpt a pedestal, and the proportions of the torso would be altered, it was time to reconsider the posing of the bust as well.
Finally, the proportions of the flaming head simply didn't work for me. They were not bad, just not a "full" pumpkin. I wrestled with this one a bit, as I was strongly leaning toward resculpting the head and casting the flames separately in tinted translucent resin. But once the bust was reposed and the head repositioned, the head was a much better "fit". I am in the process of tweaking the proportions, but just so, effecting a minor enhancement along the lower "jaw".
Images to follow as soon as I get a moment. . .
FOLLOW-UP
The bulk of the work is now done. Next up:
- fitting the head (DONE!)
- cleaning up the scales; re-scribing or resculpting where necessary (already begun)
- attaching the arms and filling the joins
- fitting the pumpkin grenades--the fit is good, but the attachment shallow: I want to peg these to eliminate any surprises down the road. . . it will also give me something to put in the hand-vise during painting.
02 October 2010
KitKong's Model Mansion's Jack O'Lantern bust
I was recently referred to KitKong's Model Mansion and while browsing through their Villains section, I stumbled upon "Jack" (KKMM12). "Jack" is none other than Jason Philip Macendale, Jr., bka as Jack O'Lantern, but at one time or another also the Hobgoblin and Demogoblin.
The 1/6th scale "mini-bust" is sculpted by Chris Elizardo. It is produced in China in an interestingly tinted--lavender--cold-cast/ bonded porcelain, cast in 10 pcs. The piece is ably reviewed here on Monster Model Review #65. All I would add is that the castings are pre-prepped at the factory, thus eliminating a significant portion of the preparatory clean-up.
As I told James, the man behind KKMM, I am delighted with this kit, especially as I received considerably more than one might expect from the US$19.95 srp (yes. . . US$19.95!!!!). I have already executed some mods, with possibly more to come; but these are to satisfy my particular vision of the piece and the aesthetics of a bust, and not corrective measures demanded by sub-standard design or production. Quite the contrary!
I am now doing some general work on the piece. If I decide to throw this one in the ring at Atlanta, I will soon open a dedicated thread. But for now. . .
Back to the bench!
01 October 2010
Knight Models' Green Goblin (KMV016)
I must have stared at the box, surfed the web, scratched my head. . . well, you get the idea. . . for nearly an hour before taking a deep breath and finally opening my third Knight Models kit.
As I mentioned way back when, I have a select few must-have characters on my list. One of these is our friendly, neighborhood web-slinger's arch-nemesis, Norman Osborn, bka The Green Goblin. So when KM finally announced their release of this character, I was ready to let bygones be bygones, and throw my money in the ring one . . . more. . . time. . . Speaking of money, this is a very reasonably priced offering relative to what we've had to date, especially if you consider that you get a mixed media kit of the GG on his bat glider...
So, what do we get? I received issue #151/500, and if what was in the collectible tin is any indication, then ordering asap after the kit is released is key to avoiding any major disappointment/s! While not bowled over with the quality, this is a significant (!) improvement over my past experiences. The glider is cast in 7 pieces, with the major structures (4, including exhaust plume) cast in light-grey PUR. Going over it with a fine toothed comb, I found about 10 air holes, which are now filled and curing. More disconcerting was the rough, uneven surface of the glider body: KM needs to pay more attention to the surface finish of their masters and prototypes.
The figure itself--7 pcs., white metal--is not bad at all. It appears that a harder alloy has been used, and surface texture, though a little rough and crystalline, should buff out nicely. No significant pitting discerned as of yet, though there are indications of super-cooling and/or short pours--again nothing significant, though the locating pegs, feet-to-glider, will require some work.
All in all, after a moderately in-depth examination, I would have to give this one a solid B, maybe a B1/2+. KM is not going to rock the world with their castings, but you have to applaud their creativity and their passion.
PS--As I mentioned earlier, this is not your "classical" GG. This is the GG from the Marvel Knights' Spider-man arc. . .

While it might not appeal to the purists, I applaud KM's decision to offer this variant--especially as Moebius has pretty-much sewn-up the classic version.
As I mentioned way back when, I have a select few must-have characters on my list. One of these is our friendly, neighborhood web-slinger's arch-nemesis, Norman Osborn, bka The Green Goblin. So when KM finally announced their release of this character, I was ready to let bygones be bygones, and throw my money in the ring one . . . more. . . time. . . Speaking of money, this is a very reasonably priced offering relative to what we've had to date, especially if you consider that you get a mixed media kit of the GG on his bat glider...
So, what do we get? I received issue #151/500, and if what was in the collectible tin is any indication, then ordering asap after the kit is released is key to avoiding any major disappointment/s! While not bowled over with the quality, this is a significant (!) improvement over my past experiences. The glider is cast in 7 pieces, with the major structures (4, including exhaust plume) cast in light-grey PUR. Going over it with a fine toothed comb, I found about 10 air holes, which are now filled and curing. More disconcerting was the rough, uneven surface of the glider body: KM needs to pay more attention to the surface finish of their masters and prototypes.
The figure itself--7 pcs., white metal--is not bad at all. It appears that a harder alloy has been used, and surface texture, though a little rough and crystalline, should buff out nicely. No significant pitting discerned as of yet, though there are indications of super-cooling and/or short pours--again nothing significant, though the locating pegs, feet-to-glider, will require some work.
All in all, after a moderately in-depth examination, I would have to give this one a solid B, maybe a B1/2+. KM is not going to rock the world with their castings, but you have to applaud their creativity and their passion.
PS--As I mentioned earlier, this is not your "classical" GG. This is the GG from the Marvel Knights' Spider-man arc. . .
While it might not appeal to the purists, I applaud KM's decision to offer this variant--especially as Moebius has pretty-much sewn-up the classic version.
25 September 2010
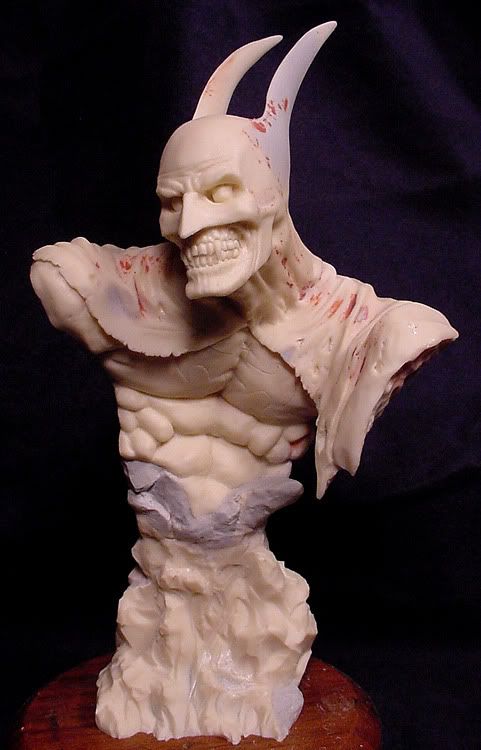
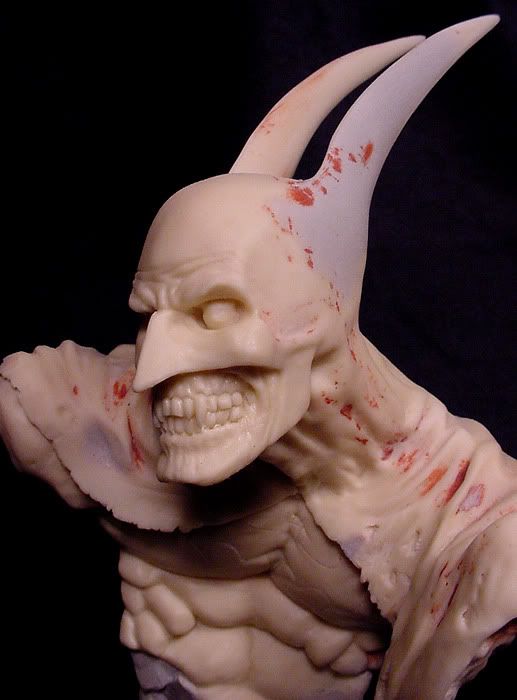
Yedharo Models' "King of Destruction" (fka "The Green Giant")
Yedharo Models is one of the "New Wave" manufacturers that are quickly taking root in the 21st c. hob- by. Probably best know for their series of Zodiac-centric busts and figures ("War of Zodiac"), they can hardly be pegged to a particular scale, or even genre--though they have ably evinced a preference for "fantasy".
The talent behind Yedharo is one Fausto Gutiérrez López. To those of us who value the byline, Fausto is no stranger: his ample skills can be found under the Andrea and Pegaso brands. I can also say that he is eminently approachable, as it was my pleasure to discover recently. . .
While the "Incredible Hulk" has never been one of my favourite Marvel personalities, I am very much taken with the character in the Planet Hulk, World War Hulk, and Hulk 2099 storylines/ series. Which brings us to this posting. . .
While browsing through various on-line retailers, I stumbled across a figure titled "The Green Giant", produced by Yedharo. "A rose by any other name" being what it is, this piece was obvi- ously inspired by the gladiatorial Hulk in Planet Hulk! It was listed as TBR. So I went to the Yedharo site (their website under construction), and saw that their "King of Destruction" had been released in October 2009 (to see a painted sample, click here). Was "The Green Giant" a deriva- tion of this piece? Had the former been discontinued in favor of the latter?
Well, the only way to find out would be to go straight to the source. And within the hour, I had a response from Fausto! He was very forthcoming and candid, and explained that it was "The Green Giant" that had been 'retired' in favor of "King of Destruction", to mitigate the overwhelming similarities to the "Green Scar". Fair enough. The changes would be easy enough to reverse if I were so inclined.
The figure is now before me. Marketed as 54mm, this is a "hulking" brute of a piece. Cast in 7 pieces (no groundwork) in a soft-ish grey polyvinyl resin, the casting quality is VG+++ (I cannot bring myself to give it an EXCELLENT because of the presence of stray shallow surface bub- bles/divots; BUT I must emphasize that these are relatively few in number and quickly dealt with.).
I'm very much looking forward to diving into this piece, but it will have to wait 'til next year. Let the ideas simmer for a while. . .
FOLLOW-UP
I must say that I really do like this kit! I filled all of the air holes(no more than 10, all shallow) on the body and leg prior to writing the above: the pieces were curing in the oven as I wrote. Perhaps not surprisingly, the casting was noticeably harder and felt "heftier" once it had cooled down. I then dry-fitted the pieces that came with a locating peg, and the fit was EXCELLENT! Finally, I reduced some of the pouring sprue nubs, and the resin ground like a dream! Arguably the best kit I have purchased this year!!!
22 September 2010
Ragin' Cajun -- The Coattails
As I mentioned in my follow-ups below, all joins save the head have been fitted for seamless assembly, and, perhaps more importantly, a tight fit. In the interim, the figure has been completely and perma- nently pegged for mounting. This is not as straightforward as it might sound, as the left ankle is particularly thin; and I had to drill through the connecting copper tubing in the left knee/thigh. The name of the game is a steady hand, sharp bits, and staged, incremental widening of the opening.
On to the coattails! I'm perhaps jumping the gun here a bit, but this is the crux of the project--in every respect. While I could certainly finish clean-up and detailing, this all amounts to naught without the tails.
First step was transferring the figure to a spacious 3.5" round work base. This gave me the opportunity to align and secure the mounting pegs. Once securely mounted, I began to pack clay around the lower half of the figure, finger modeling as I went along to keep the amount to be removed at a manageable level. Once the clay was applied and allowed to "cool" from the kneading and handling, I began to model in earnest. . .
The purpose of the clay is to create a male molding surface, a negative impression, and a support for the epoxy putty that will be draped over it to make the coattails. The negative impression must be bold and deep enough to accommodate the thickness of the putty. There is decent amount of "guesswork"/speculation involved, but it should be constrained and logical. . .
The left half of the tails is now ~75% done. A bit more tweaking followed by clean-up, and it is a fait accompli. The right half is a bit more challenging, as it is collapsed, and anchors the flowing garment. I am about 60% done with this as I write.
More to follow. . .
UPDATE 25.09.10--The coattails are now in epoxy-putty! The pattern approach worked much better than I had anticipated, though there is still a considerable amounting of underfilling and surface finishing to be done. The figure is now in the oven, the first stage of mating the tails to the torso curing. . .
FOLLOW-UP
The coattails are now permanently attached to the torso, and the long building-out process has begun in earnest. This is where the undersurface irregularities are smoothed-out to ensure a strong x-sectional taper to the progressively thinner sections of the fabric as we approach the edges, as well as enhancing the surface drapery. As I said, this is usually a fairly drawn-out process , but there is no room for haste here.
FOLLOW-UP (2)
Save for final finishing and touch-ups, the coattails are now done! Most of you who know me know that there is still a lion's share of work to be done, but I can now 'zoom-out' and think in terms of the overall piece rather than just a portion of the same.
21 September 2010
Knight Models' next Marvel releases???
If the banners that appear throughout the KM site are at all indicative of what we might expect in the relatively near future, then these are my projections for what is to come:
- Juggernaut
- Dr. Doom
- Abomination
- Carnage
- Thanos
19 September 2010
Ragin' Cajun -- Phase 1 mods
Those of you the have been following this thread know that I intend to have Gambit kneeling, discharging his bō on the pavement, while charging his cards. To date, I have:


FOLLOW-UP
All the joins save for the head have now been pegged and fitted for seamless assembly. Work on the coat-tails will be underway in less than a fortnight. . .
FOLLOW-UP (2)
Just completed fitting and attaching the right knee-guard. All subassemblies are now ready for final clean-up and detailing. . .
- Removed the trench-coat tails. As I mentioned earlier, the unit is horribly cast, and if I had intended on the doing the kit straight OOB, I would have returned it. Needless to say, sculpting dynamic, flowing coat-tails, swooshing around the subject, will be the most challenging aspect of this reanima- tion. Also, I will have to sculpt the drapery and detail of the right arm where it was molded to the coat-tails. As a sidebar note, I found a sizable air hole where the arm joined to the coat. . .
- Re-animated right leg. This is a little more involved than one would think largely due to the proportions of the figure. I thought I could retain the poleyn (knee guard) attached to the leg, but the variability in thickness between the two guards demanded that I remove the right one, and refit it to the knee. The right leg is now posed; pinned; the flattened calf muscles reworked; and awaiting the rescribing of the boots and the attachment of the knee guard.
- Reworked attachment block of torso to legs. This is a bad fit. And if you look closely at the painted boxart, you will see that little or no filling was done on the join seam of the legs, and the rolled edge of the breastplate does not line-up.
- Slightly repositioned and pinned the left arm, and replaced the too-short and anything-but-straight bō (the image of the boxart shows the best KM could come up with?) with a brass rod. This required careful surgery to avoid damaging the fingers, but it is one instance where the softness of the alloy actually helped.
- Finally, the left leg was pegged for mounting and the figure (well, the legs) now sits on its work base.
FOLLOW-UP
All the joins save for the head have now been pegged and fitted for seamless assembly. Work on the coat-tails will be underway in less than a fortnight. . .
FOLLOW-UP (2)
Just completed fitting and attaching the right knee-guard. All subassemblies are now ready for final clean-up and detailing. . .
Subscribe to:
Posts (Atom)