
24 December 2011
Red Skull (Bust)-Painting (1): Priming & U/C'ing
The bust is now primed. Barring any unforeseen reveals, I should have it undercoated by the end of next weekend.
23 December 2011
Divio Juckal-Painting (II): U/C'ing Fur
After a grueling 11+ hrs. at work, this evening was spent u/c'ing the fur on our werewolf. Or, at least most of it. While I fully intended to do the flesh in oils before tackling the fur, upon further reflection that would have set me up for some harrowing contretemps down the line.
I now have about an hour or two of u/c'ing left on ol' DJ, and then we can focus on the whole canvas with the oils.
More to follow. . .
I now have about an hour or two of u/c'ing left on ol' DJ, and then we can focus on the whole canvas with the oils.
More to follow. . .
22 December 2011
White Ape of Barsoom-Painting (1): U/Cing
Last, but certainly not least. . . The rampaging, six-limbed ape is now undercoated!
This was a tricky one, and is certainly a candidate for reworking once I break-out the oils. Burroughs is characteristically sparse in his descriptive passages, so, taking into account that the beasts were glabrous save for the shock of hair, what exactly did he mean by "white"?
After spending some time reviewing images of Snowflake, may he RIP, I decided on a warm parchment undercoat, freely mixing and blending no less than four Reaper and Vallejo colours. The end result is a cool fleshtone, which should take quite readily to the "white" oils to follow.
More to follow. . .
20 December 2011
Divio Juckal -- Painting (I): U/C'ing Flesh
I am trying to get at least an hour's worth of bench-time per night--so far, so good. . .
Tonight was spent u/c'ing the hairless areas on our vârcolac. I used Reaper's Yellowed Bone and Vallejo's Beige-Red in a loose, free-mixed application. It was more important to get a feel for the topography/ contours of the sculpture than it was to effect absolute coverage. I also took advantage of the "wetness" of the Reaper base colour to block in some salient highlights, etc. Again, as much an exercise in familiarization as it was a warm-up with the brushes.
A very satisfying outing: not too demanding with great results. The next step on DJ will be the hairless flesh in oils with a transitional grisaille along the edges of the fur. . .
Stay tuned!
19 December 2011
ALVH-Painting -- Undercoating
Just completed undercoating the "darks" on Abe--straightforward; no surprises.
Well, no surprises but one. I used Reaper Master Series paints for the first time, and I couldn't be happier! Smooth, high saturation, superbly tolerant of thinning, mix well with Vallejo--and no glossy spotting or random glazed patches. As I understand it, their formulae include a flow enhancer, as well as an agitator in the bottle: it used to be a metal skull, but there was apparently some concern re: the metal v-à-v toxicity, so it got switched to a plastic ball. Either way, great initiative!
I am particularly taken with their Pure Black (#09037). This is a deep, warm black that yields varied tones depending on the number of coats applied.
If--WHEN!--I need to replace my acrylics, Reaper will definitely be on the short list.
Back to the bench!
PS--Face is now undercoated.
UPDATE-20.12.2011... Lincoln is now fully undercoated. NEXT: Oils!
17 December 2011
Holiday Greetings '11
But here goes . . .
Take some time for yourselves this Holiday Season: plot out a new project; or make some inroads on an ongoing venture; or simply wrap-up that poor soul that has been desperately clamoring for completion!
Above all, enjoy whatever time you have with family and friends. We're a smidge over a fortnight away from wrapping-up the first year of the second decade of the 21st c., and things do not appear to be getting any less scary. . .
And with that, I would like to take this opportunity to wish the readership a joyous, restful, peaceful--and, yes, productive!-- Holiday Season; and a healthy, happy and prosperous New Year.
Thank you for your patronage and support.
MERRY CHRISTMAS
HAPPY HANUKKAH
FELIZ NAVIDAD
BUON NATALE
FRÖLICHE WEINACHTEN
JOYEUX NOËL
CRĂCIUN FERICIT
SUNG TAN CHUK HA
WESOŁYCH ŚWIĄT BOŻEGO NARODZENIA
S'ROZHDESTVOM KRISTOVYM
Augie
Looking ahead to 2012. . .
2011 has been a less than stellar year. It got off to a great start; but by the time I hit the final turn, the race was all but over. That is not to say that I am not pleased with what has been accomplished, especially under the circumstances; but it certainly did not come close to meeting expectations.
Unfortunately, 2012, at this point, looks quite grim. Other than Loki, there is nothing that is "jumping" off the bench at me. This could change in the proverbial "blink of an eye", but for now I am resigning myself to an off-year that might very well see little-to-nothing done.
Enough of the gloom 'n' doom. As most of you by now know, my modelling year is divided into two parts: an all-too-short prologue culminating with the annual Atlanta Show in February; and the rest.
PART 1
1) Abraham Lincoln - Vampire Hunter
2) Great White Ape of Barsoom
3) Red Skull (bust)
These are all soon-to-be in-progress paints: now primed.
PART 2
This is tricky at this point. Loki, as I've mentioned, is the only sure bet. The rest are just simmering ideas that will more than likely not be in the running by this time next year. . .
4) Loki (Knight Models 75mm)
5) Divio Juckal (Smart Max, 1/35th)
6) Jack O'Lantern (bust, KitKong Model Mansion 1/6th scale)
7) Tars Tarkas (bust, Monster Caesar/Andrew Martin, "1/8"th scale)
8) Baba Yaga (Smart Max Nibaba ['Smog 1888'] conversion)
I will update this posting (as warranted) in the weeks leading up to the Atlanta Show; and post a revised version just after the Show.
I look forward to your comments and observations.
Here's to a productive Holiday Season & New Year!
13 December 2011
LET THE COUNTDOWN BEGIN!!!!
LESS THAN 10 WEEKS UNTIL ATLANTA!!!!
I have just completed what I hope will be my last fiddling-about with the final line-up. What this means is that time-permitting and barring any unforeseen developments--hobby-related or not--the figures will be primed and moved to the painting bench over the weekend.
Three figures in nine weeks. . . hmmm. . .
04 December 2011
Notable Acquisitions November 2011
KITS
Moebius kit of Black Widow (J. Laudati/J. Yagher, 1/8th scale)
Moebius kit of Black Widow (J. Laudati/J. Yagher, 1/8th scale)
Divio Juckal -- Pre-prime prep & Groundwork
It is definitely getting to be "that time" of year, so the last few days have been spent tying-off loose ends and the like.
While the vârcolac was all-but-ready for priming, I had spent virtually no time at all on its presentation: this was begun to be addressed this weekend. First, base selection. Check. Next, groundwork. If I had received the plinth included in the initial release of the kit, I would have gladly stuck with that and case closed; however, I received one of the later generic cobblestone slabs that did nothing for the piece.
Enter MiniArt. I sectioned a piece of this set, cut and trimmed it to size. . . eh voila--instant street corner. Of course, there is still loads of finishing to do, but the worst is over. However. . . since I wanted a more dynamic presentation, I had to reposition the feet on the figure. So my erstwhile "all-but-ready for priming" figure will have to be reworked a bit more before I move it to the spray bench.
Getting there. . .
UPDATE - 06.12.2011. . . The figure has been positioned on the base, and all the "sub-filling" between the groundwork and the base has been completed using Aves AS-White. Save for final finishing--sanding, detailing, polishing--the groundwork has been completed. Back to the figure!
02 December 2011
Alejandra -- Assembly (Ia)
As of Step I, the figure had been essentially completely assembled minus arms, hair (won't be used), and gear. Today, I rounded off Step I by completing the filling (MS) of the holes for the coiffure that won't be used, as well as fiddly seam along the neck. This is probably as far as I'll get with Alejandra this year. . .
Back to Abe!
PS--This is a superb figure suitable for any experience level!
Back to Abe!
PS--This is a superb figure suitable for any experience level!
29 November 2011
Alejandra -- Assembly (I)
As anticipated, this was a relatively simple, straightforward assembly. As always, careful surface prep and repeated dry-fitting will optimize what is already a good fit, thus minimizing post-assembly filling.
As of this writing, all major sub-assemblies have been completed. I have assembled the body (body + boots) and have filled the same with PUR. So far, so good. . .
As of this writing, all major sub-assemblies have been completed. I have assembled the body (body + boots) and have filled the same with PUR. So far, so good. . .
28 November 2011
2011 Status Report -- Pre-Winter Update
There are now but five weeks left in the year, which means that the 35th Annual Atlanta Miniatures Show is but 12 weeks away . . . [YIKES!]
It also means that the time to bring down lofty, breezy dreams to a more grounded reality is upon me. And to this end, my display will most likely be comprised of the following pieces:
1) Abraham Lincoln - Vampire Hunter (Andrea 54mm conversion)
2) Great White Ape of Barsoom (Smart Max Mr. Honk ['Smog 1888'] conversion)
3) Divio "Mad Dog" Juckal [SP vârcolac] (Smart Max 'Smog 1888')
4) Red Skull (bust, Jaguar Models 1/12th scale conversion)
with only 2 of them definitely in competition--IF THAT!
Should time decide to make itself more abundant (with its yin-- work--ebbing at a near proportional level), at least one of the Marvel pieces might make an appearance:
A1) Red Skull (bust, Jaguar Models 1/12th scale conversion)
A2) Loki Laufeyson (Knight Models 70mm)
Hopefully, I will not have to pare-down the lineup any further. . .
BACK TO THE BENCH!!!
It also means that the time to bring down lofty, breezy dreams to a more grounded reality is upon me. And to this end, my display will most likely be comprised of the following pieces:
1) Abraham Lincoln - Vampire Hunter (Andrea 54mm conversion)
2) Great White Ape of Barsoom (Smart Max Mr. Honk ['Smog 1888'] conversion)
3) Divio "Mad Dog" Juckal [SP vârcolac] (Smart Max 'Smog 1888')
4) Red Skull (bust, Jaguar Models 1/12th scale conversion)
with only 2 of them definitely in competition--IF THAT!
Should time decide to make itself more abundant (with its yin-- work--ebbing at a near proportional level), at least one of the Marvel pieces might make an appearance:
A2) Loki Laufeyson (Knight Models 70mm)
Hopefully, I will not have to pare-down the lineup any further. . .
BACK TO THE BENCH!!!
19 November 2011
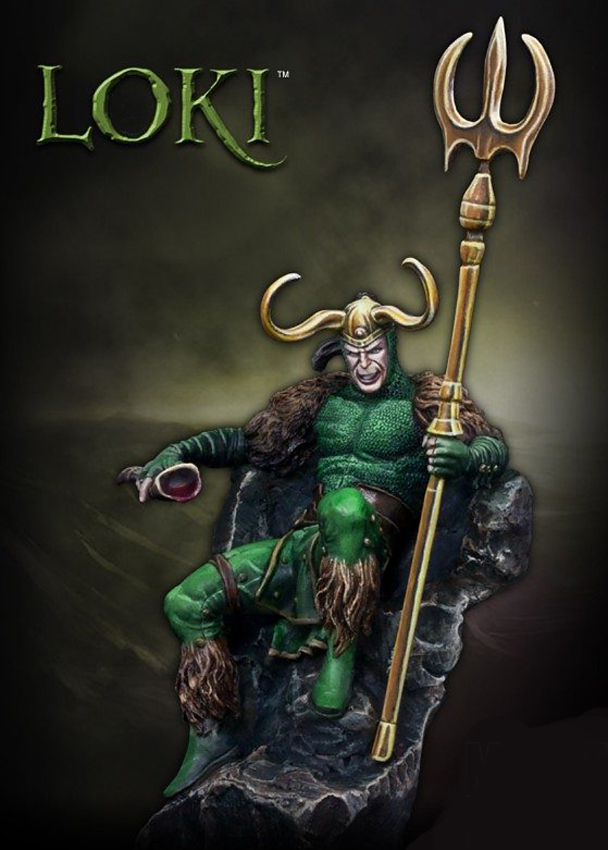
Loki -- GRAPHIC UPDATE
Save for the helmet "accessories, this is pretty much my "restored" canvas. . .

I would note that one of the things that prompted the replacement of the polearm was that whatever Loki might have been engaged with was left entirely to the imagination of the viewer--in short, conflicting perspectives. In my rendition, Loki is admiring and celebrating not only his acquisition of Mjolnir, but what it represents. . .
I would note that one of the things that prompted the replacement of the polearm was that whatever Loki might have been engaged with was left entirely to the imagination of the viewer--in short, conflicting perspectives. In my rendition, Loki is admiring and celebrating not only his acquisition of Mjolnir, but what it represents. . .
16 November 2011
Loki -- UPDATE (3)
I'm probably getting a bit ahead of myself, but after nearly two weeks away from the bench (too much Work and car woes), I felt I had to do something. . .
To this end, Loki is now fully assembled save for the horns and the "panache" of the helmet. I glued the left arm in place, so now the god of Mischief is in all his glory. . . or nearly so.
Next step--final detailing and clean-up, and pre-prime prep.
To this end, Loki is now fully assembled save for the horns and the "panache" of the helmet. I glued the left arm in place, so now the god of Mischief is in all his glory. . . or nearly so.
Next step--final detailing and clean-up, and pre-prime prep.
04 November 2011
Loki -- UPDATE (2)
I have made a decision re: the weaponry--the "spear" is history! I briefly considered leaving him sans weapon, but that was a bit too "strained". Having slept on it, I decided to add Mjolnir to the mix.
This is by no means an easy mod to carry out. It is not difficult, but the somewhat flattened hand and overly 'tight' grip dictates proceeding with caution. The worst is now behind me (fleshing-out the hand, adding an extended index finger, etc.), and Mjolnir's head (Plastruct and MS) is in the oven curing. . .
Moving right along. . .
FOLLOW-UP. . . Mjolnir is essentially done! All that remains are the bindings on the [wood] handle, and final assembly (which may wait until the figure is painted).
FOLLOW-UP (2). . . Mjolnir--save for final assembly--is done!
I was in a bit of quandary re: the bindings, as I did not want to sculpt them, BUT. . . I did not have any suitable material with which to do it. That's when my lady came up with the brilliant/inspired notion of making my own using tin solder! I had Mjolnir's handle bound within 15 mins. or so - 10+ mins. worth of hammering and trimming; 3-5 minutes of binding. Great stuff!!!
03 November 2011
Loki -- UPDATE
To give credit where credit is due, I am having a blast with this kit! Yes, there are annoying corrections to be made; but on the other hand, this affords me—and any miniaturist!—the opportunity to put his or her "mark" on the piece.
As of this writing, I believe the putty work on the throne to be done. There is still a load of finishing and texturing to be done, but the “hassles” (fitting, shimming, etc.) should be behind me.
The figure is now partially assembled: I attached the right arm the other night to allow me to bed the limb in its modified conformation. I am still undecided about the left arm (with Loki’s “spear”), as in this iteration, he appears to have eschewed any weaponry.
More to follow. . .
Moebius' Black Widow. . .
has finally arrived!!!
This figure kit was to have been released back in the Summer; but all good things come to those who wait.
This is a beautifully done 1/8 scale kit with some very pleasant surprises engineering-wise that will facilitate the work ahead. Comprised of 23 pieces (including base) cast in a "Sunny Flesh" PS, this kit should fall together OOB with a minimum of fuss and bother for those who elect to stick with the stock rendition.
While I may start gluing and filling sub-assemblies, this project is on the 2012 docket at the earliest.
Bring on the MK-VI and War Machine!!!
FOLLOW-UP. . . The kit. . .
29 October 2011
iHobbyExpo 2011 News!
While doing maintenance on the blog, I inadvertently deleted the entry on this year's iHobbyExpo. My sincere apologies. . .
While I am not inclined to reconstruct it, I would direct you to this excellent overview. And, by way of recap, the following:
While I am not inclined to reconstruct it, I would direct you to this excellent overview. And, by way of recap, the following:
- Moebius Black Widow -- imminent availability.
- Moebius Iron Man 'MK-VI' -- by the end of 2011.
- Atlantis Blackbeard (ex-Aurora) -- Q1, 2012.
- Moebius "The Bride and The Monster" -- June/July 2012.
- Moebius deluxe Dracula w/ female victim -- 2012.
- Moebius "Rhodey" Rhodes - War Machine -- 2012
Knight Models' Loki Laufeyson (KMV027)
Some might say I'm a glutton for punishment--and I would hesitate to argue the point too vigor- ously. However, I do know what I like, and I certainly liked Knight Models' , and especially the sculptor Jérôme's (in my Notable Acquisitions posting for Sept/Oct, I made the guarded assump- tion that this is KM regular, Jérôme Renaud), take on the Norse god of Lies and Mischief:

Sixth time must be the charm. . . or, KM had a long talk with their caster--or got a new one!. . . or, I finally lucked out. In any event, casting #39/500 is everything one might expect in a 21st c. white-metal kit! The 9 white-metal pieces are crisply cast in what appears to be a somewhat harder alloy, with no apparent distortion, and little clean-up to be done (at first glance). The base/ "throne" is cast in resin, and even this is notable improvement--though there is a soft-cure flaw, and some air voids (I've seen three to-date) that will have to be corrected. All in all, this is a solid A, casting-wise!
As with GG, this rendition of Loki may not appeal to the purists: it is taken from the time of the "Siege" storyline. Personally, it does it for me!
FOLLOW-UP. . . In the spirit of complete transparency, here are some "hands-on" observations:
FOLLOW-UP (2). . . On to Step 2. . . Step 1 eliminated the over-whelming majority of the gaps in the fit, but did not provide a consistent locator "marker" of any sort. This is what I hope to achieve in Step 2. That accomplished, I could then begin to re-focus on the figure itself.
Before closing, I would point out that I shortened the base by some 5mm. This gives it more of a "throne-y" feel--at least AFAIC.
Sixth time must be the charm. . . or, KM had a long talk with their caster--or got a new one!. . . or, I finally lucked out. In any event, casting #39/500 is everything one might expect in a 21st c. white-metal kit! The 9 white-metal pieces are crisply cast in what appears to be a somewhat harder alloy, with no apparent distortion, and little clean-up to be done (at first glance). The base/ "throne" is cast in resin, and even this is notable improvement--though there is a soft-cure flaw, and some air voids (I've seen three to-date) that will have to be corrected. All in all, this is a solid A, casting-wise!
As with GG, this rendition of Loki may not appeal to the purists: it is taken from the time of the "Siege" storyline. Personally, it does it for me!
FOLLOW-UP. . . In the spirit of complete transparency, here are some "hands-on" observations:
- The alloy, while decidedly harder, still requires careful handling. All the more so given the finely rendered mail "tunic".
- Shrinkage differential remains a major shortcoming, though nowhere near the magnitude of the Doctor Doom kit. In fact, I am dealing with this as I write: the fit of the figure to the "throne" is considerably less than one would hope; however, given that the figure is significantly less interactive with the seat, and the latter is cast in one piece, it is a relatively simple, albeit painstaking and multi-step, fix. KM needs to re-evaluate their choice of resins; OR, forgo mixed-media kits entirely!
FOLLOW-UP (2). . . On to Step 2. . . Step 1 eliminated the over-whelming majority of the gaps in the fit, but did not provide a consistent locator "marker" of any sort. This is what I hope to achieve in Step 2. That accomplished, I could then begin to re-focus on the figure itself.
Before closing, I would point out that I shortened the base by some 5mm. This gives it more of a "throne-y" feel--at least AFAIC.
Notable Acquisitions Sept-Oct 2011
KITS
Knight Models kit of The Destroyer (Rhee Hyun, 70mm)
Knight Models kit of Loki (Jérôme [Renaud?], 70mm)
PAINTS, TOOLS & SUPPLIES
Selection of groundwork "bases" from Dark Age's Groundwerks.
Knight Models kit of The Destroyer (Rhee Hyun, 70mm)
Knight Models kit of Loki (Jérôme [Renaud?], 70mm)
PAINTS, TOOLS & SUPPLIES
Selection of groundwork "bases" from Dark Age's Groundwerks.
11 October 2011
Resurgens
About a year ago, I decided to shelve the Abraham Lincoln - Vampire Hunter project as I did not feel, for whatever reason, that it was "working".
Well, the figure is now stripped, and I am happy to report that it survived. Unfortunately, the head suffered the most damage (the only damage, actually), but that is not necessarily a "bad thing"--after all, as good as it might have been (and that was decidedly arguable), it could have been better.
So, the reworking of Abraham Lincoln - Vampire Hunter has begun in earnest. I will know by the end of the month whether this project is worthy of completion--or being scrapped once and for all.
Stay tuned!
FOLLOW-UP. . . I spent most of the afternoon and early evening cleaning up the stripped casting and working on the head. As to the latter, I had to rebuild the nose, as well as rework some of the exposed plastic.
A note about the stripping process--and, most importantly, the consequences of the same. I used acetone as my stripping agent--probably not the wisest choice, but the only stripper I had available that would not violently attack the polystyrene "core" I used for the head. I figured the metal was safe; as it turned out, so was the epoxy putty and the glazing putty! Hence, 85%+ of the figure survived none the worse for wear.
The head was a mixed bag: the areas of bare plastic were attacked, but not what I would describe as "violently". In fact, the nose was the only real casualty, and that was one of the areas that I had deemed "unsatisfactory" in the first go-round. The other areas were merely softened, and I took the opportunity to actually rework some of the same as I would a medium-hard clay. Very satisfying! What was even better was that after "baking" the figure for about two hours or so, attempting to burn away any remaining acetone, the plastic was as good as new! Something new learned everyday!!
So far, so good! As of this writing, this figure is tentatively on the "Active" list once again. Final clearance to follow. . .
UPDATE - 16.10.2011 . . . The head/face is now all-but-done, as are all the touch-ups and revisions made to the body. The one spot I have not spent too much time on is the hand holding the severed head: once that is cleaned-up and checked-off the list, the figure will essentially be ready to re-prime. I have also modified one of the stovepipe hats from SM's Mr. Honk that I will probably add to the groundwork, along with an axe. . .
UPDATE - 17.10.2011 . . . The figure is now essentially ready for priming! All that remains to be done is going over the "trophy" head: I have already added a deep cut on the left forehead, and I know I will replace the left fang.
Not bad for a few days' work. I am moving this thread to the completed projects' folder: the next graphic update will be of the [re-]primed figure when I relaunch the painting thread. . .
UPDATE - 18.10.2011 . . . I've focused on the trophy head this evening. Whereas the initial fitting was somewhat "loose" and capricious, I decided to tighten things up considerably. To this end, the new head has been re-fitted and securely pegged (nb: not permanently--the head will not be permanently attached until just prior to final mounting), with the coiffure to be reworked in the days to come. Almost there. . .
UPDATE - 19.10.2011 . . . DONE!!!
Abraham Lincoln: Vampire Hunter -- The Film
Just stumbled across very good news indeed. . . the film version of ALVH commenced filming in March of this year, and has been scheduled tbr in June 2012.
Will have to give serious thought to "dusting off" the project. . .
Will have to give serious thought to "dusting off" the project. . .
07 October 2011
Oðindestroyer (I) - The left arm w/ helm; sabatons; Oðinsword
As I mentioned in the last posting, the helm has been hollowed out. In anticipation of what followed, I also cleaned-out and "squared" the left sight.
Well. . . since my last posting, I popped-off and took apart the left arm. This allowed me to rework the animation of the same, as well as integrate the helm with the arm, which are now a single unit. The helmet was pegged to the metacarpals with a piece of copper wire, but not before the ventral surface of the latter was reduced to nothing. This will allow me to model a more natural, animated hand, actually cradling the helm. I have roughed-in the fingers of the gauntlet, and restored the proximal lamina of the manica. My allusion to this specialized item of Roman armour is not made lightly, as the best way to visually describe the Destroyer within a historical context is as a crupellarius.
The left arm is now in the oven curing. Once it is done and cooled, I will rework the join of the arm to the shoulder plates unit--essentially creating a deeper ball joint to facilitate a more stable join.
More to follow. . .
UPDATE - 08.10.2011. . . Finishing the left arm has begun. Perhaps one--or two?--more putty sessions to get everything just so; but definitely over the hump. More importantly, I just transferred the figure to its working base. I will have to resculpt the feet, however, as these appear to have suffered disproportionate shrinkage (lateral compression) in the casting process. WIP images to follow shortly. . .
UPDATE - 09.10.2011. . . The feet (sabatons) have been roughed-in and Phase 1 reduction has been completed. . . the difference is night and day!
UPDATE - 10.10.2011 . . . When we last heard of the Oðinsword, the blank was curing in the oven. Since then, I have added the tang and the quillons; roughed-in the pommel; and the blade is now ~75% finished. The pommel (and whatever of the grip will be visible) will be attached to the hand; the blade/quillons unit will be a separate piece that will be attached to the hand via the tang.
01 October 2011
Oðindestroyer - The Project
If not for the inordinate amount of redetailing awaiting me, this would be a relatively simple, straightforward conversion:
- Sculpt a bare head of the All-Father.
- Reanimate the left arm to have it holding the Destroyer helm.
- Sculpt the Oðinsword.
In short, something like this.
The new head has been roughly sculpted (in SSF), and fitted to the armour. Much left to do--beard, facial landscaping, eyepatch, hair, etc.), but definitely off to a good start. . .
FOLLOW-UP. . . The helm has been hollowed-out, and I have begun detailing of same.
FOLLOW-UP (2) - 02.10.2011 . . . The Oðinsword blank is now curing in the oven. Right arm has been pegged and fitted; rt. gauntlet has been tapped to accommodate the sword's tang. The left arm has been reanimated, pegged, and attached: though I have glued it in place, I am not sure whether this will provide me with enough room to effect the changes envisioned, so I may yet pop it off. The fingers of the left gauntlet have been ground off--they will be re-sculpted around the helm.
Oðindestroyer - Review of KM's The Destroyer
Knight Models' first release (according to KM, the second) in their "Tales of Asgard" series is The Destroyer (KMV-024). The master is from the hands of Rhee Hyun, his second work for KM.
This is a relatively simple, white-metal kit. Comprised of 4 pieces (body, helm, 2 arms) + ground- work, it is as "under-engineered" as it gets nowadays--and this is NOT a "bad thing"!
Sadly, casting quality has not improved one iota since this time last year . The metal is argu- ably softer, and the detail suffers accordingly. For example, most of the rivets will have to be re- fined, if not redone--five rivets were not even cast! Which brings me to the second strike: rough, grainy finish on the metal. I suspect that this is due to excessive use of talc as a mold release:
a conclusion supported by the missing rivets (talc would have filled the respective cavities); nu-
merous voids on the surface of the casting, some relatively deep and irregular; and the non- existence of many of the engraved lines delineating the segmented plate armour.
That's pretty much it in a nutshell. Regrettably, no surprises; however, since this will be a [some- what minor] conversion of the subject, most of the offending items will be dealt with in the course of the "upgrade".
NEXT: The project.
This is a relatively simple, white-metal kit. Comprised of 4 pieces (body, helm, 2 arms) + ground- work, it is as "under-engineered" as it gets nowadays--and this is NOT a "bad thing"!
Sadly, casting quality has not improved one iota since this time last year
. The metal is argu- ably softer, and the detail suffers accordingly. For example, most of the rivets will have to be re- fined, if not redone--five rivets were not even cast! Which brings me to the second strike: rough, grainy finish on the metal. I suspect that this is due to excessive use of talc as a mold release:a conclusion supported by the missing rivets (talc would have filled the respective cavities); nu-
merous voids on the surface of the casting, some relatively deep and irregular; and the non- existence of many of the engraved lines delineating the segmented plate armour.
That's pretty much it in a nutshell. Regrettably, no surprises; however, since this will be a [some- what minor] conversion of the subject, most of the offending items will be dealt with in the course of the "upgrade".
NEXT: The project.
29 September 2011
Oðindestroyer - Introduction
It has been a VERY good Summer at the local cinema for Superhero fans! I have not seen GL, but I have seen the three Marvel releases: all different--but all VG+, or better!
For myself, the biggest surprise was Thor. As I have told several friends, it is--IMHO--the best of the prequels that collectively set the stage for next year's release of The Avengers. Don't get me wrong. . . the Iron Man films are still my favourites, but there was a very different dynamic, pace, and purpose at work with these.
But I digress. . . One of the more memorable "characters" in Thor was the Destroyer, Oðin's own, personal armour automaton. Those who wish a more in-depth background of the character can check out the Wiki entry.
The Destroyer is essentially lifeless until animated by the life-force of a sentient being. To the best of my knowledge, the only time that the Destroyer armour has been "worn" was when Oðin donned it to deal with Thor in the one-shot, Thor: Man of War (2008). There is some very inspirational art in this issue, and given what I knew about the movie when it was released, I was hoping they might take a brief detour in this direction. Alas, no, but it was probably for the best.
As you can probably well-imagine, the hobby-and-collectibles biz immediately gravitated to the character of the Destroyer. Surprisingly, one of the companies was Knight Models, with their first--and only release to date--in their "Tales of Asgard" series.
This kit (#109/500) was recently presented to me as a gift. Was I excited to receive it? YOU BET! Excited and grateful. Do I feel the same after having spent a week or so with it? Obviously I am ever-grateful for the thoughtful generosity manifested; but the excitement has been tempered considerably.
Full review to follow in the days to come. . .
18 September 2011
Red Skull #3--Prepwork, Phase 2: The Red Skull (II)
I had a bit of free time this afternoon, and after doing some putty-work and grinding on the groundwork of the White Ape, I decided to rough-in the dentition of the RS. That accomplished, I proceeded with working-out the left side of the facial structures, such that the left side of the face is now essentially done.
I might try to continue with the right side once the head comes out of the oven. . .
FOLLOW-UP. . . The head is now completely roughed-in. Now the "fun" begins, micro-detailing the dentition, etc. . . .
UPDATE - 27.09.2011. . . I now have a "rough" of the cigarette holder. For this version, I used a piece of copper wire of a suitable diameter. While it required a certain amount of care while shaping and grinding, it ultimately yielded superior results than its brass counterpart.
05 September 2011
Red Skull (Bust)--Wrapping-up
It's been an incredibly productive day. . . just goes to show what a holiday, much-needed rain, and moderate temperatures can do for your productivity. . .
I might be a bit premature in declaring this piece ABD (all-but-done), but just. The head is now completed; the hand is a session or two from being done; as is the pesky RK. All that remains undone is final clean-up and the pre-prime once-over. In all likelihood this piece will be primed alongside the Great White Ape of Barsoom.
Until then. . .
FOLLOW-UP - 24.12.2011 . . . I treated myself to a "Me Day", and effectively wrapped-up the pre-prime work on this piece. Next step: PRIMING!
Red Skull #3--Prepwork, Phase 2: The Red Skull
I actually began work on the head a few weeks ago, first shimming the calvarium (with MS) to ensure a positive "lock" of the hat; and beefing up the frontal, sphenoid, and anterior temporal bones and supra-orbital processes to de facto recess the eyes. Last week, I ground off the soft tissue of the nose and lips, and began to work the lower half of the face into more angular, skeletal features. Today, I continued with the latter; and ground-off the ears and redefined the jawline.
So far, so good! More to follow. . .
So far, so good! More to follow. . .
White Ape of Barsoom--Wrap-up
The fairing, blending and detailing of the hair was indeed completed by early nightfall, which paved the way for initiating the finalization steps. I have just completed the first "glazing" of the sculpt, and if all goes as hoped, I should have it completed and ready for priming over the coming weekend.
This concludes the Modelling phase of the project. I have enjoyed it immensely. AFAIC, this has been a "classic" conversion project. . . and I will finally have a Great White Ape of Barsoom in my collection!
Images of the primed, completed figure will be posted in the introductory post of the Painting phase of the project.
Until then. . .
04 September 2011
White Ape of Barsoom--Update (4)
By way of keeping everyone abreast of the progress. . .
Stay tuned. . .
- Fairing, blending and fine detailing of the dorsal half of the hair continues--and may be completed before calling it a day.
- Groundwork has been fitted to display base. Have yet to decide whether to build up the "integrating groundwork" as an integral part of the resin piece; or after the latter has been permanently attached.
- Club has been finished.
- Fine finishing and final detailing has begun.
Stay tuned. . .
01 September 2011
2011 Status Report -- Fall Update
1) Red Skull (bust, Jaguar Models 1/12th scale conversion)
2) Divio "Mad Dog" Juckal [SP vârcolac] (Smart Max 'Smog 1888')
3) Great White Ape of Barsoom (Smart Max Mr. Honk ['Smog 1888'] conversion)
4) Abraham Lincoln - Vampire Hunter (Andrea 54mm conversion)
5) Loki Laufeyson (Knight Models 70mm)
It is looking like this might very well be my Show line-up for 2012. That's not to say that changes and/or additions are not possible; but there are only so many hours in a day, and it looks like I will have my hands full at work at the very least through the Show.
If there are changes and/or additions to the above, they will most likely come from this "active reserve":
a) Gambit (Knight Models 75mm) -- on the painting bench.
b) Red Skull #2 (ff) (Smart Max 150mm conversion)
c) Red Skull #3 (ff) (Andrea Miniatures 90mm conversion)
d) Tars Tarkas (bust, Monster Caesar/Andrew Martin, "1/8"th scale)
e) Oðindestroyer (Knight Models 70mm conversion)
f) Baba Yaga (Smart Max Nibaba ['Smog 1888'] conversion)
Back to the bench!!
A~
Baba Yaga - UPDATE
- Mortar has been "scaled". Surface texturing of the mortar has begun, as has the hollowing. I'm about a third of the way done with the latter.
- The pose has been "locked" and the lower half of the figure is completely roughed-in. Finishing of the left leg has begun.
- Figure has been fitted to the rim of the mortar. Pegging to follow soon.
- "Fleshed-out" the torso somewhat: nothing dramatic, just a bit more youthful.
Stay tuned. . .
26 August 2011
Notable Acquisitions August 2011
KITS
Andrea Miniatures kit of Reinhard Heydrich (???, 90mm)
Smart Max kit of Nibaba (Allan Carrasco, 1/35th scale)
Andrea Miniatures kit of Reinhard Heydrich (???, 90mm)
Smart Max kit of Nibaba (Allan Carrasco, 1/35th scale)
21 August 2011
Tars Tarkas -- Prepwork (2): The Harness (2)
The complete right half of the harness is now roughed-in. The shoulder wing will probably be augmented in the days to come, but the foundation is in place.
And, the left shoulder strap is roughed-in and in place, along with the leading section of the shoulder wing. I am finally beginning to see a 3-d'al rough sketch of what the final piece could look like and I am most satisfied.
All that remains to be roughed-in is the rear cross brace/drag handle. DONE!
More to follow. . .
And, the left shoulder strap is roughed-in and in place, along with the leading section of the shoulder wing. I am finally beginning to see a 3-d'al rough sketch of what the final piece could look like and I am most satisfied.
More to follow. . .
19 August 2011
White Ape of Barsoom--Graphic Interlude (2)
In all haste. . .


A significant amount of finishing work remains to be done, but nothing out of the ordinary. If you look closely, our subject will need to have some dental work done over the weekend. . .
UPDATE - 22.08.11. . . Not quite "over the weekend", but close enough. . . The lower right canine has been successfully implanted and our subject now has a full set of pearly whites. . . or close enough. The "smoothing" and toning of the musculature is underway in earnest, and save for a bit of touch-up filling on the right support (middle) hand, all the putty work save for touching-up the coiffure is now done!
On the home stretch!
UPDATE - 24.08.11. . . The front half of the coiffure is essentially done! I really can't wait to be able to get some paint on this face/ head!!
15 August 2011
White Ape of Barsoom--Update (3)
The fairing and blending and fine detailing of the hair continues. Fairing of the right half of the face/scalp is all but done; and both ears have been sculpted in their new apical location.
The forearms have been tentatively fitted, but yet to be permanently attached. As the club would prove to be major annoyance, if not outright hindrance, during painting, I have removed it proximal to the gripping hands, and hollowed the latter. I will rebuild an attachment peg,probably reinforced with wire.
Movin' right along. . .
UPDATE - 16.08.11. . . The forearms have been fitted. This required some rearrangement of the coiffure, but all for the better. The club has been pegged and fitted.
Getting close. . .
UPDATE - 17.08.11. . . The forearms have been permanently attached. . . Let the finishing begin!
The forearms have been tentatively fitted, but yet to be permanently attached. As the club would prove to be major annoyance, if not outright hindrance, during painting, I have removed it proximal to the gripping hands, and hollowed the latter. I will rebuild an attachment peg,
Movin' right along. . .
UPDATE - 16.08.11. . . The forearms have been fitted. This required some rearrangement of the coiffure, but all for the better. The club has been pegged and fitted.
Getting close. . .
UPDATE - 17.08.11. . . The forearms have been permanently attached. . . Let the finishing begin!
13 August 2011
White Ape of Barsoom--Update (2)
The "unruly shock of wiry hair" is all-but-done and permanently attached.
Re: the latter. The coiffure is being done in three stages: stage 1 was done is SSFine ; stage 2 was done in MS. The "wig", if you will, was then permanently attached; which brings us to stage 3: fairing and blending and fine detailing.
Re: the latter. The coiffure is being done in three stages: stage 1 was done is SSFine ; stage 2 was done in MS. The "wig", if you will, was then permanently attached; which brings us to stage 3: fairing and blending and fine detailing.
Baba Yaga - Converting SM's Nibaba
The other day I was discussing what-we-do with my lady, and she brought-up the topic of Baba Yaga and why a figure had not been done of this archetype of Eastern European folklore. She then pondered why Smart Max had deviated so drastically from her usual depiction in their release of Nibaba.
Why indeed? I'm in no position to account for the enigmatic design; however, what I can do is make Baba Yaga from Nibaba!
The figure was designed and sculpted by the very talented Allan Carrasco. The kit is comprised of 8 pieces + base, superbly cast in the grey-green PUR preferred by Smart Max. I will use 6 of the eight pieces in this conversion project, discarding the base and the oaken "legs" of Nibaba.
To date, the figure portion of the project calls for the sculpting of the lower half of Baba Yaga (pelvic girdle and thighs roughed-in); making a mortar (now cast; hollowing and detailing to come) and pestle, and silver birch broom; and resculpting the right hand.
More to follow. . . !
UPDATE - 28.08.11. . . The lower half of BY is now completely roughed in: all that remains to be done is "lock" the pose and "putty"-out the soles of the feet; but that will have to wait until the mortar is completed.
While the right hand will be resculpted, after mulling the matter over, I am not sure if will be a resculpt or an extensive modification: I might simply modify the limb to take the form of a natural silver birch broom. . . A deviation from the canon that might work quite nicely. . .
11 August 2011
White Ape of Barsoom--Update
Well, the Rubicon has been crossed. . .
The Barsoomian White Ape has been tentatively fitted to the core element of the groundwork.
By way of prologue, the setting of this piece has occupied my thoughts for quite some time. Not only that, but how to go about it!? After much deliberation, and not a few mock-ups, I finally decided on Pegasus' Gothic Rubble #2, which I got for a VERY good price. I will be using the left half of the section on the left in the image. The overall effect is damn near perfect!
Back to the bench!!!
10 August 2011
White Ape of Barsoom--Graphic Interlude
Just a "sneak-peek" to give you an idea of where the project is going. . .

By way of notes, the lower left canine is broken off by design. Aside from the upper forearms (w/ club!) the unruly, wiry shock of hair has yet to be added.
Movin' right along. . .
By way of notes, the lower left canine is broken off by design. Aside from the upper forearms (w/ club!) the unruly, wiry shock of hair has yet to be added.
Movin' right along. . .
06 August 2011
Tars Tarkas -- Prepwork (2): The Harness
As I mentioned in the introduction to, and the review of, this bust, the Barsoomian war harness is virtually the only article of clothing worn by a Martian warrior, regardless of "race".
I will be the first to admit that I have yet to conceptualize the "small" picture of a Thark war harness. I know what it looks like (what I want it to look like) from "afar", but the details are very vague--at best. Part of the problem is a dependence on the source material, in spite of the dearth of details as provided by ERB.
I have just concluded roughing-in the right shoulder strap of the harness. A design I keep coming back to is a pared-down, open- backed version of a kataginu, in leather of course. Aside from liking the esthetics of the look, it will add depth and an added dimension to the bust.
More to follow. . .
05 August 2011
Red Skull #3--Prepwork, Phase 1 completed
The arms have been fitted and await the fine tuning/finishing. Very pleased and a significant improvement on the overall dynamics of the figure. Not quite out of the woods yet, but the heavy undergrowth is thinning-out noticeably!
And the "crotch seam" has been filled and faired. This effectively concludes Phase 1 of the prepwork--all that remains to be done is the general clean-up, which as I mentioned in the review, is minimal.
Phase 2, the namesake, will commence shortly. . .
And the "crotch seam" has been filled and faired. This effectively concludes Phase 1 of the prepwork--all that remains to be done is the general clean-up, which as I mentioned in the review, is minimal.
Phase 2, the namesake, will commence shortly. . .
Tars Tarkas -- Prepwork (1a)
Just a quick one to bring the readership up-to-date. . .
Reduction of the harness has begun in earnest. . . I figure I'm about half-way there. Next step will be to reduce it to its scale thickness while beginning to work-in the stress-work in the leather and the tension drapery.
More to follow. . .
Reduction of the harness has begun in earnest. . . I figure I'm about half-way there. Next step will be to reduce it to its scale thickness while beginning to work-in the stress-work in the leather and the tension drapery.
More to follow. . .
03 August 2011
Red Skull #3--Into the breach. . .
It was a short lived honeymoon; but to look on the bright side, at least there was one!
I stand by my original review. Having said that, there is a world of difference between good castings and good fit! The castings are undeniably exquisite. The fit? Not so much. And save for a shrinkage differential between the torso and the arms, there is no apparent distortion.
Today, I removed the sword's scabbard mount, and assembled the legs, and the torso to the same. I now have a headless and armless figure before me. There is a significant gap (~1mm) along the entire mid-seam of the breeches, front to back. Yes, this could have been addressed by reducing the respective contact surfaces, but that would have compromised the fit of the torso.
The torso's fit to the legs unit was less than precise in the absence of a "key". Still, not a bad join with but a minimal fill along the back of the waist, below the belt. The main problem, as alluded to above, will be with the arms. These simply do not fit well, with the torso shrink- ing more than the limbs, and the right arm shrinking more than the left. I have yet to see a build-up that tackles this glaring issue, much less make mention of it.
I have yet to decide on how to approach this. Unfortunately, due to some poor judgement on the design of the hands, I can not remove the hands, hollow-out the sleeves, and model wrist stumps. Since the back of the right hand will be inaccessible to paint once the arm is mounted, the grief is compounded. . .
On the plus side, the separately cast cap fits the head like a glove! PERFECT!!
More to follow. . .
UPDATE - 04.08.11. . . After countless dry-fittings, burnishing contact surfaces, trimming mounting keys. . . you name it!. . . I decided that the only way to effectively take care of the "arm pro- blem" is to tackle it "old school". In other words, carefully fitting first one arm (I elected to start with the left as it would take two sessions at most), and then the next. I should be done with the left arm tonight; hopefully I'll be done with the right arm over the weekend. The right arm is a little more involved, as the sleeve will have to be substantially shimmed. . . as will the tunic upon which it rests.
Ah. . . the joys of figure painting!
02 August 2011
Red Skull #3--Andrea's Reinhard Heydrich
I started my first full-figure rendition of the Red Skull just three weeks-shy of a year ago. Now, I have an ip bust and full-figure on the bench, soon to be joined by what will be my last dance with Herr Johann. . .
I have just received Andrea Miniatures' 90mm rendition of Reinhard Heydrich in 1937. You can well imagine my trepidation regarding this acquisition--especially given my past experiences with this manufacturer, and my experience with this project's immediate precursor. BUT. . . the uniform and pose are exactly what I was seeking, and the price was right. Nothing ventured. . . nothing gained.
This figure was released in June, 2007, the first in the manufacturer's 90mm "The Third Reich -- Rise & Fall" series. Admittedly, a strange choice for a series, to say nothing of a premiere subject! Regardless, Andrea has released some real gems in this series, and if my sample of Heydrich is any indication of what a miniaturist can expect, then they will not feel at all short-changed!
On the whole, this is an EXCELLENT kit! The castings (8 pcs. + base) are a throwback (comeback?) to happier times: Andrea at its best! On a historical note, I don't believe that the boxart, or any number of the build-ups on the Web, do justice to the portraiture of Heydrich. It is actually quite good! The detail is crisp throughout, most notably on the sword, which I will regrettably not include in my conversion.
As to the project, fairly straight OOB! Some slight mods to the left leg to delete the belting associated with the sword; tweaking of decorations, etc.; and - of course - remodelling the head and adding the cigarette holder.
I will start clean-up (VERY little to be done) and assembly in short order, but this is a Fall project.
Stay tuned!
31 July 2011
Tars Tarkas -- Prepwork (1)
The more I handle and study this figure, the more I like it!
To date, I have done two things:
FOLLOW-UP . . . With the harness section cured, I pegged it to the figure in situ using 1/16" brass tubing. The harness was then popped off the bust, and placed in the oven to "hard cure". I then counter-sunk the exposed ends of the tubing, checked the fit, and started marking off the areas to be reduced. So far, so great!
To date, I have done two things:
- Lowered the height of the pedestal. Whether by coincidence or design, Andrew thoughtfully marked-off three tiers at the business end of the pedestal. This is a rather large bust, and being solid-cast resin, relatively heavy. Handling weight is not a concern; "display weight" is: the figure could be somewhat top-heavy. So I simply cut off the first "tier", thus lowering the figure on its pedestal. I might go for second reduction once the mods are completed.
- I have roughed-in the front main section of the Thark war harness. I haven't finished the design of the harness yet, but I needed something more palpable than a 2-d'al sketch to work out the details. So the roughly-shaped MS harness is now curing on the figure: once completely cured, I will sketch out the areas to be reduced and then pop-it off the figure. The harness will be constructed in at least four pieces.
FOLLOW-UP . . . With the harness section cured, I pegged it to the figure in situ using 1/16" brass tubing. The harness was then popped off the bust, and placed in the oven to "hard cure". I then counter-sunk the exposed ends of the tubing, checked the fit, and started marking off the areas to be reduced. So far, so great!
30 July 2011
White Ape of Barsoom--Prepwork: Phase (2)
The right hand has been pegged (to serve double-duty as the figure's mounting peg) and positioned, though not "locked"; and our subject is now sporting a new set of much more impressive canines.
So much for the latest, already-announced "news". What is most noteworthy is that I am in the finishing phases of the musculature! This has really been a relatively painless--and yes, enjoyable!-- process. Given my current workload, I am guess-timating that this piece will be all-but-ready for priming in about 4 weeks!
I'll see if I can throw some images up in the next week or so. . .
Movin' right along!
Notable Acquisitions July 2011
KITS
Smart Max kit of Mister Honk (Allan Carrasco, 1/35th scale)
REFERENCES
Captain America: The Art of Captain America - The First Avenger
Smart Max kit of Mister Honk (Allan Carrasco, 1/35th scale)
REFERENCES
Captain America: The Art of Captain America - The First Avenger
27 July 2011
Hail [Monster] Caesar!!! Tars Tarkas bust
In my June installment of "Notable Acquisitions", I mentioned that I had Monster Caesar Studios' bust of Tars Tarkas of Thark, Green Martian of Barsoom (aka Mars), sculpted and produced by Andrew Martin, on order.
Unfortunately, this was just about the time that the Canadian Postal Strike was hitting its peak, so a delay was not entirely unanticipated. What turned-out to be a four-week in-transit time was! But all's well that ends well--and it did!--and I can say with no reservation whatsoever that it was well worth the wait!!
Before moving on to a brief review, let me just say that Andrew is a consummate professional--not only as a very talented sculptor, but as a businessman. I contacted him yesterday (of course!) about my concerns re: the seemingly inordinate delay, and he was very forthcoming and accommodating. I can't recommend him highly enough!
To the matter hand. I don't feel a need to post images as what you see in the link above is what you get. This is certainly the most convincing, "realistic", and faithful depiction of a Green Martian I have ever seen. A two-piece casting-- bust and pedestal, it is the embodiment of perfection. Truly amazing!
Some might argue that it is a somewhat minimalistic rendition of the powerful warrior. And I would agree--to a point. But in so doing, Andrew, much as Burroughs in his literary creation, has given us enough latitude to let our imagination flourish, and personalize our depiction as we would like--and our skills allow. I plan to make a few mods to mine: the most obvious will be the addition of a Barsoomian war harness, virtually the only article of clothing on Martian warriors.
Before closing, I would just point out that there are no less than four Green Martian "hordes" on Barsoom, so we can certainly go above and beyond and depict a Warhoon or a Torquasian. BTW, for the curious, this is an approximately 1/8th scale bust!
I just received this piece, so rest assured more to follow shortly. Until then. . .
PS--Clean-up and pegging to pedestal. . . < 15 mins.!
24 July 2011
White Ape of Barsoom--Prepwork: Phase (1)--cont.
The figure has been assembled, "filled", and the integrating musculature roughed in. The only pieces left to attach permanently are the head (though it has been pegged and fitted) and the upper set of forearms.
This in effect concludes Phase (1). Phase (2), aside fromrepositioning the right hand [DONE!] , will involve:
FOLLOW-UP . . .
This in effect concludes Phase (1). Phase (2), aside from
- creating a plausible, aesthetically pleasing overall muscular conformation.
- removing any remaining traces of clothing.
- reworking the head slightly: repositioning ears,
reworking the canines[DONE!], and adding hair.
FOLLOW-UP . . .
- conforming the musculature underway.
- canines removed and tapped.
- right supporting intermediary arm pegged.
23 July 2011
White Ape of Barsoom--Prepwork: Phase (1)
Let the cutting begin!!!
FOLLOW-UP . . .
Coming together very nicely. . .
- Fig. 1: I first assembled the two-part torso (dorsal half [with arms] and body; nb--forearms cast attached to the lamppost). I then bisected the torso at the terminal edge of the vest before setting the upper torso aside.
- Fig. 2: Dorsal half of the torso set aside for safekeeping. Upper section of the body then reduced to the mid-pecs, more or less. Fig. 1 was then pegged to Fig. 2.
- Head: No major work done to this point, save grinding off the pince-nez, the collar and bow-tie.
FOLLOW-UP . . .
- Fig. 2: Dorsal half of the torso has been sectioned vertically, and the arms roughly fitted to the pegged compound figure.
- The assembled intermediary left limb has been straightened and permanently attached to Fig. 1 (note: the upper third of the body [the primary shoulder girdle] can still be removed from the rest of the actual body).
Coming together very nicely. . .
22 July 2011
What can one do with Mister Honk?
Mister Honk, by virtue of its x-treme pose, is a figure that you either love right away. . . or you relegate it to the B-list.
I was one of the latter. Great subject, and certainly a great sculpt. . . but when it was all said and done, "What do you do with it?"
Well, a couple of thoughts immediately come to mind. For fans of the DCU, there is the makings of a pretty neat, if leaner, Gorilla Grodd, or his benevolent counterpart, Solovar. Obviously, those more ambitious miniaturists can try their hand at one of the PotA's militant gorillas. Me? Well, one of my favourite Martian species in Edgar Rice Burroughs' Barsoomian series is the Great White Apes of Barsoom, and I thought I'd take a stab at it before the market gets inundated with figurines from next year's cinematic release.
The challenge facing any miniaturist wishing to do a Barsoomian White Ape is much the same as one wishing to model a Green Martian: integrating a second set of arms/legs in a convincing and anatomically plausible fashion. White Apes and Green Martians had a pair of arms and a pair of legs--and in-between a pair of limbs that could serve as legs and/or arms! To this end, I acquired two kits of the rampaging primate.
I've yet to decide how I am going to tackle this. Needless to say, I've dug-up and dusted-off my primate anatomy books that were my constant companion for 2 academic quarters many moons ago. I'm surrounded by at least four legal-size xeroxes of a gorilla skeleton. And while I am no closer to a solution, I am having a ball!!!
More to follow. . .
17 July 2011
Batwoman (Eaglemoss)
What with work, some lingering health issues, and the unbearable heat, it's been a rather rough Summer benchwise. And the "dog days" are yet to come! Still, it has not been entirely unproductive, though little worthwhile to show for it. . .
As you might have read, I stripped the Bowen Designs' retro Iron Man bust yesterday. While I was at it, I threw my latest addition to the Eaglemoss grey army, Batwoman (#81) into the acetone. This project, along with the bust, is tentatively scheduled for next year, so no expectations please; but I might as well start chronicling things from Day 1.
By way of prologue, what I received--the finished piece--was a serious disappointment. As I mentioned in my review of this piece, this has become a rather alarming trend of late with Eaglemoss. Nonetheless, I still consider these some of the best values on the market. . . provided the miniaturist is willing to hold up his/her end of the bargain.
The figure is now stripped and awaiting repackaging to be stored. Stripping revealed the breakdown of the piece, a surprising 5(!) pieces: main body, cape, rt. boot, and gauntlets/forearms (x2). It also revealed a wealth of detail and subtlety that had been largely obscured by the heavy-handed application of heavy-bodied paint!
The figure will be done largely stock, though I intend to redetail the gauntlets, and replace the batarangs, which were little more than scallop-edged rectangles. The rest of the work will involve reworking the cape to effect a seamless attachment to the body.
More to follow. . .
14 July 2011
Iron Lantern (Bust) – Introduction
Some of the last comic books I read back in the 20th c. were from an ad-hoc publisher, a regrettably short-lived collaborative effort between DC and Marvel that went by the name Amalgam Comics. Unfortunately, there were but 24 issues published from 1996 through 1997.
Amalgam Comics provided us with some of the most memorable superheroes in comic book history. Dark Claw (Logan Wayne//Batman/Wolverine); Dr. StrangeFate (Charles Xavier//Dr. Strange/Dr. Fate— admittedly not the most imaginative of names); and the subject of this homage to Amalgam, Hal Stark, aka Iron Lantern (Hal Jordan/ Tony Stark//Green Lantern/Iron Man).
The base figure—bust—is the “Retro” Iron Man, part of the Group 2 Iron Man mini-bust (mb) 3-pak (Phase III - #2485/2500) offered by Bowen Designs, and sculpted by the Kucharek Brothers. While the now-classic Silver Age Iron Man mb (Phase I) is in some ways a better “fit”, the Retro mb eked out the Silver Age candidate given what I have in mind and the palette.
So how do we go about transforming Tony Stark/Iron Man into Hal Stark/Iron Lantern? The first step is to strip the bust down to the cold-cast porcelain, and disassemble as much as I can—if at all. [FU-16/07/11: DONE! AOTW, the gauntlets have been removed and the bust separated from the pedestal. While I am still examining potential joins, it appears as if this was the extent of the "break-down".] Second comes the actual mods to the original sculpt. These are relatively easy (including the addition of the Lantern insignia) save for the enhancements required on the helmet. Finally, the painting. I will be venturing into uncharted waters when I get to this point. . .
NO FEAR. . . Corps ASSEMBLE!
30 June 2011
Notable Acquisitions June 2011
KITS
Toy Biz kit of Wolverine (Shiflett Bros., 1/12th scale)
Tsukuda kit of Cyberdyne T-800 Endoskeleton - T2-JD (???, 1/9th scale - deluxe plated version)
Monster Caesar Studios bust of Tars Tarkas (Andrew Martin, ~1/8th scale)
PAINTS, TOOLS & SUPPLIES
Selection of finishing abrasives from Resin Bench Models [Excellent products and service!]
20 June 2011
Red Skull (Bust)--Prepwork: Phase (4)--UPDATE (III)
The cigarette holder--with cigarette--is done! Now I can proceed with completing the hand. . . hopefully, any repositioning of fingers can be kept to a minimum.
Almost there. . .
FOLLOW-UP - 23.06.11. . . At the risk of being perhaps a bit premature, the hand is [essentially] done! Now comes the finishing... of the hand and the rest of the bust!! I wish I could post images this weekend, but any graphic updates will have to wait until after month end.
Until then. . .
13 June 2011
X-Force: Wolverine - Entr'acte
The right leg is now essentially done--still rough, but the final lines are evident, albeit continuing to emerge. The left leg will be perma- nently attached once I decide on the final conformation of the muscu- lature, and the mounting stump for the boot is finalized: the left boot will be the only separate piece in the lower half of the body.
I would say the head is about 70% done: still a bit more work to do on balancing the cat-eye "wings".
And that's about it for now. Hopefully I'll have some time this week- end to post some ip shots.
I would say the head is about 70% done: still a bit more work to do on balancing the cat-eye "wings".
And that's about it for now. Hopefully I'll have some time this week- end to post some ip shots.
07 June 2011
X-Force: Wolverine - The first tentative steps
While I wait for my Alumilite to arrive--not a bad thing as it gives me more time to acquire some intimacy with the subject, the model. . . AND the conversion!--I decided to start playing with some putty. To this end, I have roughed-in a very tentative right wing of the mask; filled-in the claw locator slots on the gauntlets; and worked on the top of the right boot. I've also begun to detail the mouth, beginning with grinding off the front teeth.
I have also paused to reconsider the reanimation of the legs. I did not like the pose as provided--it just didn't work for me. I then saw a build-up of the kit by the gentlemen who designed it! Same figure, same pose. . . but relocated on the base and at a different angle.

More to follow. . .
UPDATE - 08.06.11. . . The Alumilite arrived today--excellent service straight from the source!--and the torso, arms, and pelvic girdle are now filled. . .
FOLLOW-UP - 09.06.11. . . The figure is now completely filled. Let the fun begin!!!
UPDATE - 11.06.11. . . This really should be a new post, but there are still some loose ends to address before breaking out the camera. The figure is now reanimated, based on what the Shiflett Bros. did with theirs. It will require a bit more work before everything is in sync, but I am very pleased with what is now before me.
I have also paused to reconsider the reanimation of the legs. I did not like the pose as provided--it just didn't work for me. I then saw a build-up of the kit by the gentlemen who designed it! Same figure, same pose. . . but relocated on the base and at a different angle.
WOW! I'm not saying I am not going to proceed with my original "design"; however, once the figure is filled and pegged, I am going to have to play around with the pose to see if I can capture some of the same dynamics as the Shiflett Bros.
More to follow. . .
UPDATE - 08.06.11. . . The Alumilite arrived today--excellent service straight from the source!--and the torso, arms, and pelvic girdle are now filled. . .
FOLLOW-UP - 09.06.11. . . The figure is now completely filled. Let the fun begin!!!
UPDATE - 11.06.11. . . This really should be a new post, but there are still some loose ends to address before breaking out the camera. The figure is now reanimated, based on what the Shiflett Bros. did with theirs. It will require a bit more work before everything is in sync, but I am very pleased with what is now before me.
05 June 2011
X-Force: Wolverine - Planning the conversion
I thought I would get a head-start on planning the major issues to be addressed in converting Toy Biz's 1/12th scale X-Men Wolverine to his X-Force persona. To date. . .
Repositioning of the left leg, and to a lesser extent the right leg and arms. This will include the resculpting of the left half of the pelvic girdle[see update here].- Elimination of shoulder wings; reworking of musculature of the arms.
- Conversion of boots (nb: bilateral "wings" already removed).
- Conversion of gauntlets, including reworking of "claws".
- Head (including resculpture of dentition).
Search widget not working
Just a head's up that the usually reliable and thorough Blog Search widget is not working at this time. Apparently this is something that happens about once a year, when apps and the like are updated, etc.
In the meantime, if you need to find something but cannot remember the thread or the subject of the posting, you might want to try: http://blogsearch.google.com/blogsearch/advanced_blog_search. Paste the blog url (http://augiemefecit.blogspot.com/) in the "In blogs. . . at this url" field, and type in your search terms. This will provide you the results you are looking for.
FOLLOW-UP - 07.06.11. . . The search widget is kaput. I am going to delete the option from the sidebar: it is, after all, useless. While the above workaround is still very effective, there is an even easier one: use the search function on the navbar at the top of your page (far left, next to the Blogger icon). I've tried it several times, and it is just as thorough--and fast!--as the widget.
UPDATE - 19.06.11. . . You might have noticed that I have replaced the search widget, thanks to a fellow blogger who devised a very useful and seamless work-around. It is working perfectly--for now. Keeping my fingers crossed!
04 June 2011
X-Force: Wolverine
I can not say I am a huge X-Men fan. And my favourites have always been what I would call "sup- porting cast": Angel/Archangel, Gambit, Nightcrawler, etc. Having said that, Hugh Jackman's por- trayal of James Howlett/"Logan", bka Wolverine, amongst others, on the Silver Screen has been a refreshing and pleasant refamiliarization with old acquaintances.
X-Force is the X-Men's "black ops" strike team, and has been led by Wolverine since its reincar- nation in 2008. X-Force is gritty and "dark", and Wolverine is in his element: it's an intriguing sub- ject.
The main hurdle is the base figure: where would one start? There are three potential candidates, all OOP. Two are 1/6th scale vinyl kits from Horizon. While well done and eminently workable, the scale is way too large for my tastes and display capacity. That leaves the 1/12th scale, polysty- rene offering by Toy Biz, sculpted by the Shiflett Bros., which is fortunately relatively easy to ac- quire--and affordable!--on eBay.

Spectacular build-up by CH colleague Ben Edwards. More views here.
The kit is comprised of 27 pieces: 24 pieces for the subject; 3 pieces for the scenic base. Wol- verine is generally considered one of the poorer TB efforts, and while there are fit problems, it is nowhere near as bad as proclaimed. There are only a few spots that require gap-filling; and this is easily accomplished with liquid cement and the fluffy shavings generated by a Dremel burr. As with the Rhino, the plastic takes to file and burr as well--or better!--than most.
All subassemblies have been completed, awaiting to be filled with PUR. Once it is filled, the reanimation of the figure and the conversion to the X-Force uniform will begin in earnest. . .
To be continued. . .
X-Force is the X-Men's "black ops" strike team, and has been led by Wolverine since its reincar- nation in 2008. X-Force is gritty and "dark", and Wolverine is in his element: it's an intriguing sub- ject.
The main hurdle is the base figure: where would one start? There are three potential candidates, all OOP. Two are 1/6th scale vinyl kits from Horizon. While well done and eminently workable, the scale is way too large for my tastes and display capacity. That leaves the 1/12th scale, polysty- rene offering by Toy Biz, sculpted by the Shiflett Bros., which is fortunately relatively easy to ac- quire--and affordable!--on eBay.
Spectacular build-up by CH colleague Ben Edwards. More views here.
The kit is comprised of 27 pieces: 24 pieces for the subject; 3 pieces for the scenic base. Wol- verine is generally considered one of the poorer TB efforts, and while there are fit problems, it is nowhere near as bad as proclaimed. There are only a few spots that require gap-filling; and this is easily accomplished with liquid cement and the fluffy shavings generated by a Dremel burr. As with the Rhino, the plastic takes to file and burr as well--or better!--than most.
All subassemblies have been completed, awaiting to be filled with PUR. Once it is filled, the reanimation of the figure and the conversion to the X-Force uniform will begin in earnest. . .
To be continued. . .
29 May 2011
Notable Acquisitions Apr-May 2011
A new feature that I hope will be of interest to the readership. It will cover every aspect of what we do. . .
KITS
Resin Pimps bust of Doctor Fate (DC) (???, 1/8th scale)
Forbidden Zone bust of Dracula (Mike Hill, 1/4 scale)
KITS
Resin Pimps bust of Doctor Fate (DC) (???, 1/8th scale)
Forbidden Zone bust of Dracula (Mike Hill, 1/4 scale)
Red Skull (Bust)--Prepwork: Phase (4)--UPDATE (II)
With month-end fast approaching and some IT issues to deal with at home, time at the bench has been somewhat limited. Nonetheless, the left collar tab is now all-but-done, and hopefully will be finished by the end of the extended weekend. I will follow the canon I set for the full figure and have Herr Schmidt as an Oberst-Gruppenführer; however, I might change the backing--or piping--colour to a yellow-biased Giftgrün ("toxic green"). Giftgrün was the Waffenfarbe of the SD.
Updated images to follow upon completion. . .
FOLLOW-UP - 30.05.11. . . The left collar tab has been completed, and the head is now all-but-done. Final finishing on the torso has begun and is well under way. All that really remains to be finished is the RK, and the right hand--but first, the cigarette holder!
22 May 2011
Red Skull (Bust)--Prepwork: Phase (4)--UPDATE
As refinement of the skull (head and neck) continues, I took a brief break to finish and attach the Totenkopf on the right collar tab, which replaces the stock Sigrunen.
I also finalized the position of the fingers . All that remains is the final tweaking and "locking" once the cigarette holder is completed.
I also finalized the position of the fingers . All that remains is the final tweaking and "locking" once the cigarette holder is completed.
16 May 2011
2011 Status Report
Rather than let the early projections stand throughout the year, I thought a mid-year (or pre-Summer) update might be a welcome addition. I will probably follow-up with a Fall update in Sept/Oct.
The post-Show revised slate can be found here. This is the pre-Summer lineup. . .
1) Gambit (Knight Models 75mm) -- already transferred to the bench!
2) Red Skull (bust, Jaguar Models' 1/12th scale conversion)
3) Divio "Mad Dog" Juckal [SP vârcolac] (Smart Max 'Smog 1888')
4) Dracula (1931) (bust, Mike Hill 1/4th scale)
5) Red Skull #2 (ff) (Smart Max 150mm conversion)
6) Domino (X-Force) (Moebius 1/8th scale "BW" conversion): if released in Sept. as announced, this may be my major Fall project.
As always, subject--though less likely--to change.
And as always, I hope you will find something of interest in the above--I look forward to your comments and observations.
Back to the bench!!
A~
WonderFest 2011 Most Amazing Figure
The 2011 edition of WonderFest appears to have been one of the best ever. Over 600 (!) entries, and a vendor area that would make one think one had died and gone to heaven.
This year's "BoS" (Most Amazing Figure Award, which includes a US$300 cash prize) went to a superb creation, "The Reverend and Mrs. Fairfax--Vampire Hunters".


Regrettably, I don't know who the artist is. BRAVISSIMO, whomever you might be.
For more images of this piece and many more, I would direct you the two sets of images by fellow CH member, Steve Copeland:
http://www.flickr.com/photos/62898839@N05/sets/
This year's "BoS" (Most Amazing Figure Award, which includes a US$300 cash prize) went to a superb creation, "The Reverend and Mrs. Fairfax--Vampire Hunters".
Regrettably, I don't know who the artist is. BRAVISSIMO, whomever you might be.
For more images of this piece and many more, I would direct you the two sets of images by fellow CH member, Steve Copeland:
http://www.flickr.com/photos/62898839@N05/sets/
14 May 2011
WonderFest Scoop!
Moebius, through no fault of their own I hasten to add, has not exactly delivered when it comes to the Universal Monsters. But I can't help but jump for joy with this announcement. . .
http://culttvman.com/main/?p=17465
The announced release date is December, 2011.
http://culttvman.com/main/?p=17465
The announced release date is December, 2011.
10 May 2011
The Return of the Cigarette-holder
In my last update I indicated that I had decided to nix the holder due to the fact that I would have had to reposition the hand.
This evening I revisited the quandary, and found a solution! EUREKA!! Rather than reposition the hand, I will reposition the entire forearm! Yes, it will involve some remodeling of the greatcoat sleeve, but that is eminently more doable than the involved surgery to remove the cuffed hand--and the resulting pose is much more natural.
The alterations are still in the preliminary stages, but, as soon as I have the arm remodeled and fitted, I will post images.
Nice to be back on track!
"Captured?"--Musings on a future project
As I mentioned in an earlier posting, the 'Classic Monster Bug' has latched-on in a serious way, and I am getting overrun with ideas, re-evaluations, etc.
The bust genre is well represented with Mike Hill's masterful rendition of Bela Lugosi in his iconic rôle. And Lord knows I have plenty of ip full-figures in all sorts of scales--from 54mm to 250mm!--but I'm not quite "feeling" dusting-off--literally!--a project. Rather, I feel like starting something new, a project that in all likelihood will join its other ip brethren on a crowded workbench. . . . . . but maybe not!
In 1994, Randy Bowen and Dark Horse teamed-up to release what to this day is a very unique rendition of Dr. Frankenstein's Monster. Though simply titled, "Frankenstein", it depicts the Monster chained and shackled as he appeared briefly in one of my all-time faves, "The Bride of Frankenstein".

My favourite rendition of this kit masterfully done alla Basil Gogos by fellow New Yorker and Tampa Bay dj/voiceover artist, Don Capone
I remember when this kit was released, but even then, it left me less than moved. As to why, hopefully a couple of images will be worth a couple of hundred words. . .


The bust genre is well represented with Mike Hill's masterful rendition of Bela Lugosi in his iconic rôle. And Lord knows I have plenty of ip full-figures in all sorts of scales--from 54mm to 250mm!--but I'm not quite "feeling" dusting-off--literally!--a project. Rather, I feel like starting something new, a project that in all likelihood will join its other ip brethren on a crowded workbench. . .
. . . but maybe not!In 1994, Randy Bowen and Dark Horse teamed-up to release what to this day is a very unique rendition of Dr. Frankenstein's Monster. Though simply titled, "Frankenstein", it depicts the Monster chained and shackled as he appeared briefly in one of my all-time faves, "The Bride of Frankenstein".
My favourite rendition of this kit masterfully done alla Basil Gogos by fellow New Yorker and Tampa Bay dj/voiceover artist, Don Capone
I remember when this kit was released, but even then, it left me less than moved. As to why, hopefully a couple of images will be worth a couple of hundred words. . .
A hi-res still from the film
Mike Hill's magnificent 1:1 reconstruction of the classic scene
Bowen's Universal Monsters have always left something to be desired. To me, translating [a] 2-d'al still/s into a 3-d'al sculpture leaves very little wiggle room for personal expression. If one is to create a "bridge scene" between two frames, then the progression must be linear and the setting constant. In Dark Horse's Frankenstein, we see everything from a wooden seat and a trapezoidal pedestal on the chair, to an expression and range of movement not afforded the Monster in the film.
So it has occurred to me to put my money where my mouth is, and recreate this iconic scene in miniature. This project will have a little bit of everything: conversion, sculpture, scratch-building, kit-bash- ing. . . all in glorious multi-media!
We'll see how far I get with it. . .
So it has occurred to me to put my money where my mouth is, and recreate this iconic scene in miniature. This project will have a little bit of everything: conversion, sculpture, scratch-building, kit-bash- ing. . . all in glorious multi-media!
We'll see how far I get with it. . .
06 May 2011
Red Skull (Bust)--Prepwork: Phase (2-3)--UPDATE
I wasn't joking when I quipped that the paucity of visual references of the new Silver Screen Red Skull at the moment would afford me more time to work on the bust. . . that is precisely what I have done!
In some respects the bust is just about done; in others, I can't begin to visualize the end. Mind you, this is not a 'bad thing'. . . quite the contrary. In no particular order:
In some respects the bust is just about done; in others, I can't begin to visualize the end. Mind you, this is not a 'bad thing'. . . quite the contrary. In no particular order:
- The head/skull is now about 80% done. Both eyes are in place; though as I suspected, the dentition is in the process of being reworked.
- The right forearm has been positively fitted. The major components can now be assembled securely without a drop of glue.
- The right hand has been sectioned and wired; repositioning of the fingers to accommodate the cigarette has begun. Yes, the cigarette--no holder. I would have had to reposition the hand within the cuff to accommodate the the holder, and the gain was not commensurate with the effort required. Aside from the head, the hand is the most labour-intensive element of this project.
- The Oak Leaves of the RK have been roughed-in. The Swords await. . . !
30 April 2011
Red Skull #2--Preliminaries (3)
An update to the update. . .
The new head is coming along splendidly. . . Some additional scaling remains to be done, but definitely on track.
The main news is that I have attached the tails of the greatcoat to the torso, and fitted the former to the legs subassembly. This required that the locating pegs on each of the 4 component pieces be ground off, and the corresponding slits on the legs filled. It also required that the tails be reshaped somewhat to allow them to fit over--as opposed to around--the legs. There is considerable surface finishing to be done, but nothing unexpected or out of the ordinary considering the number of pieces comprising the tails. It should be noted that any finishing will be tentative until I see a full-body still from the movie: all I have right now is the concept art, which--I am delighted AND relieved to say--has proven to be remarkably accurate to date.
More to follow. . .
26 April 2011
Red Skull #2--Preliminaries (2)
This is more of an update than a "new" posting per se, with considerable time having been spent on the head. I somehow got ahead of myself and ended-up losing my way around the base head; so now we essentially go for an original sculpt. While I am inclined to believe this will yield a superior likeness, it might even prove to be easier in the long run. In the short run, however, I will be forced to resculpt the eyes.
I have removed the "electrodes", etc. from the sleeves of the great coat. The right and left arms were provisionally tacked in place (CA+), and sectioned and pegged (including the hand), respectively. This step was critical since the figure will be interacting with what is being held in the left hand.
All in all, save for the cranial detour, I am very pleased with the progress to date. Unless more stills get released soon, I will be forced to put the project aside until the release of the movie as I am fast approaching the point of no return. No biggie. . . more time to work on the bust!
21 April 2011
FZ's Dracula (Bust) by Mike Hill
As it turns out, I didn't have long to wait: the bust was awaiting my arrival from work this afternoon.
If the Monster was exquisite, Dracula is sublime. This is a must-have classic! And in spite of the many very competent paint jobs one sees, a classic example of why "figures", whether busts or full, are best marketed in a primed, unpainted state.
But first. . . the bust is essentially a one-piece resin casting, with only the high standing collar of the cloak cast separately: attachment of this piece might prove to be a little tricky. As with the Monster, also provided is a cast display plinth, a cast name plate, and a clear lexan/acrylic rod. I will enhance the support of the bust--still to be worked out.
The castings are nearly flawless. Poured from a two-piece mold, there is but a very light seam line that can be mechanically sanded or manually scraped off in less than 30 mins. I could very easily have this bust primed by the end of the weekend; but I will savor it a bit, study it a lot, and devise my painting strategy before initiating the process.
The execution of this piece is almost perfect. It is certainly the best likeness of Lugosi in his iconic rôle available in miniature! Which means that unless one is very careful and on his/her game, paint will almost certainly detract from the presence of the sculpture. No pressure!
I am very much looking forward to moving this piece to the painting bench. . .
More to follow!
FOLLOW-UP. . . The fitting of the standing collar is just about done. As I said, this is somewhat tricky, and it will probably require a quick swipe of filler once it is attached. Other than that, I have spent a few hours this afternoon on surface finishing and enhancing undercuts.
AND. . .
I've decided to rework and extend the cloak into a pseudo-pedestal, which will not only serve to add colour to the presentation; but, more importantly, will introduce some tension into the pose of the bust.
Back to the bench!
20 April 2011
Revenant
The last week has been trying at best--dealing with the day-to-day while feeling markedly less than 100% makes for long, hard days. It also means that there is considerably less time to be spent at the bench, which is not necessarily a bad thing. . .
As much as I have enjoyed planning and "designing" the Gaslight Birds of Prey, it is time to move on to less monopolizing pursuits. Thus the ladies have been securely withdrawn from the bench, freeing up much needed space and providing a wide-angle view of what could potentially lie ahead. In no particular order. . .
I spent a productive hour or so yesterday with the ip movie version of the Red Skull. If you recall, this will be a full figure. . . a 1/12th-scale full figure! I roughed-in the salient landmarks of the face with MS, as well as removing the collar from the "plastron" of the upper coat, and permanently attaching the same to the torso. I will hopefully have some time--and the "ganas"--to work on the face this weekend and post a graphic update. So far, this is proving to be an ideal kit for this conversion!
I am anxiously awaiting the arrival of Mike Hill's bust of Bela Lugosi as Dracula, produced by Forbidden Zone. You might recall the difficulties I had acquiring one of its two companion pieces, the Frankenstein Monster (the other being the Wolf Man from one of the sequels to the 1941 classic) . . . this acquisition was much easier, as a colleague was looking to part with his. For some reason, the 'Classic Monster Bug' has sunk its fangs into me, and I feel compelled to spend some time with my old childhood friends. Unless I am gravely (pun intended) mistaken, I am hoping to have this one cleaned, primed, and on the painting bench within a fortnight, give or take. . .
Along with at least one of the Smart Max SP offerings. . .
Stay tuned. . .
14 April 2011
SP Oracle -- PRE-preliminaries - INTERMEZZO
This is the week for swapping out mounts in the middle of the wet stuff. . . We've already seen my rearranging the cast and compo- sition of the Birds of Prey diorama; and now. . .
I decided to use a replacement head for Mistress Gordon. There was nothing wrong with my first female head in 1/35th scale; quite the contrary! But there were two issues:
While still early in the game, I can see where this venture is starting to acquire quite a bit more complexity and depth than initially anti- cipated. Thus my first mini-diorama in ages will be a long-term, back-burner project, which will free me up for individual pieces. All for a good cause. . .
FOLLOW-UP - 16.04.11. . . The replacement head has been sized and coiffured--all that remains is to add the ears. It has also been fitted into a Phase I collar: roughed-in but no detail work as of yet. If there is no extensive reworking awaiting to be done, this has to be one of the simplest and more straightforward mods to undertake.
I decided to use a replacement head for Mistress Gordon. There was nothing wrong with my first female head in 1/35th scale; quite the contrary! But there were two issues:
- Scale. While undoubtedly visually proportionate, if I were to eliminate the hair, the head would be noticeably undersized; however, that alone would not have made me reconsider. . .
- The real issue lay in that it was fine as a standalone piece. But in an interactive setting, the head would have to be reposi- tioned. And that was the opening salvo in what would be a long, losing struggle.
While still early in the game, I can see where this venture is starting to acquire quite a bit more complexity and depth than initially anti- cipated. Thus my first mini-diorama in ages will be a long-term, back-burner project, which will free me up for individual pieces. All for a good cause. . .
FOLLOW-UP - 16.04.11. . . The replacement head has been sized and coiffured--all that remains is to add the ears. It has also been fitted into a Phase I collar: roughed-in but no detail work as of yet. If there is no extensive reworking awaiting to be done, this has to be one of the simplest and more straightforward mods to undertake.
13 April 2011
REVIEW--Arlith, the Silent Shadow
You might recall reading that Andrea's Arlith, the Silent Shadow was my first choice as a base figure for a SP version of The Huntress. As a standalone, dynamic piece, something that I will in all probability do in the relatively near future, she still tops the list! But for now. . .
Be that as it may, Arlith deserves her 15 minutes! The petite 54mm figure is truly delightful! A somewhat scantily-clad, caped-and-hooded thief or assassin--the incarnation of a female Grey Mouser!--is perched on a tiled rooftop, precariously balanced while casting her grappling hook. My eyes were pretty much burned-out by the week- end of the show, so I quickly dismissed the idea of tackling a petite 54 sometime in the future; but my recent progress with Miss Liddell has prompted a reassessment.
And so, forcing aside any qualms due to Andrea's less-than-stellar quality control and CS, I ordered the kit--it arrived Saturday. Inspect- ing the factory-sealed box led to a sinking feeling in my gut: there, next to the © notice, were the 3 dreaded words. . . MADE IN CHINA. I put the box aside . . .
Late Sunday morning, I finally broke the seals of the box and removed the contents. Sandwiched between the familiar strip of doubled-over, medium-density foam were 10 white-metal pieces: 3 main pieces (cape; body - minus arms, head, and right leg; and roof section); and 7 secondary pieces in a heat-sealed cellophane bag.
Overall, the casting quality is excellent! There are a few spots which are so-so, but these are unobtrusive and perhaps even by design. I have yet to test the fit of the secondary parts, but the cape fits to the body seamlessly. At least as of this writing, this is one the better, if not best, Andrea kits I have ever seen or handled--and the second VG+ or better from this manufacturer in less than a year! If Andrea has truly turned a corner, kudos to them!
10 April 2011
Black Canary à la Steampunk
I concluded my introductory posting on a SP Huntress with, "All that remains is to find a suitable 50- 54mm base figure for a SP Black Canary. . ." And so I have. . . I think. . .
The figure is from the Spanish company Tale of War, in their Tale- Revision range. This is the company that launched its line with the now classic Victor Cat Helsing, the vampire/demon-hunting descendant of Puss in Boots!
My interests lie with the last(?) 54mm release in the range: "Alice & Answers". Taking the exquisite engineering and design provided, and adding some judicious modelling, I think I have the makings of a rather unique SP Black Canary.
In my version of Victorian London, Black Canary was a chanteuse from Le Chat Noir in Paris, a popular nightspot that was managed by one Mlle. Kyle, "Le Chat", a Scottish émigré who firmly believed in the Auld Alliance--especially when her shapely neck was on the line. One of her first discoveries was the German soprano, Diana Lanz, who abruptly left the Bayreuth Festspielhaus company with nary an explanation. Mlle. Kyle discovered her singing in a rather seedy, upstart cabaret in Paris, and was quickly taken with her. . . Diana joined Le Chat Noir as "die Harzer Roller", soon thereafter became "le Canari, and the rest was history--albeit short-lived. Before long, Fräulein Lanz was in London singing in East End music halls still using her Parisian stage-name, "The Canary". . .
It's a start. . . The most important thing is that it would appear as if all the elements of a Steampunk Birds of Prey diorama--or at worst, a mini-"collection"--have been gathered. . .
Stay tuned!
Subscribe to:
Posts (Atom)